
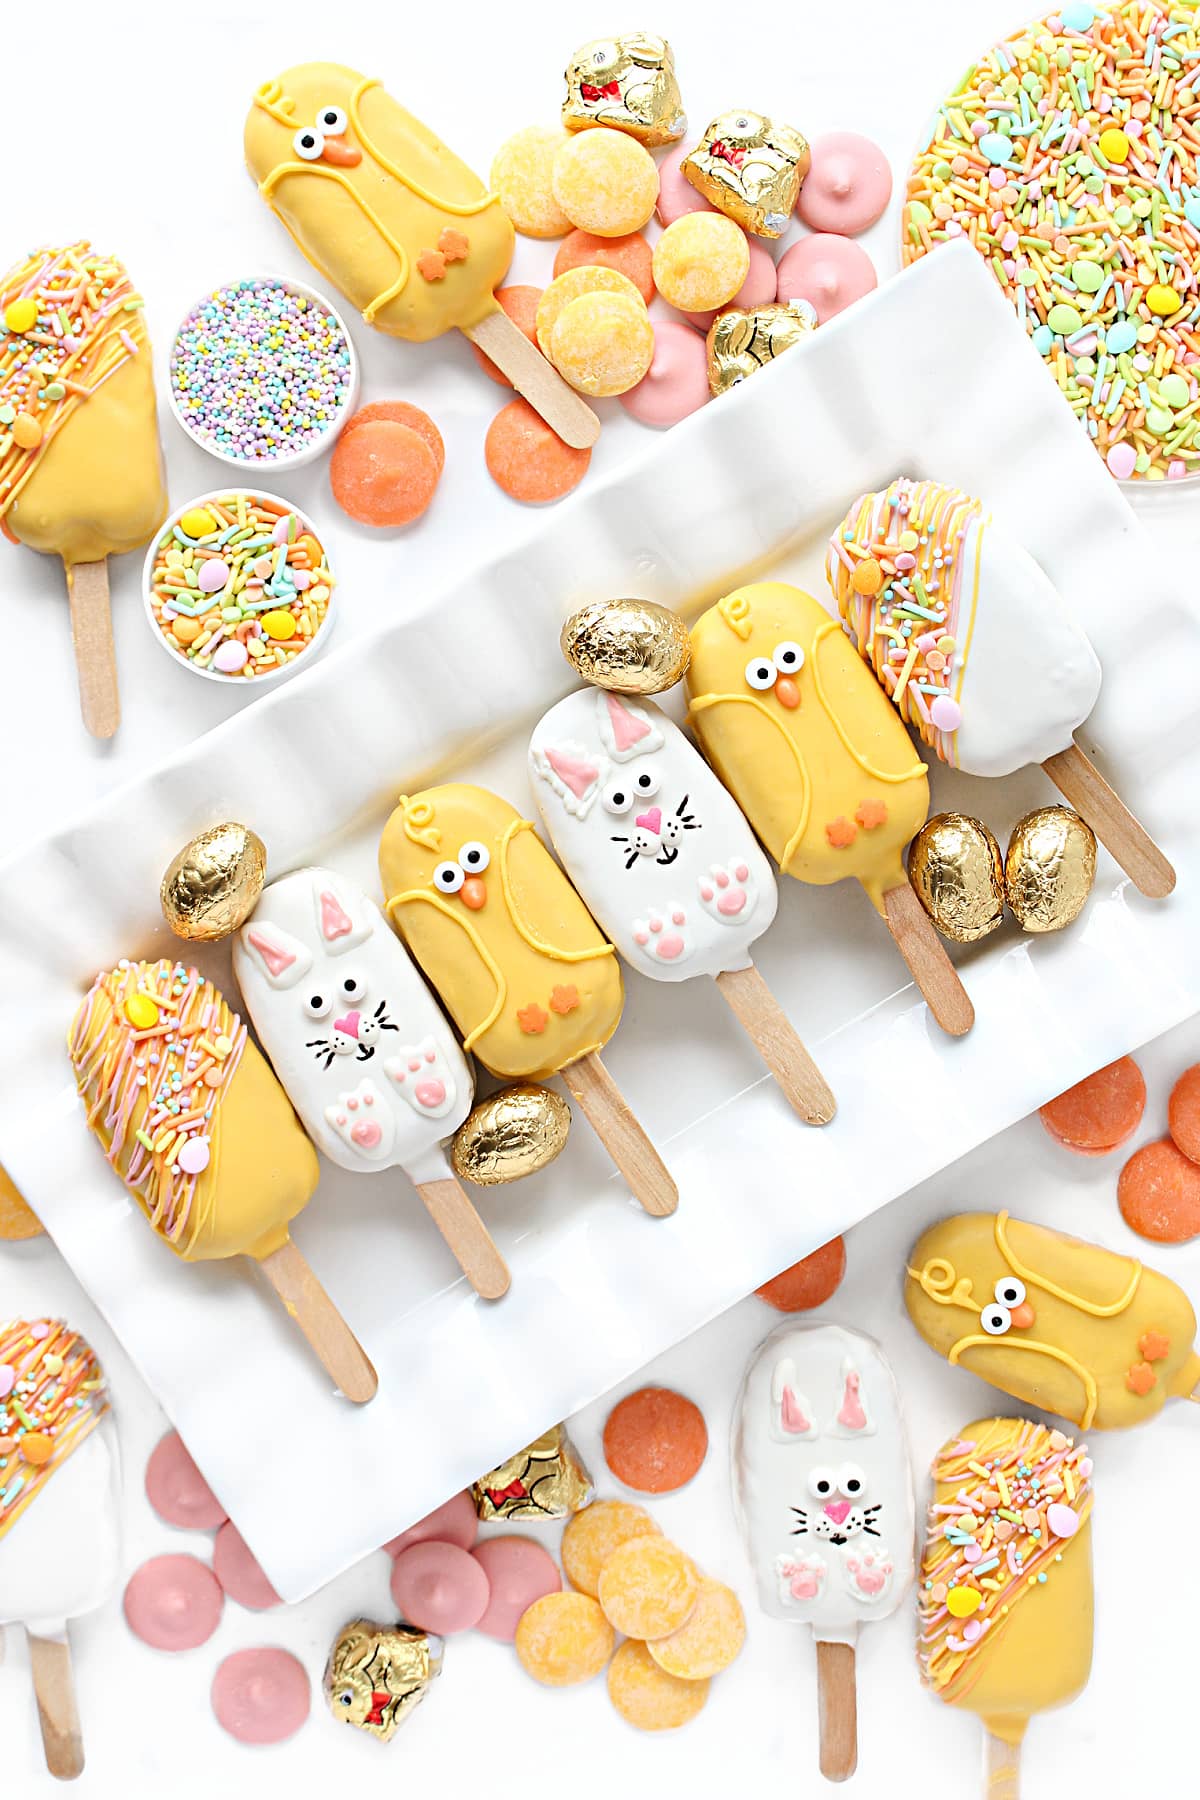
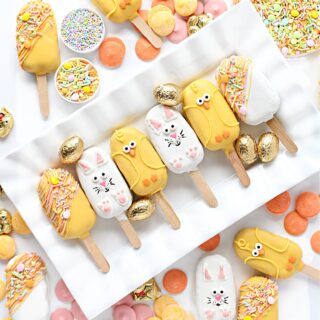
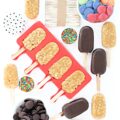
Easter Peanut Chews Candy Pops are delicious, chewy peanut butter candy easily decorated for adorable Easter treats. Add these cute pops to care packages and Easter baskets.
Why you'll love this recipe
- Peanut Butter Chews are quick and easy to make and don't require a candy thermometer.
- These tasty treats stay fresh on the counter for weeks and can be frozen for months.
- Peanut Chews Pops make great Easter gifts in care packages and Easter Baskets.
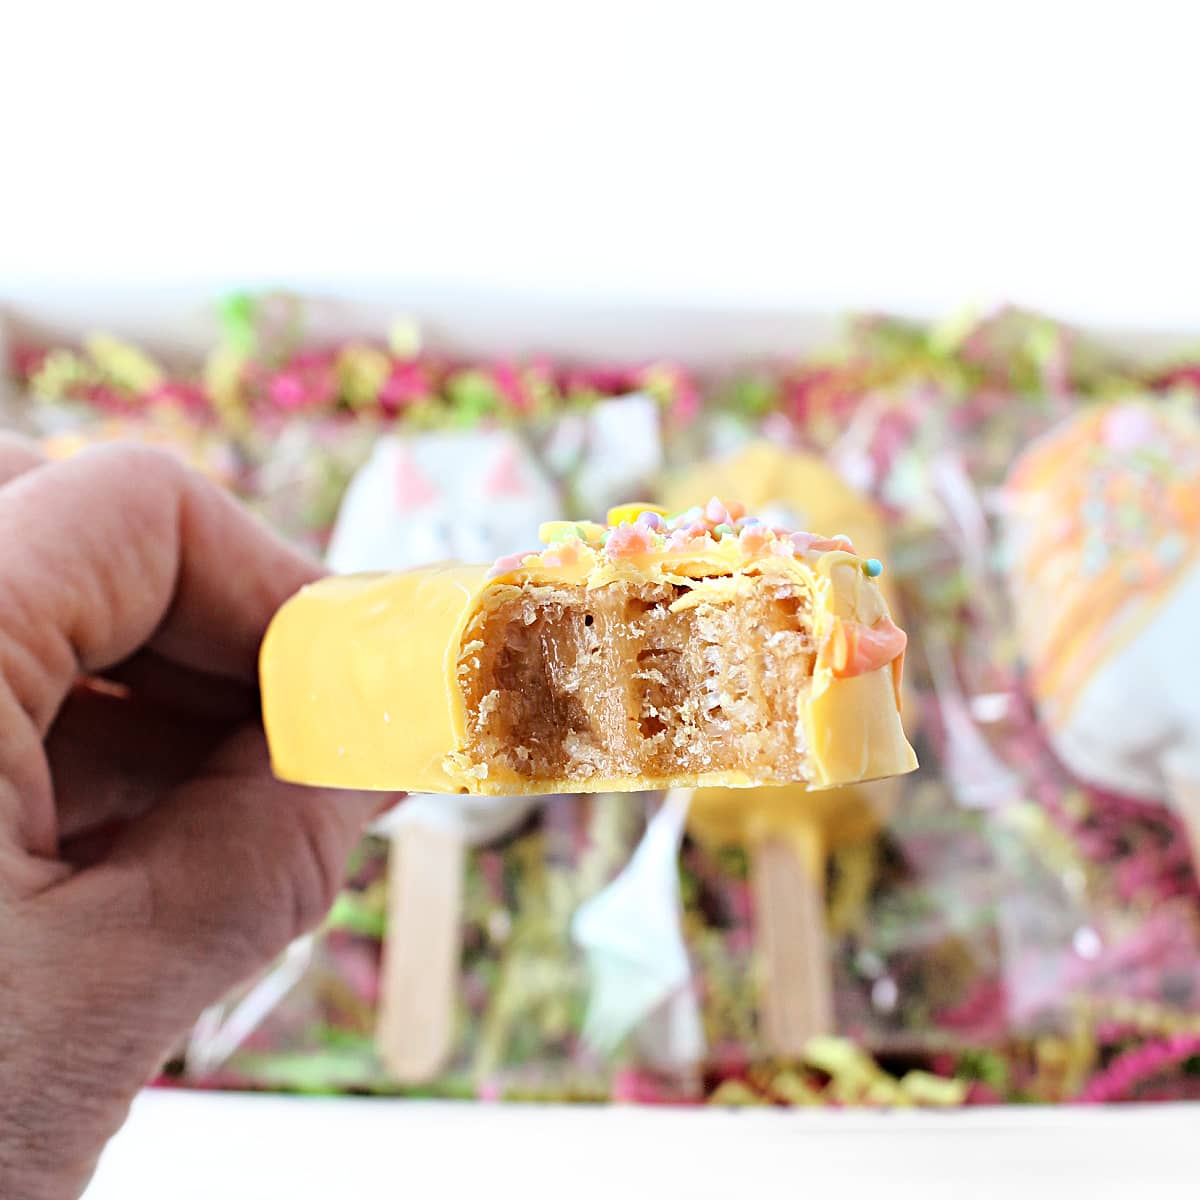
Easter Peanut Chew Pops have lots of peanut butter flavor and crispy, crunchy rice cereal chew. The candy coating keeps the pops fresh and chewy for weeks!
This fun to make, no bake peanut butter candy is shaped in a mold and frozen until you're ready to decorate. Use the whole batch, or keep some pops frozen to decorate and enjoy at another time.
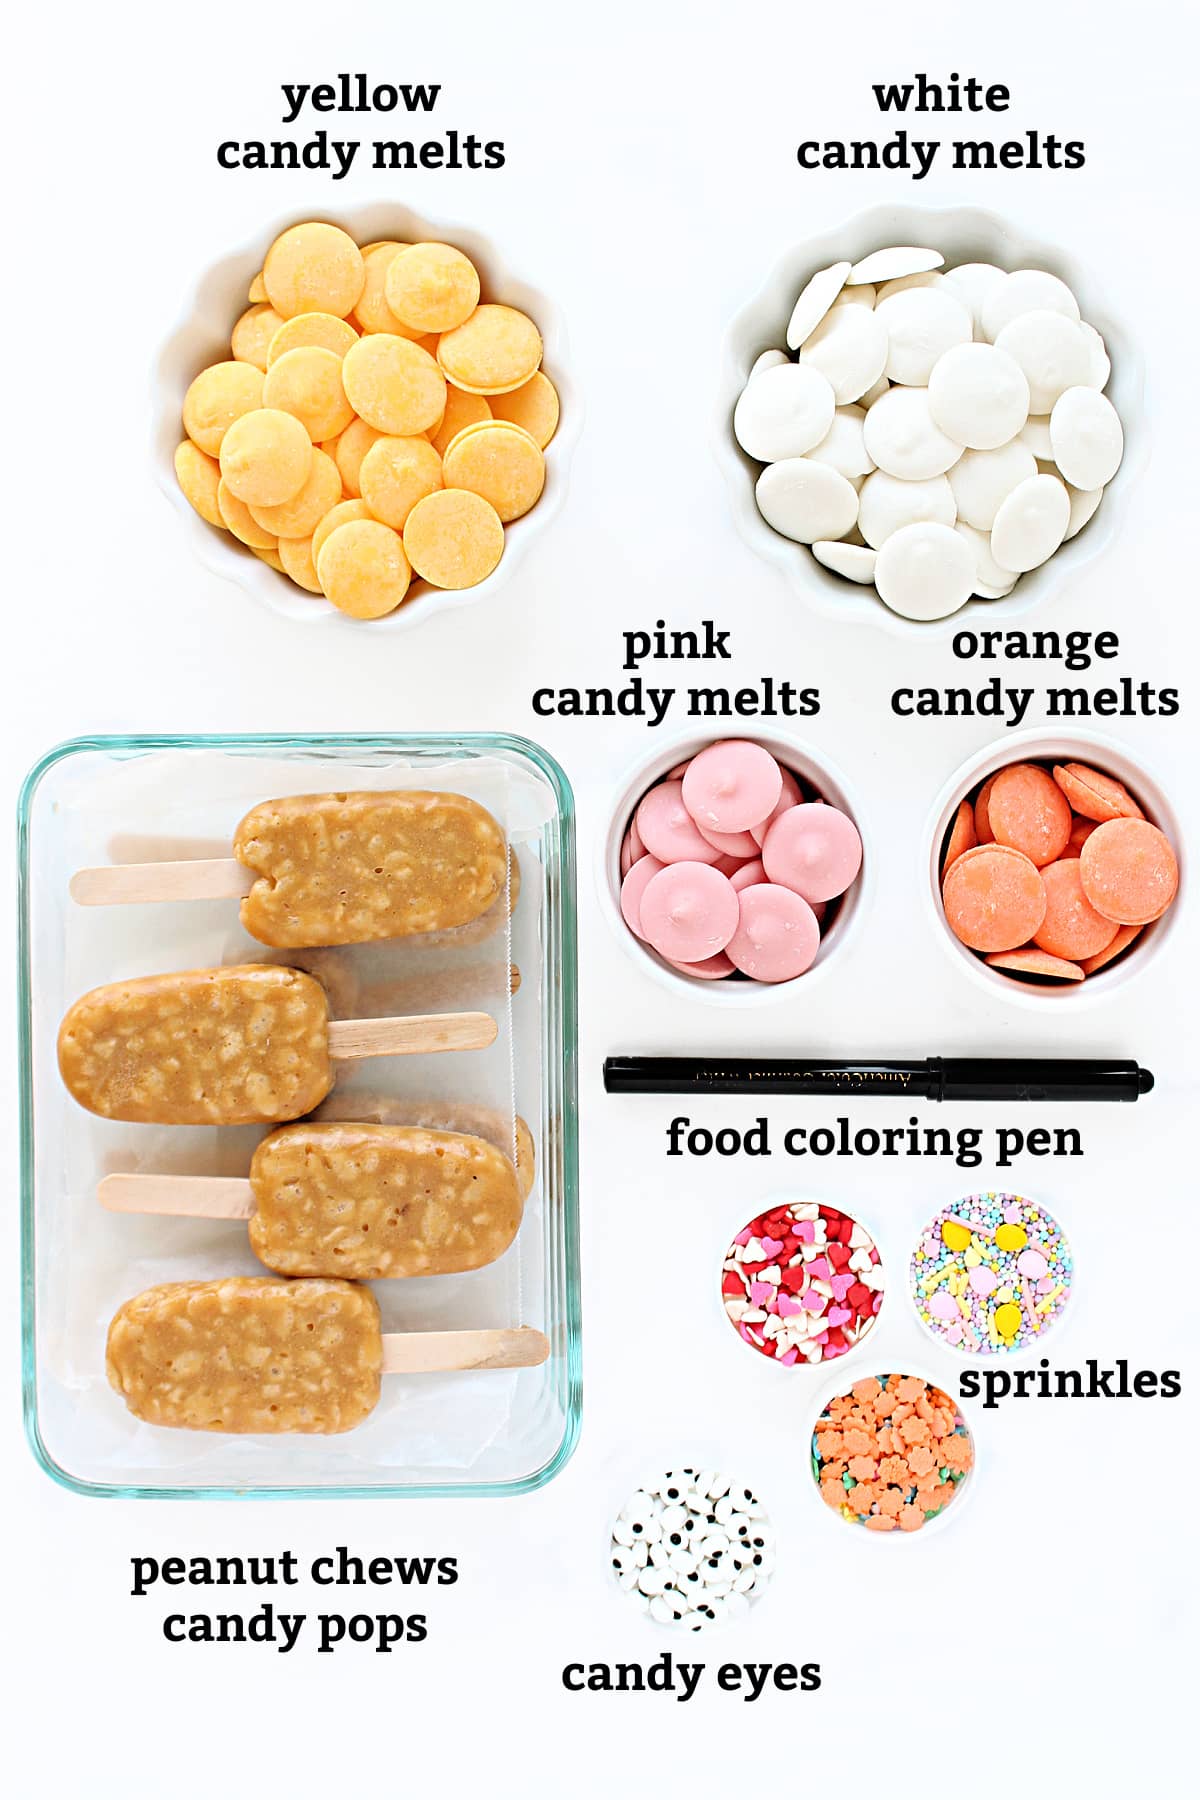
Ingredients
- Use the easy recipe for Peanut Chews Candy Pops to prepare the pops the same day as decorating or freeze the pops until ready to use.
Instructions
This is an overview of the instructions. The full instructions are in the recipe card below.
Follow instructions to make 1 batch of 25 Peanut Butter Candy pops.
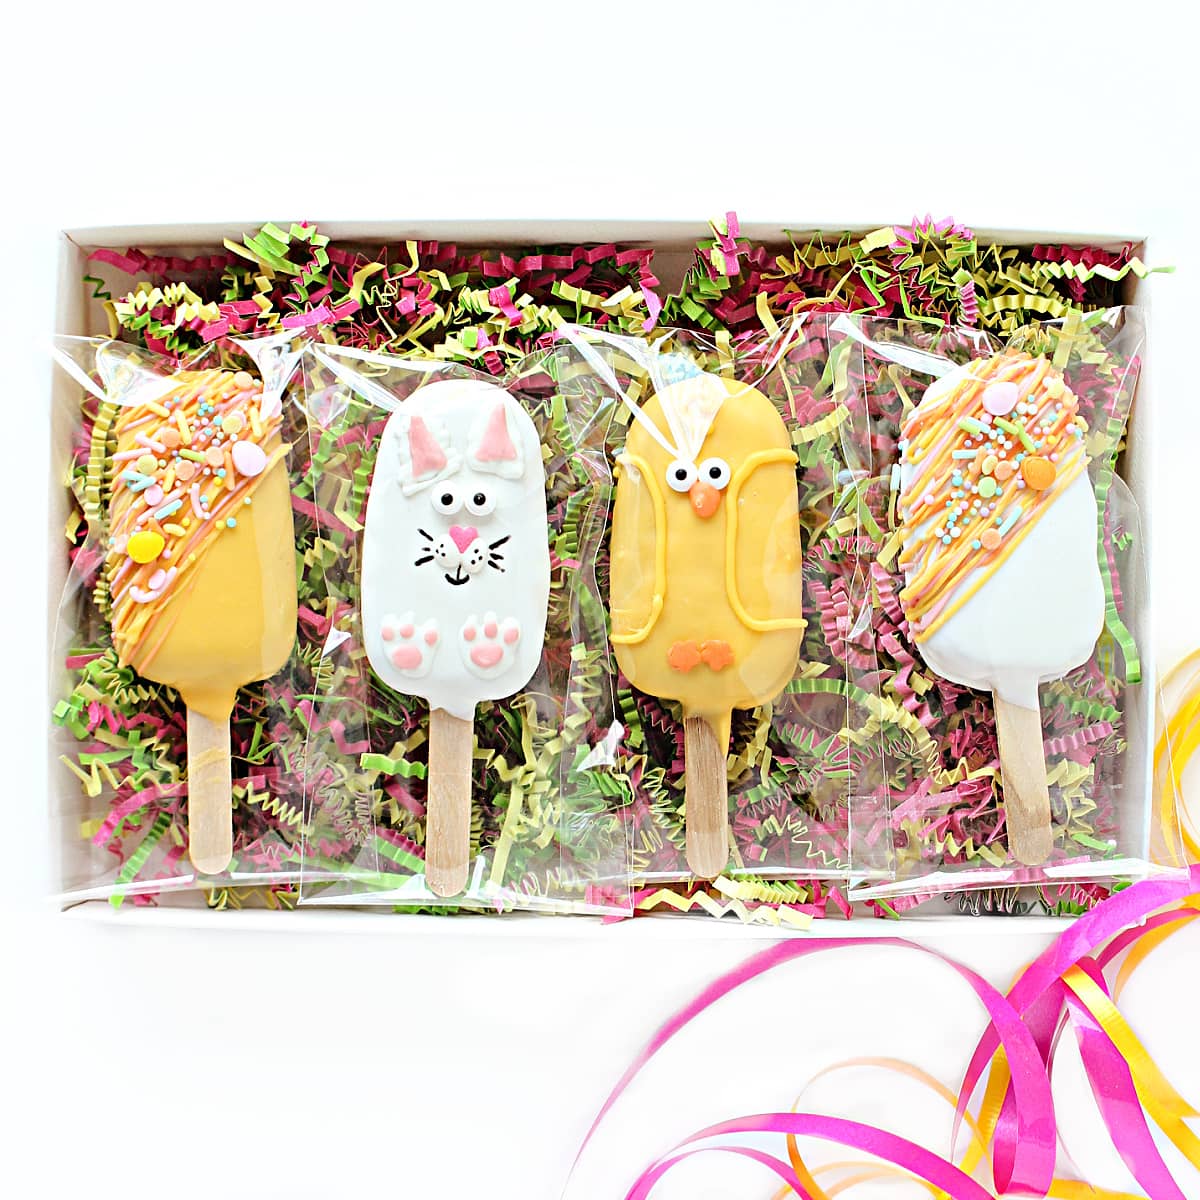
Easter Chicks
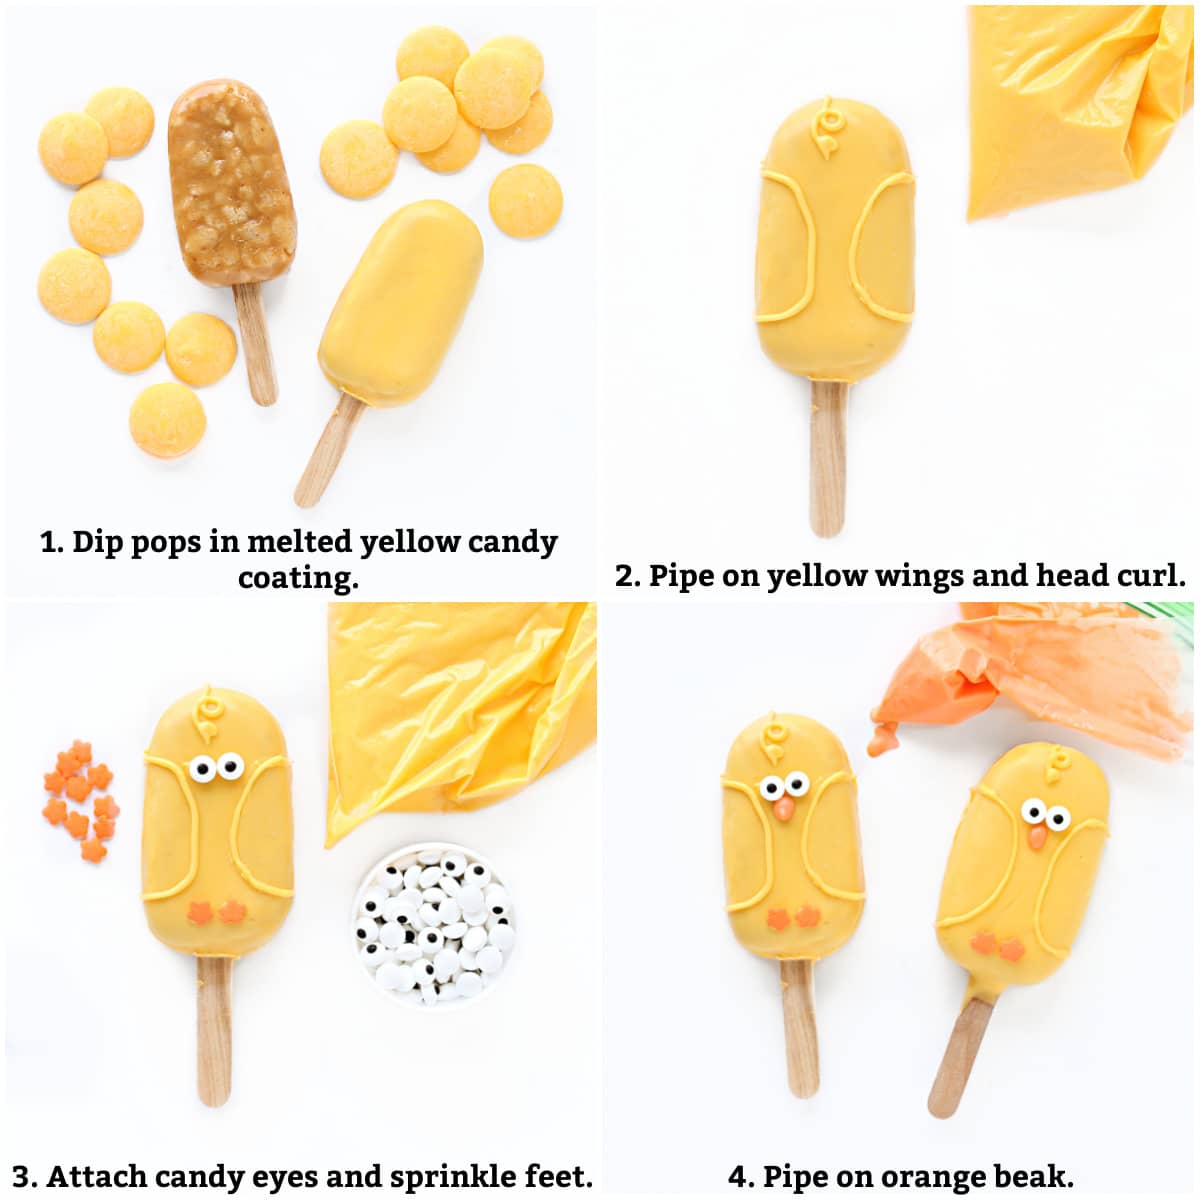
- Melt yellow candy melts, then dip and coat 6 pops.
- Use melted yellow candy melts to pipe on wings and a head curl.
- Attach candy eyes and sprinkle feet with melted candy melts as glue.
- Pipe on an orange candy melt beak.
Easter Bunnies
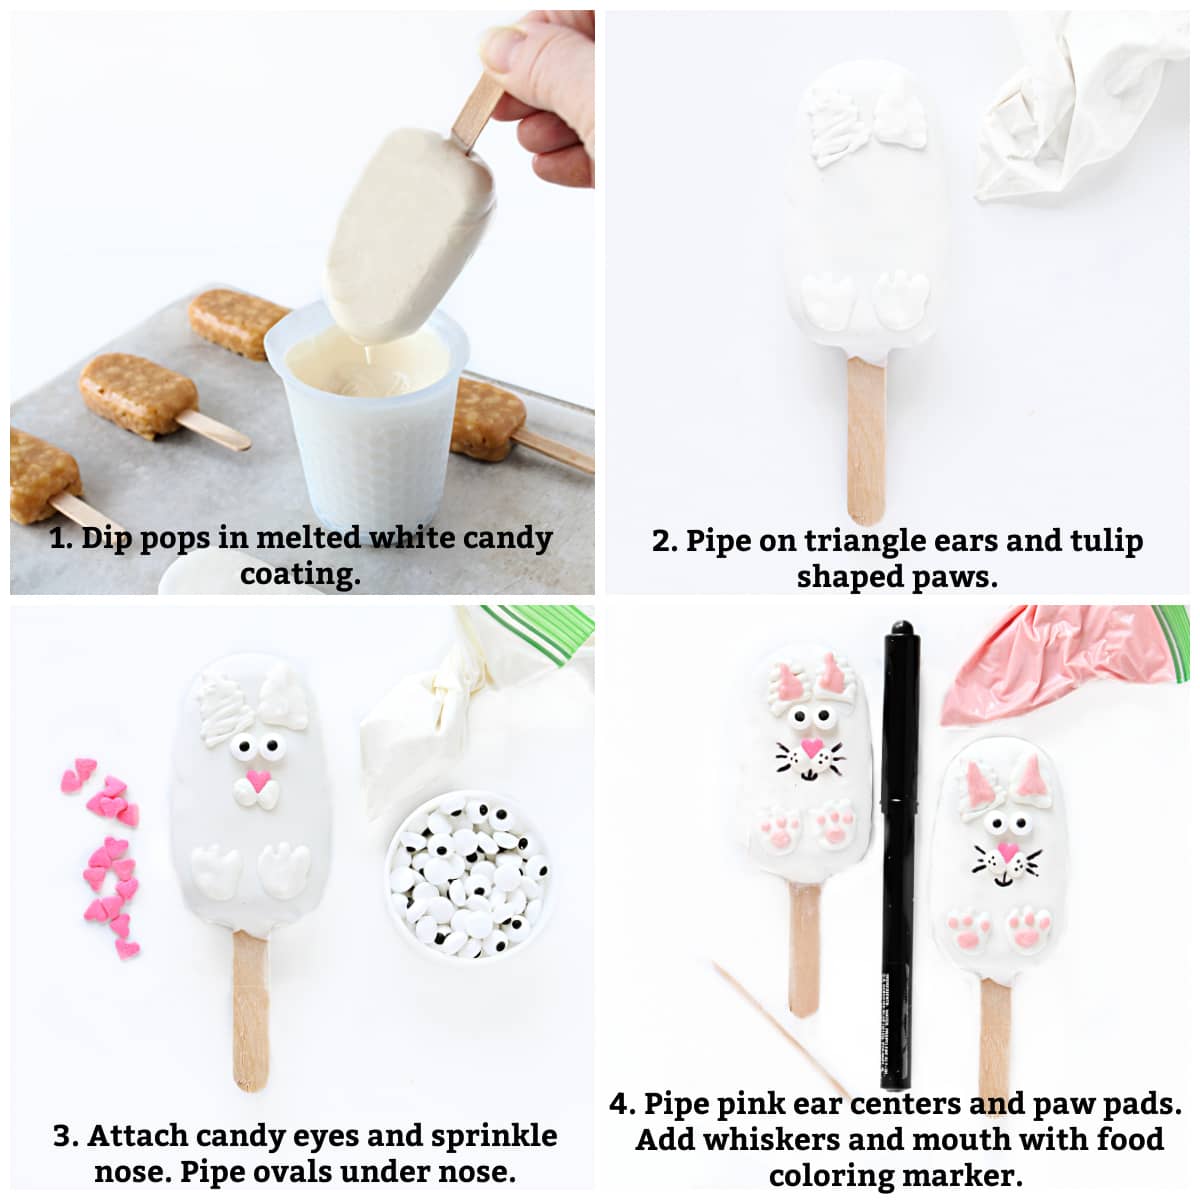
- Melt white candy melts, then dip and coat 6 pops.
- Use melted white candy melts to pipe on triangle ears and tulip shaped paws.
- Attach candy eyes and sprinkle nose with melted candy melts as glue. Pipe on oval cheeks below the nose.
- Pipe on pink ear centers and paw pads. Use a food coloring marker to add whiskers and mouth.
Drizzle and Sprinkles
Would you like to save this?
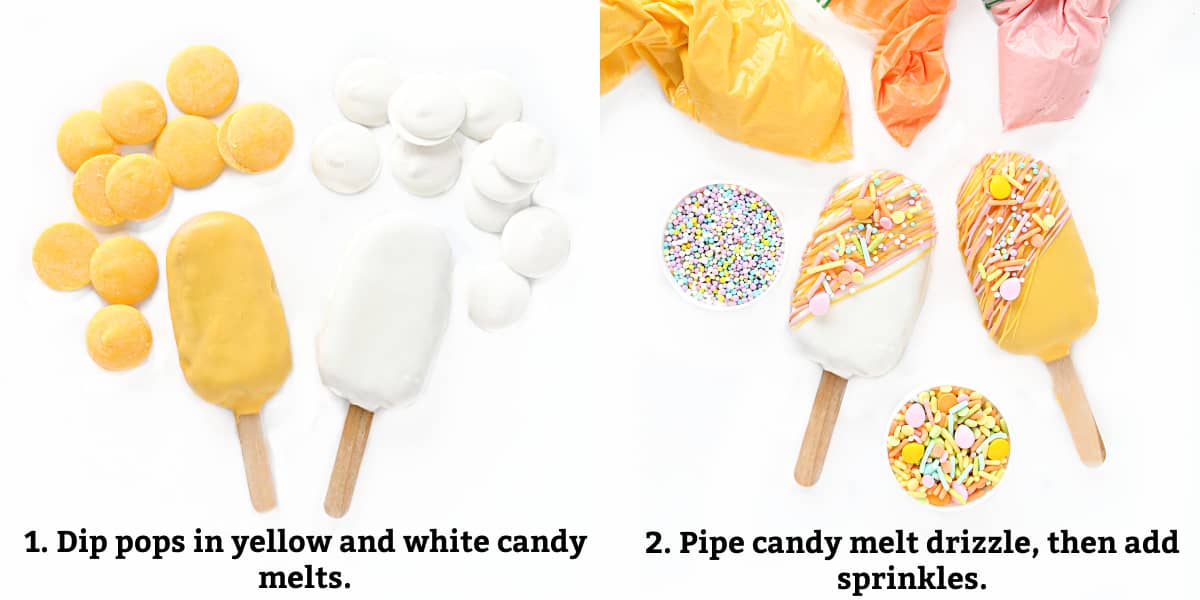
- Dip 6 pops in melted white candy melts and 7 pops in melted yellow candy melts. Place them on a wax paper lined baking sheet and chill 10 minutes or until firm.
- Pipe candy melt drizzle, then add sprinkles.
Storage
Store coated pops at room temperature in an airtight container for up to one month. Separate layers with a sheet of wax paper.
For best freshness results, seal coated pops inside individual 3" x 5" bags before storing.
Tips
- When using frozen peanut candy pops, allow the pops to warm slightly at room temperature for about 10 minutes before dipping in chocolate. If the pop is too cold the coating can crack as it firms.
- Use a glass bowl to melt coating for dipping. The chocolate will melt more smoothly and evenly. Transfer, if needed, into a dipping bowl or piping bag.
- Melt the candy wafers in the microwave at 50% power for 1 minute, then stir. Return to the microwave and continue cooking at 50% power for 15 minute intervals, stirring between intervals, until completely melted and smooth.
- If your coating is too thick, stir in a table spoon of paramount crystals or 1-2 teaspoons of coconut oil or vegetable shortening.
- My favorite containers for dipping (not for melting) are OXO silicone measuring cups.
- Oil based food coloring can be used with white melting chocolate instead of using candy melts.
- Toothpicks are a useful tool for adding candy melt "glue" to sprinkles and cleaning up piping drips or mistakes.
- To keep the pops fresh longer, enclose each pop in a self sealing 3" x 5" plastic bag.
- These 9 ½" x 6" boxes are the perfect size for gifting 4 peanut candy pops.
Frequently asked questions
Freeze uncoated peanut butter chews popsicles for up to one month in an airtight container separating layers of pops with a sheet of wax paper.
It is important to take frozen peanut chew pops out of the freezer 10-15 minutes before dipping in coating. The difference in temperature between a frozen pop and the warm coating can cause cracking.
Uncoated pops can be kept in the freezer for up to 3 months. Coated pops can be kept in an airtight container at room temperature for up to one month.
If your melting chocolate or candy melts are too thick for dipping, for best results add about a tablespoon of paramount crystals to make the coating more fluid. You can also add 1-2 teaspoons of vegetable shortening or coconut oil.
Related Recipes
Thanksgiving Peanut Chews Candy Pops are chewy peanut butter candy decorated like turkeys, pumpkins, and footballs for holiday fun.
Valentine's Day Peanut Chews Candy Pops, decorated like love birds or swirled with chocolate drizzle and sprinkles, are perfect for gifting to those you love.
Chocolate Peanut Butter Candy has a melt in your mouth peanut butter center covered in a chocolate shell. Make these tasty treats in shapes for any holiday.
White Chocolate Bark for Easter is a quick and easy to make candy that's beautiful and delicious. Great for Easter bskets, Mother's Day, and spring showers and weddings.
Graham Cracker Easter Eggs are chocolate covered treats you can make in minutes. Easy enough for the kids to help.
Make Mazapan ,Mexican peanut candy, with just two ingredients! This wonderful candy will literally melt in your mouth.
Ready to bake? Join the free membership group to get new recipes and a newsletter delivered to your inbox! You can also stay in touch on Facebook, Pinterest, and Instagram. I'd love to stay in touch!
Easter Peanut Chews Candy Pops
Equipment
Ingredients
- 25 peanut chews candy pops one batch
- 2 ½ cups yellow candy melts
- 2 ½ cups white candy melts
- ¼ cup orange candy melts
- ¼ cup pink candy melts
- 24 candy eyes
- 12 orange flower sprinkles
- 6 small pink heart sprinkles
- Easter sprinkle mix
Instructions
- Prepare the Peanut Chews Candy Pops according to the recipe. Bring the pops to room temperature for about 10 minutes before dipping and coating.
Chicks
- Dip 6 pops in melted yellow candy melts. Place them on a wax paper lined baking sheet and chill 10 minutes or until firm.
- Place remaining melted yellow candy melts in a ziplock bag. Reheat in the microwave when the coated pops are ready for decorating.
- Cut a tiny corner off the ziplock bag and pipe a curved line for each wing and a curled line at the top of the pop.
- Use the melted yellow candy melts as glue to attach the candy eyes and orange flower sprinkle feet.
Rabbits
- Dip 6 pops in melted white candy melts. Place them on a wax paper lined baking sheet and chill 10 minutes or until firm.
- Place remaining melted white candy melts in a ziplock bag. Reheat in the microwave when the coated pops are ready for decorating.
- Cut a tiny corner off the ziplock bag and pipe triangle ears, and rounded tulip shaped paws.
- Use the melted white candy melts as glue to attach the candy eyes and pink heart nose, then add small ovals of candy melts under the heart nose.
- Melt 10 pink candy melts in a ziplock bag in the microwave. Cut a tiny corner off the bag and pipe a center triangle on each ear and dots for the paw pads on each paw.
- When the melted candy decorations are firm, use the food marker pen to add whiskers and a mouth.
Drizzle and Sprinkle
- Dip 6 pops in melted white candy melts and 7 pops in melted yellow candy melts. Place them on a wax paper lined baking sheet and chill 10 minutes or until firm.
- Place left over orange, pink, and yellow candy melts in separate ziplock bags. Cut off a small corner piece of each bag.
- Drizzle the melted candy across each pop and top with Easter sprinkles.
- Allow the melted candy to firm completely before storing or placing the pops in bags.
- Store coated pops at room temperature in an airtight container for up to one month. Separate unwrapped layers with a sheet of wax paper.
Notes
- When using frozen peanut candy pops, allow the pops to warm slightly at room temperature for about 10 minutes before dipping in chocolate. If the pop is too cold the coating can crack as it firms.
- Use a glass bowl to melt coating for dipping. The chocolate will melt more smoothly and evenly. Transfer, if needed, into a dipping bowl or piping bag.
- Melt the candy wafers in the microwave at 50% power for 1 minute, then stir. Return to the microwave and continue cooking at 50% power for 15 minute intervals, stirring between intervals, until completely melted and smooth.
- If your coating is too thick, stir in a table spoon of paramount crystals or 1-2 teaspoons of coconut oil or vegetable shortening.
- Do not send Peanut Chews Pops during hot weather months.
- For best freshness results, seal coated pops inside individual 3" x 5" bags before further packaging.
- Place bagged pops in an airtight storage container with padding, if needed, to prevent any movement.


saltandserenity
Wendy, these are so adorable. Your step by step instructions are fantastic. Such an easy and accessible recipe. I'm thinking how cute these would be in the summer as ice cream bars for my grandson!