
Even children can enjoy making these Decorated Thanksgiving Sugar Cookies. I have been known to go a little overboard decorating cookies and cakes for special occasions. Usually, I see a photo or get an idea in my head and think, "That would be fun. I can do that." Hours and hours later it becomes apparent that many things in life look easy until you actually try them. Artistically decorating cookies with royal icing isn't easy. Luckily this faux version is super easy!
If you are an experienced cookie decorator, you know a lot more than me. I am a complete beginner. But iced sugar cookies are a great care package cookie.They taste wonderful and last a really long time (2-3 weeks). I am not suggesting that these are the sort of thing you might whip up an hour or so before heading to the post office. Nor am I suggesting that these would be great to make on a weekly basis. However, they ARE really special and would be great for a special occasion care package like a birthday or holiday. Decorated Thanksgiving Sugar Cookies use an easy cookie and faux royal icing recipe (thanks to bakingdom.com). Though the results are slightly different than using real royal icing, they are still pretty impressive for a cookie decorating rookie.
One of the amazing things about food bloggers, is their generosity of spirit. You might think that some of these talented people would want to keep their methods, recipes, and designs top secret. But they don't. They share. Three of my favorite cookie decorating sites are bakeat350.blogspot.com, bakingdom.com, and sweetopia.net. You have to take a look at their cookies. After ooo-ing and ahhh-ing at the beautiful designs, you can read directions and tutorials to make the cookies yourself. Assuming, of course, that you are as talented as the three women on these sites. Otherwise, you can oooo and ahhhh, then, like me, make a feeble attempt at creating something similar.
I had spent enough time ogling cookie decorating sites to get the idea that I was capable of trying it out. My first opportunity came in the form of a soon to be five year old who, for many months before his birthday, carried his stuffed Super Mario Yoshi, every where he went. This sweet Yoshi obsessed child is the son of my English student. They have a large extended family that gathers for special occasions like birthdays. I got the brilliant idea that I could be helpful by making a birthday present tray of Yoshi cookies for their celebration.
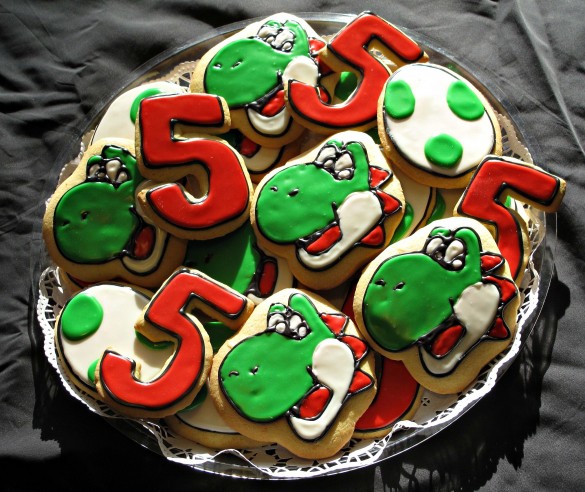
I went online and found a photo of Yoshi cookies by SweetSugarBell. Not having any of the cookie cutters "just" meant cutting them all out by hand. I watched tutorials online about outlining the shapes then flooding the shapes with thinned icing. Having a few icing tips seemed like a good idea so I purchased three tips. Day 1: I baked. Day two: I outlined in the morning and flooded in the afternoon. (And when I say "day", I mean many hours of that day.) Day 3: I presented my cookies to the birthday boy. Unfortunately, some time in the past three days he had "outgrown" Yoshi and was now carrying around a stuffed tiger. Oh well.
 Though it was a long process, I had a lot of fun. I also had a big reality check, as in, "Whoa, this is a lot harder and more time consuming than I expected!"
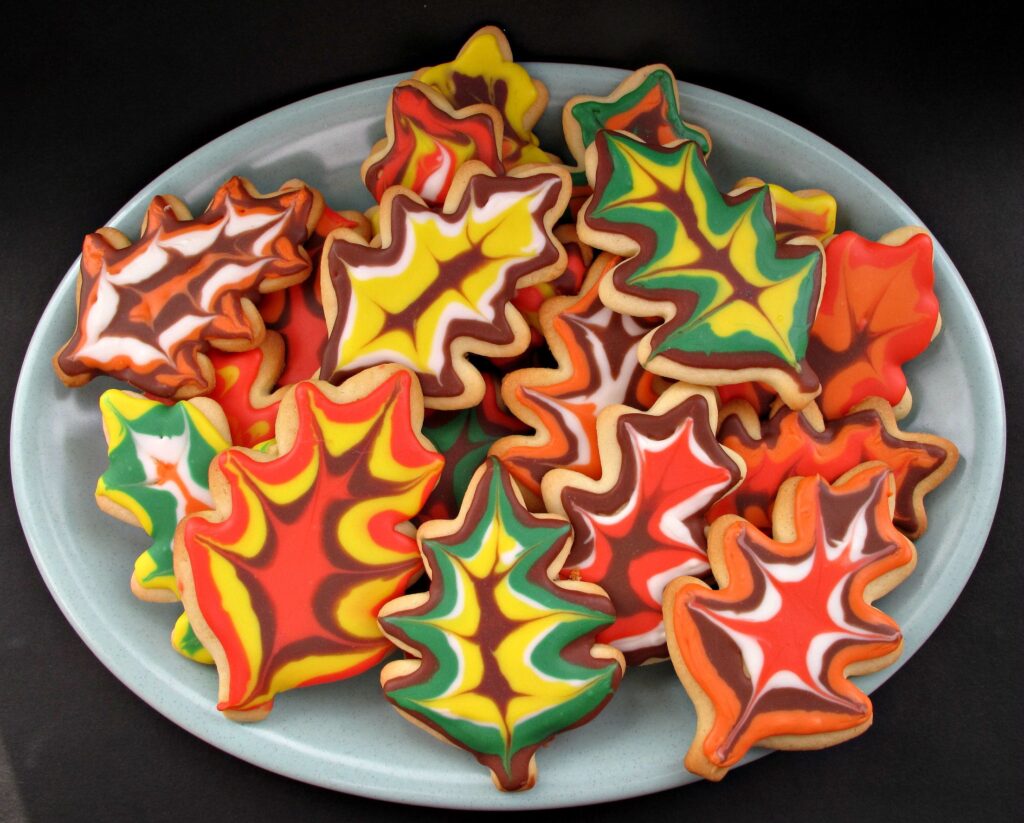
Decorated Thanksgiving Sugar Cookies are a WHOLE lot easier. (Thanks to sweetopia.net for the inspiration.) First of all, I used a cookie cutter. If you are planning on mailing cut-out cookies, choose shapes that are as rounded and compact as possible (a round ornament as opposed to a reindeer or a star as opposed to a menorah, for example). Legs, antlers, ears, are the first to go if the cookies jiggle at all in the mail. Second of all, there is no detail work in this icing. It was all rather free form tie-dye look.

This cookie recipe produces dough that is very easy to work with. Make sure to roll it out to no more than ⅛" to ¼". It does puff up a bit in the oven and the finished cookie is on the soft side. I especially like that this cookie is barely sweet. The icing provides plenty of sweetness. I used vanilla extract in both my cookies and my icing. I think lemon or almond would work equally well.
Would you like to save this?

The icing couldn't be easier. For Decorated Thanksgiving Sugar Cookies the consistency should pour off a spoon thickly, kind of like honey. Any thinner, and it will drip off the edge of your cookie (which isn't a disaster but is messy). Any thicker, and it won't blend together on the cookie and will just lie there in piped stripes (also not a disaster but not the look we are going for). No special equipment is required for this style of decorating. Piping tips give you a little more control but the icing can easily be piped out of a plastic bag with a tiny bit cut off of a bottom corner.
I learned an odd lesson at the cake decorating store when I asked about icing color. Whenever I've tried to make an intensely colored frosting or icing, I've battled with color vs bitterness. Adding enough coloring to make real red or real black makes the icing taste terrible. I was sure it was something I was doing wrong. So I asked. Basically, the answer was that beautiful colors are for looking at, not eating. Add enough chemicals to create dark color and you'll taste them. Yuck. It helps if the base color isn't white. Add cocoa to icing you plan to color black or brown. Add cherry juice for red icing. Also, I learned about "no taste" red (tulip red) that doesn't have a fire engine red color, but doesn't taste bitter. Most oddly, it appears that not everyone tastes the bitterness of added color. I taste it. Using intense colors for detail work only, seems the best bet to me.

To create the marbling effect on Decorated Thanksgiving Sugar Cookies, I started by piping two outlining rows of each color, beginning at the outside edge.

When the cookie surface is filled in with icing, drag the tip of a toothpick from the inside to the outside edge. Lift. Wipe off the tip and drag in another spot.
 Allow the Decorated Thanksgiving Sugar Cookies to dry overnight, uncovered, at room temperature. Do not store in the refrigerator because it does weird things to the icing. When the icing is hard (in 12-24 hours) store in plastic wrap or airtight containers for 2-3 weeks.

Decorated Thanksgiving Sugar Cookies
Ingredients
Cookies
- 5 cups all-purpose flour
- 2 teaspoons baking powder
- 2 teaspoons salt
- 1 ½ cups unsalted butter softened
- 2 cups sugar
- 4 large eggs
- 2 teaspoons vanilla extract
Icing
- 4 cups confectioners’ sugar
- 3 Tablespoons milk add more as needed to achieve desired consistency
- 3 Tablespoons light corn syrup
- 1 teaspoon vanilla extract
- food coloring
Instructions
Cookies
- In a medium bowl, whisk together flour, baking powder, and salt.
- In the bowl of an electric mixer, cream together the butter and sugar. Add the eggs, one at a time. Add the vanilla. Beat until fluffy (about 3 minutes).
- Add in the flour mixture, a little at a time, and beat until combined.
- Cover in plastic wrap and refrigerate for at least 2 hours.
- When ready to bake, preheat the oven to 400 degrees F. Line a baking sheet with parchment paper.
- Roll out the dough on a floured surface or between two sheets of parchment paper to ⅛”-¼” thickness. Cut into shapes.
- Place cut-out cookies on prepared cookie sheet 2” apart.
- Bake for 8-10 minutes until edges are golden brown.
- Cool completely on wire racks before decorating.
- Cookies can be wrapped and frozen to be iced at a later time. Be sure to defrost completely before icing.
Icing
- Combine sugar and milk until smooth.
- Add corn syrup and vanilla. Continue beating together until smooth and glossy. Add additional milk in tablespoon increments until desired consistency.
- Divide into small bowls. Add food coloring and mix.
- Spoon icing into piping bags or small plastic bag with bottom corner cut to form tiny piping opening.
Notes
Nutrition
Tammy
Could you use Almond flour in place of the all purpose flour?
Wendy Sondov
Almond flour and wheat flour are not interchangable in recipes without making other adjustments to ingredients. I would go to a gluten free baking site and use one of their sugar cookies, then top it with the icing method shown here. Take a look at https://glutenfreeonashoestring.com/almond-flour-sugar-cookies/ or these https://meaningfuleats.com/the-best-almond-flour-sugar-cookies-gluten-free-grain-free/
Donna
From decorating cakes, I also found that vivid colors made distasteful icing. I had <sed paste and liquid coloring. As time went by, I found powder coloring. No distasteful icing.
Wendy Sondov
Thanks for the tip. I'll give it a try. I've never tried regular powder coloring. With natural powder coloring I could only create pastels. The colors on these cookies didn't get a bad flavor at all. I use Americolor and it only took a few drops.
Val
What brand of food coloring do you use ? I can’t wait to try making these !
Wendy Sondov
Hi, Val. I always use gel food coloring and prefer the Americolor brand. Just a couple of drops gives really vibrant color without watering down the icing. I love decorating these cookies because they are so pretty and easy enough for kids to do. Have fun!
Sohbet
Thanks! These cookies are super easy.
Deanndria
I know this is an old post but still wanted to say thank you for this fun recipe! Ok no baker, but these were easy to do with your instructions and I like the icing a lot...so does my 4 year old. Thanks!
Wendy Sondov
Hi, Deanndria! This recipe may be old but it is one of the most popular on The Monday Box! 🙂 I am smiling imagining the fun you and your 4 year old must have had making these! So easy and such great results. The corn syrup icing is the only icing I use for cookie decorating. I'm a real novice at cookie decorating and find that this icing is easy to make, easy to use, tastes good, and dries for shipping. Thank you for leaving a comment and giving this recipe 5 stars! Wishing you many more fun baking adventures with your little one!
Christoph
Beautiful cookies!
The Monday Box
Thank you, Christoph!
Amy
Your cookies turned out so cute. Thank you for sharing.
Linda on Poinsettia Drive
Hi Wendy, Beautiful and thank you for teaching me how to decorate cookies. I am going to give it a try. I would like to invite you to my new blog part held each Tuesday thru Friday. You'll get large picture exposure and shout outs. You may get PINKED and get even more exposure! I hope you to see you. ~Linda poinsettiadr.com
The Monday Box
Thank you, Linda! These cookies really are easy. I have made them with kids and we all had fun. 🙂 Thanks for the party invitation. I will head other there and link up. 🙂
Carrie @ Carrie's Home Cooking
I love how creative you are! Thanks so much for sharing with us at Whisk It Wednesday. Have a momentous week and come back to see us real soon! ~Carrie
The Monday Box
Thanks, Carrie! These cookies are super easy. Even kids can look like creative decorators with these! 🙂
Trisha
These are way too pretty to eat!
The Monday Box
Thank you, Trisha! I only have a tiny bit of trouble eating cookies that take a long time to decorate. These leaves are quick and easy. No problem eating a few! 😉