This Glaze Icing Recipe makes delicious decorating icing for cookies that's easy to make and use. The icing sets firm enough for stacking and has a soft, chewy texture.
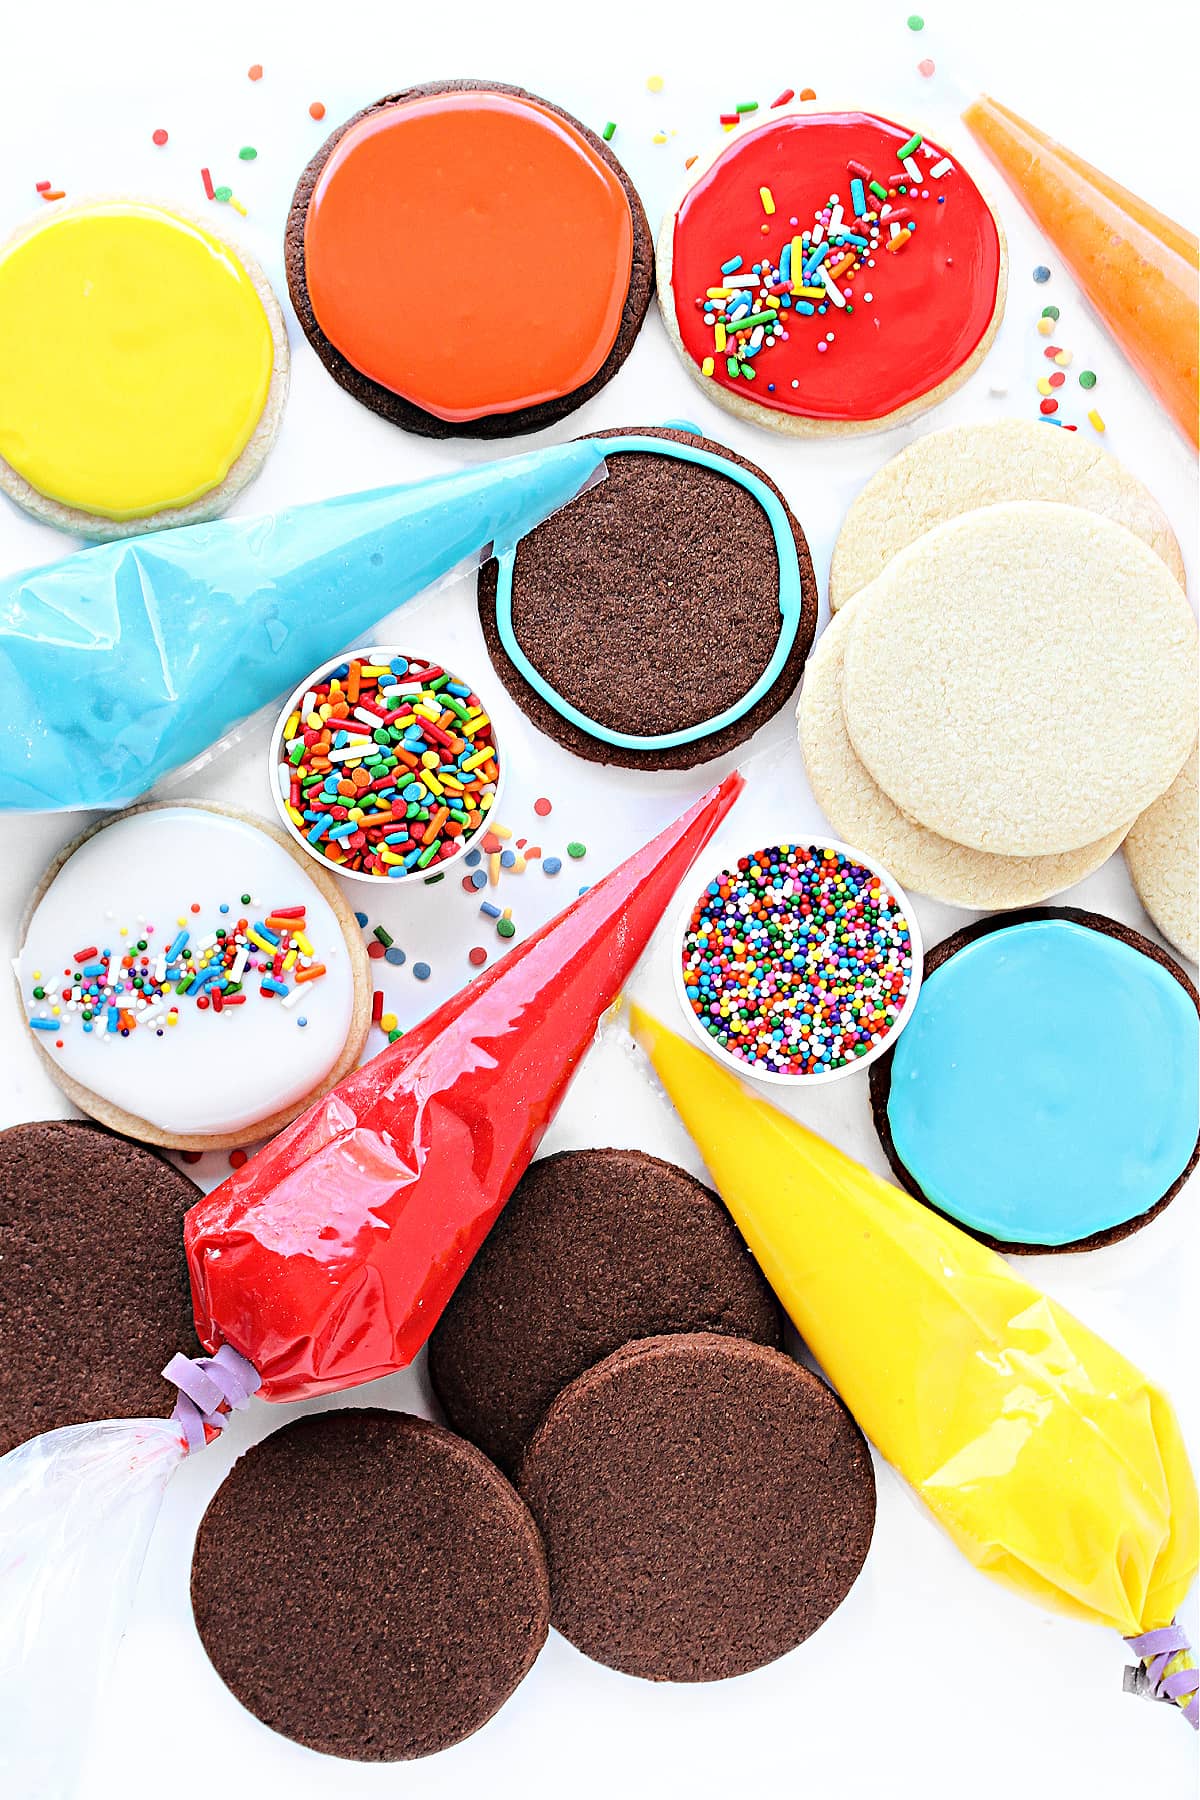
Table of contents
Why you'll love this recipe
- Glaze icing is the easy way to make professional looking decorated cookies with simple ingredients and no special tools.
- No mixer is required for this one bowl recipe.
- Iced sugar cookies retain moisture and stay fresh longer than cookies without glaze icing.
Glaze icing is easy to make and to use. This simple recipe uses just a handful of ingredients and is ready to use in minutes.
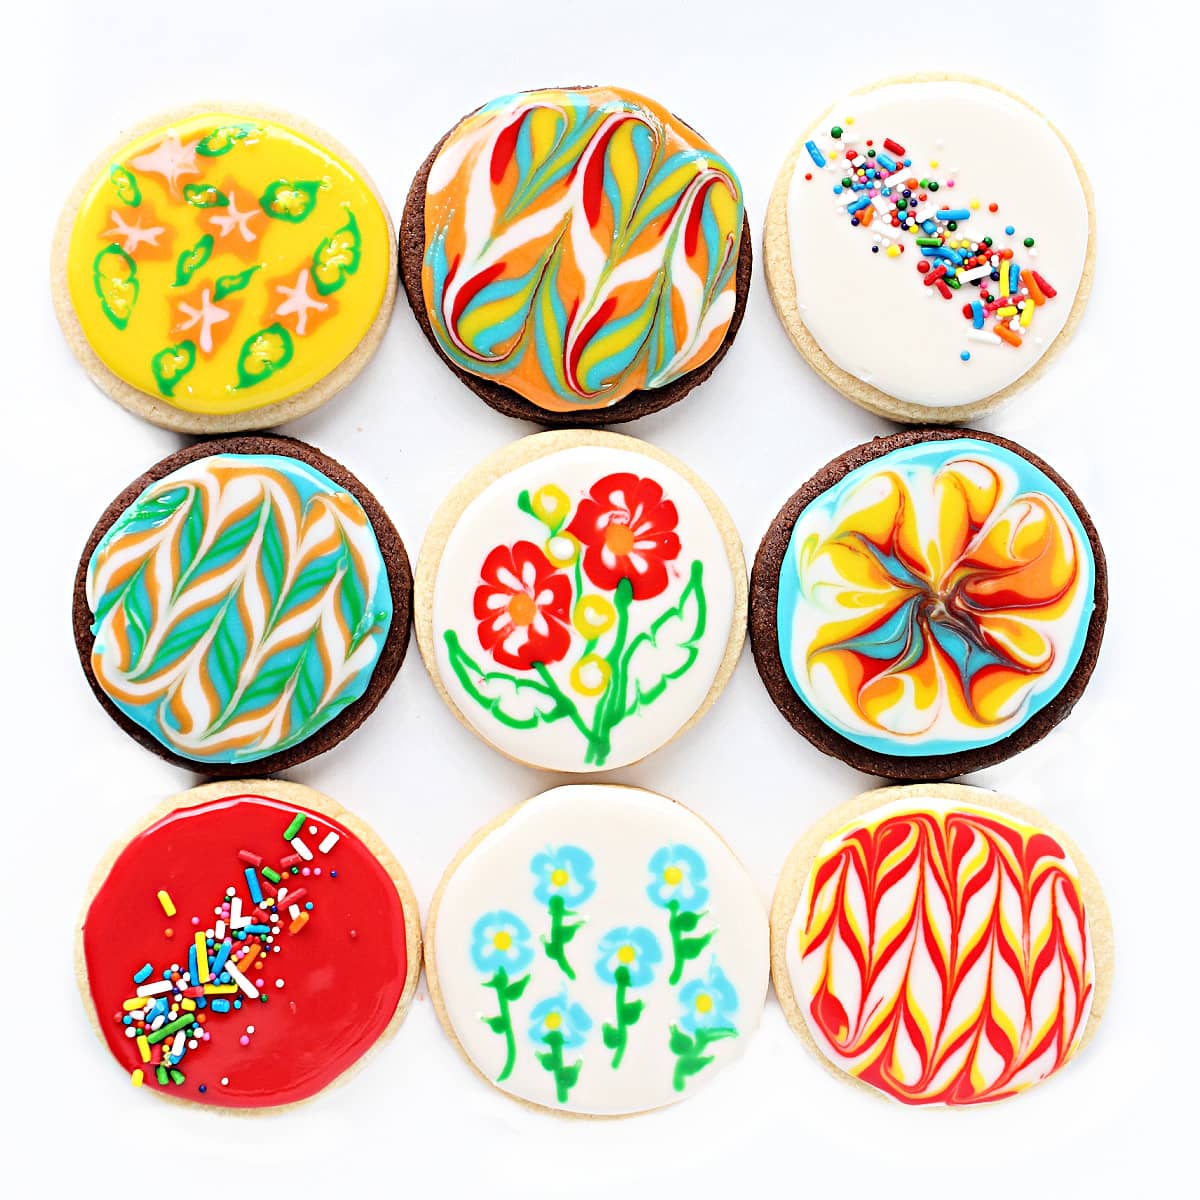
Though there are many cookie artists who use glaze icing for intricate designs, glaze is also great for decorating beginners. Even children will have fun adding colorful designs to cutout vanilla sugar cookies or chocolate sugar cookies.
Decorated cookies are popular year round. Customize with holiday or seasonal shapes, colors, and flavors.
Sugar cookies with glaze icing are always one of the favorite baked goods that I include in care packages and give as gifts.
Ingredients
This is an overview of the ingredients. You'll find the full measurements and detailed instructions in the printable recipe card at the bottom of the page.
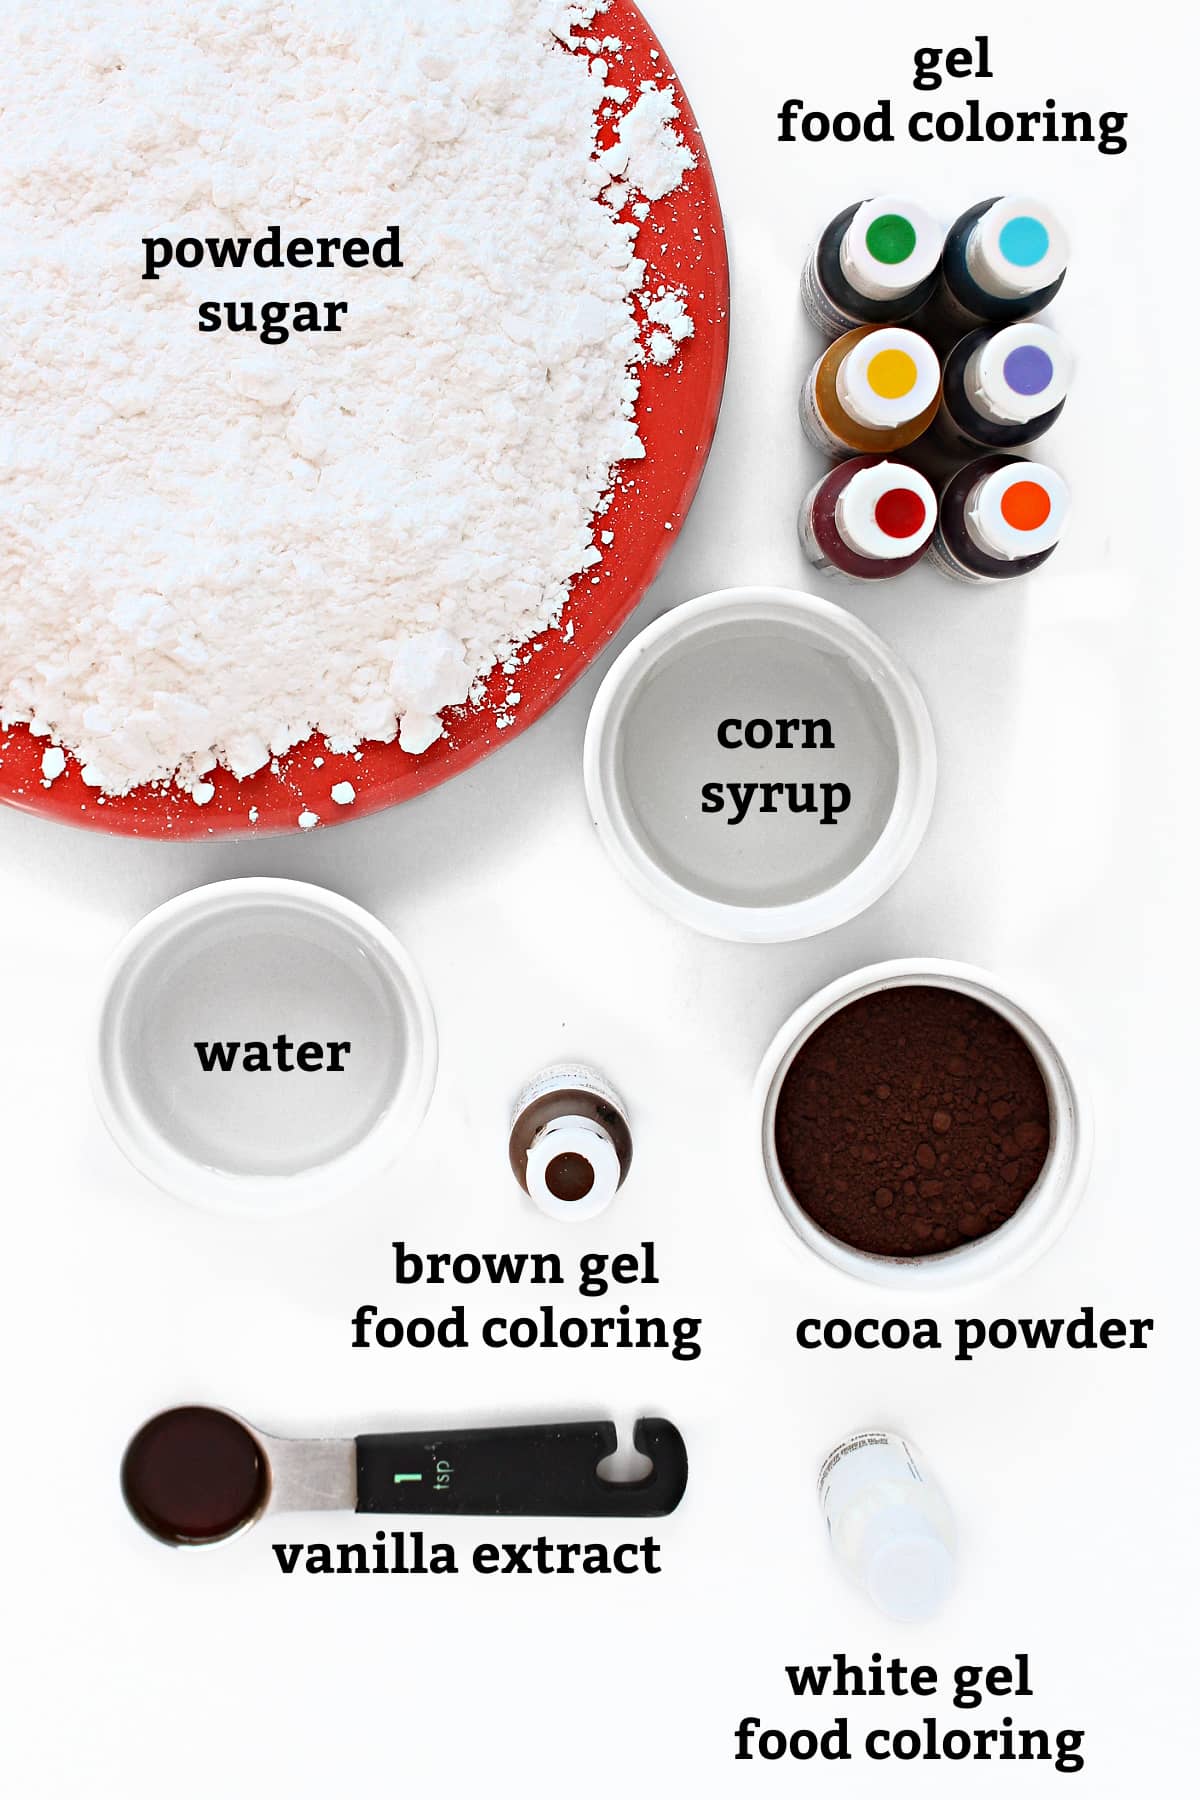
- I get the best results using gel food coloring which produces the most instense color, using the least coloring product.
- Cocoa powder can be added to make chocolate glaze with this recipe.
- Brown gel food coloring is optional in chocolate icing for more intense brown coloring.
- Pure vanilla extract gives icing a slight brownish-yellow tint that can alter the final color when adding food coloring. For absolutely white icing that doesn't effect added color, use clear imitation vanilla extract.
- White gel food coloring is optional. It makes glaze icing more opaque and helps keep colors from running.
Instructions
This is an overview of the instructions. The full instructions are in the recipe card below.
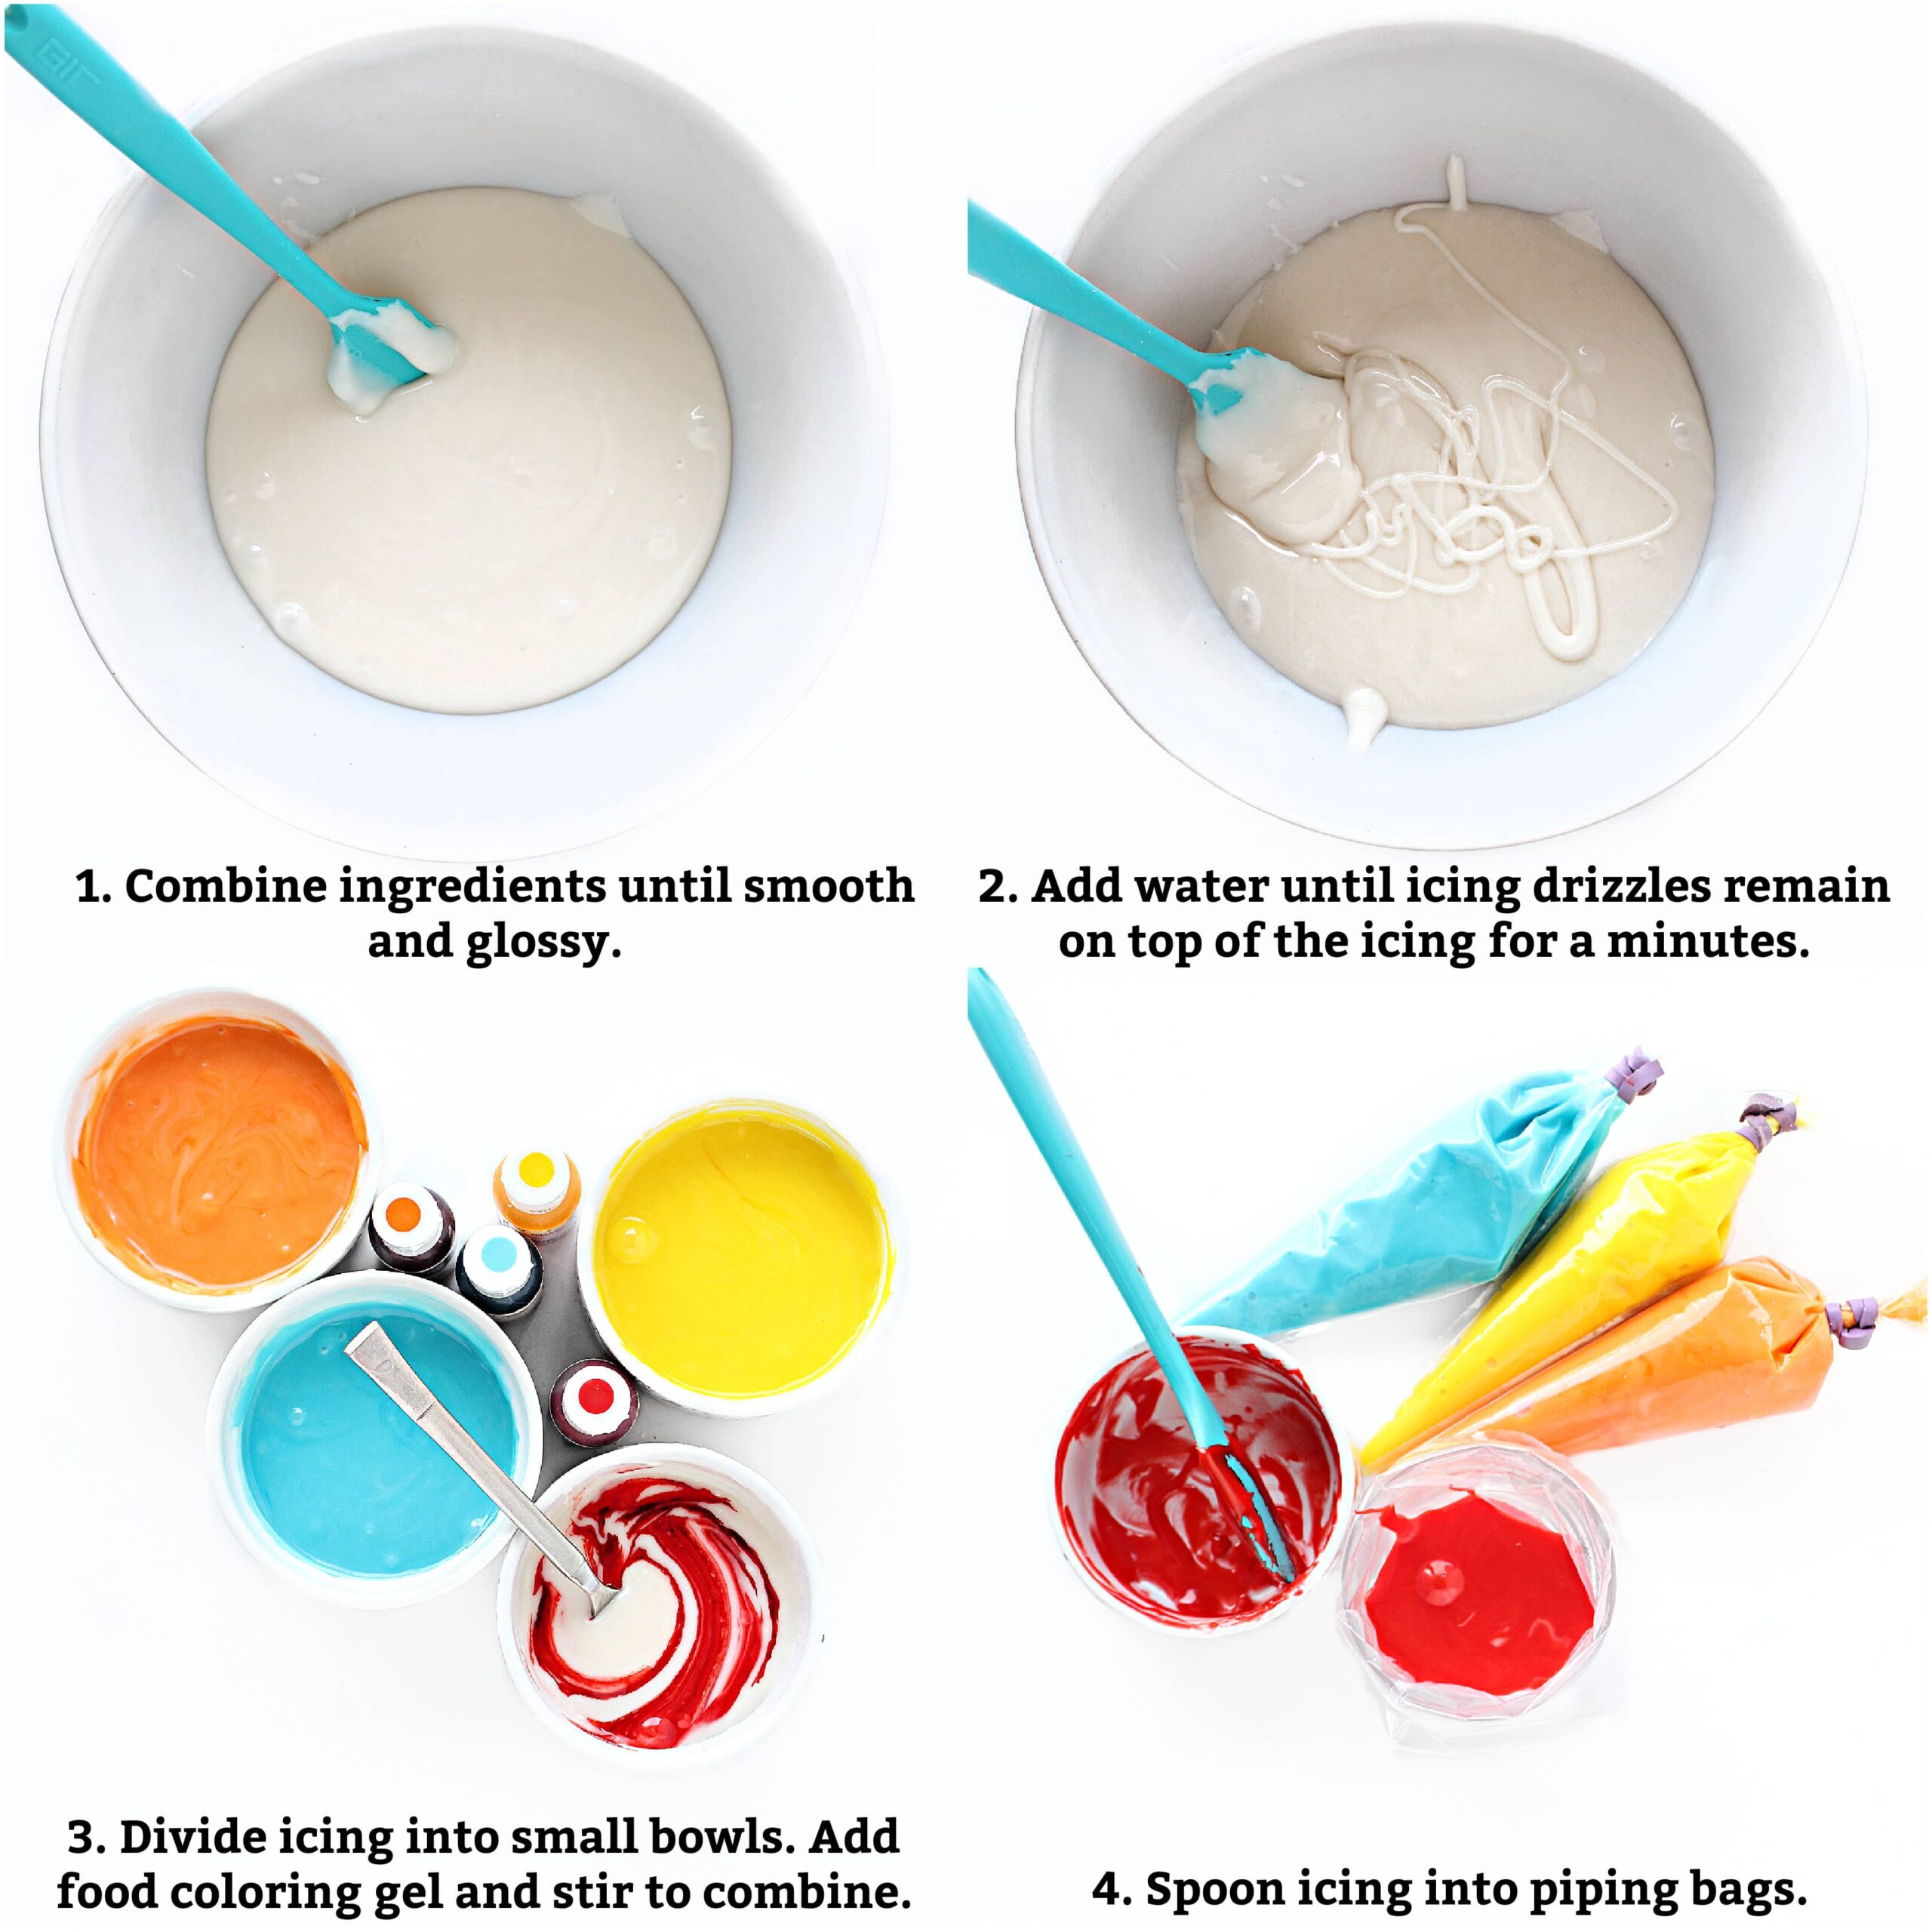
- In a medium bowl, combine the ingredients until smooth and glossy.
- Add water, in teaspoon increments, for desired glaze consistency.
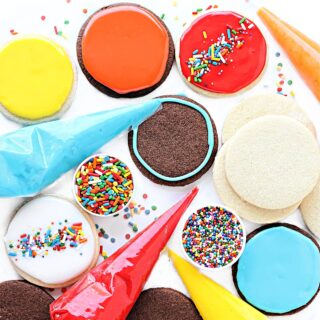
- Divide the icing into small bowls and mix in food coloring.
- Transfer the icing into piping bags or small ziplock bags.
Storage
Bagged glaze icing can be stored refrigerated or at room temperature for up to 2 weeks.
Tips
- You can replace the water in this recipe with your liquid of choice. Use the same amount of milk or juice as indicated for the water in the recipe.
- Optional white food coloring makes the icing more opaque and can help keep colored icing from bleeding.
- Gel food coloring provides deeper color (with less coloring) than liquid coloring and doesn't add excess liquid. My preferred brand for maximum color using minimum coloring is Americolor.
- Decorate one cookie at a time. For a smooth, flat surface add designs and details with additional icing immediately after flooding while the icing is still wet.
- Gently tap the iced cookie on the work surface to release any air bubbles. Use the tip of a toothpick to pop bubble if needed.
- Add dimension to a design by adding icing on top of dried base icing.
- For the fastest and easiest way to decorate glaze icing, add sprinkles to wet flooded icing.
- Use food coloring markers on top of fully dry icing to add designs or fine details to icing designs.
- Icing requires at least 12 hours to fully dry before the cookies can be stacked or packaged.
- For the longest freshness, I recommend wrapping the cookies individually in cellopane bags. Use self sealing bags or a heat sealer for airtight packaging.
How to use glaze icing for easy cookie decorating
These super simple decorating methods for glaze icing can be successfully used by adults or children, using only a piping bag (or ziplock bag) and a toothpick!
Would you like to save this?
Marbled design
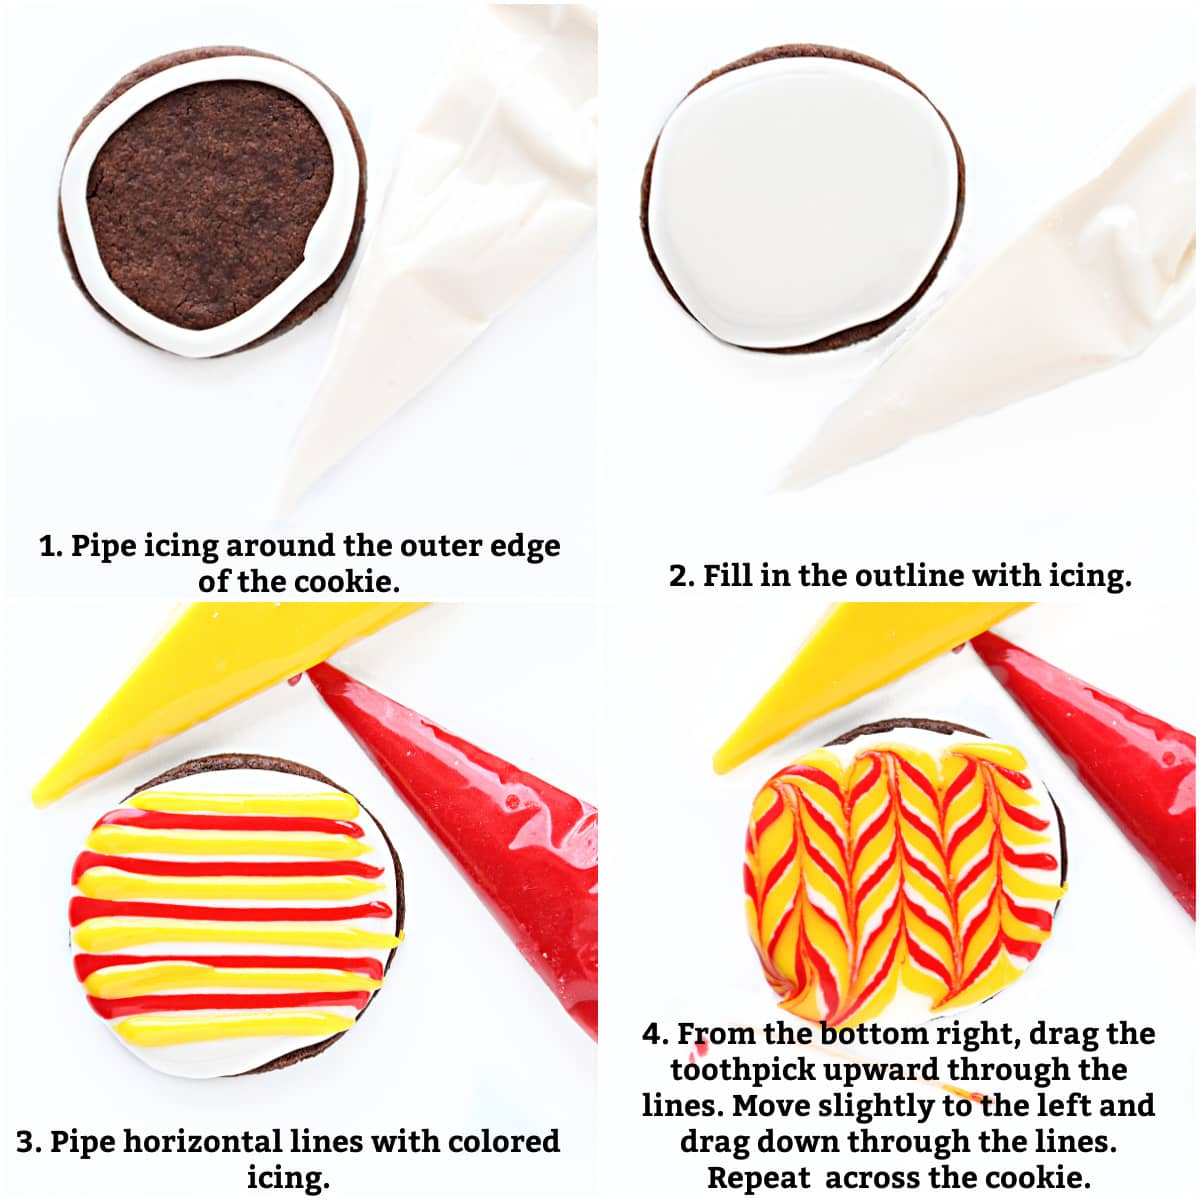
- Pipe icing around the outer edge of the sugar cookie.
- Fill in (flood) the icing out line with more icing of the same color.
- Pipe horizontal lines with different colors of icing. For a variety of designs, pipe thick or thin lines, close together or far apart.
- Starting at the bottom right of the cookie, drag the toothpick, through the piped lines, upward toward the top of the cookie. Move the toothpick slightly to the left and drag downward through the lines. Repeat the up then down drag across the cookie.
Tie dye design
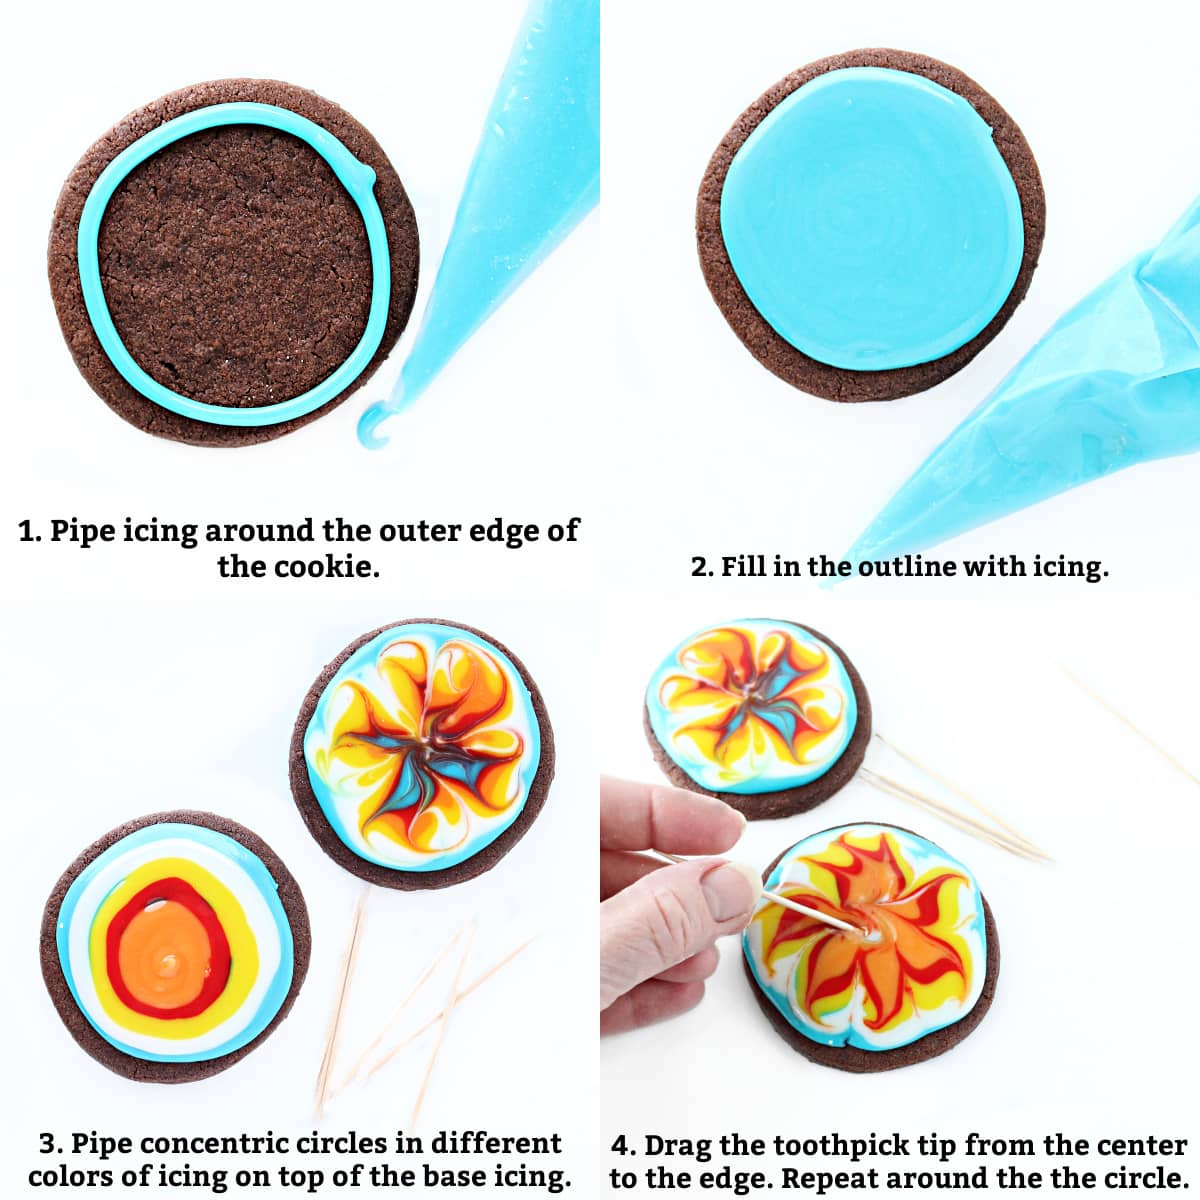
- Pipe icing around the outer edge of the sugar cookie.
- Fill in (flood) the icing out line with more icing of the same color.
- Pipe concentric circles in different colors from the edge to the center of the cookie.
- Drag a toothpick tip from the center of the cookie to the edge, pulling to the right or left at the edge to form a curl. Repeat the drag from center to edge around the cookie.
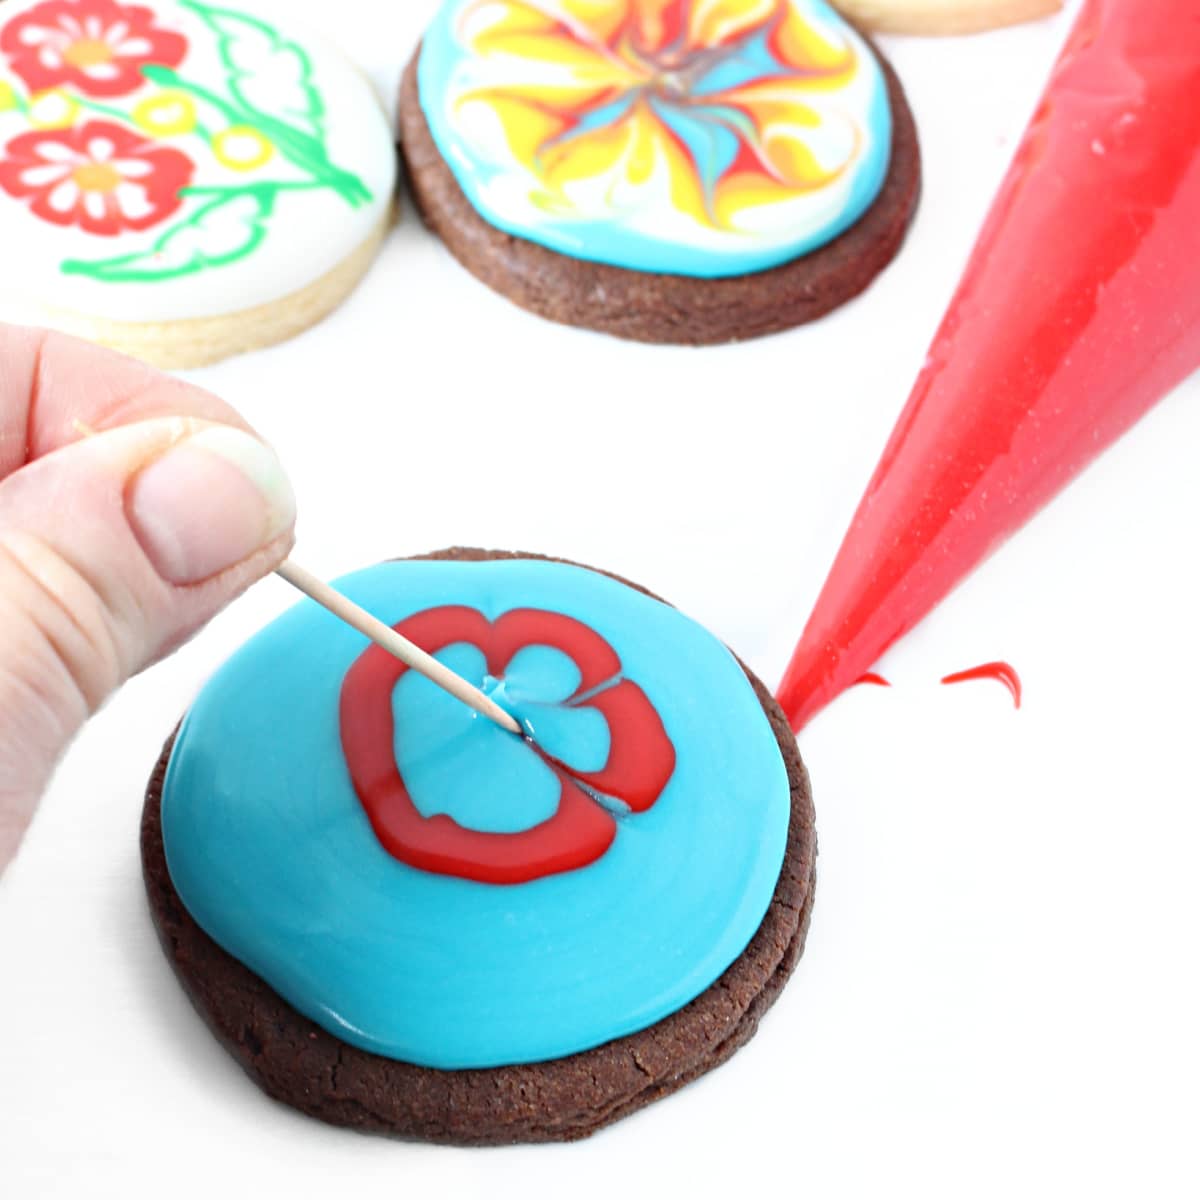
Flower design
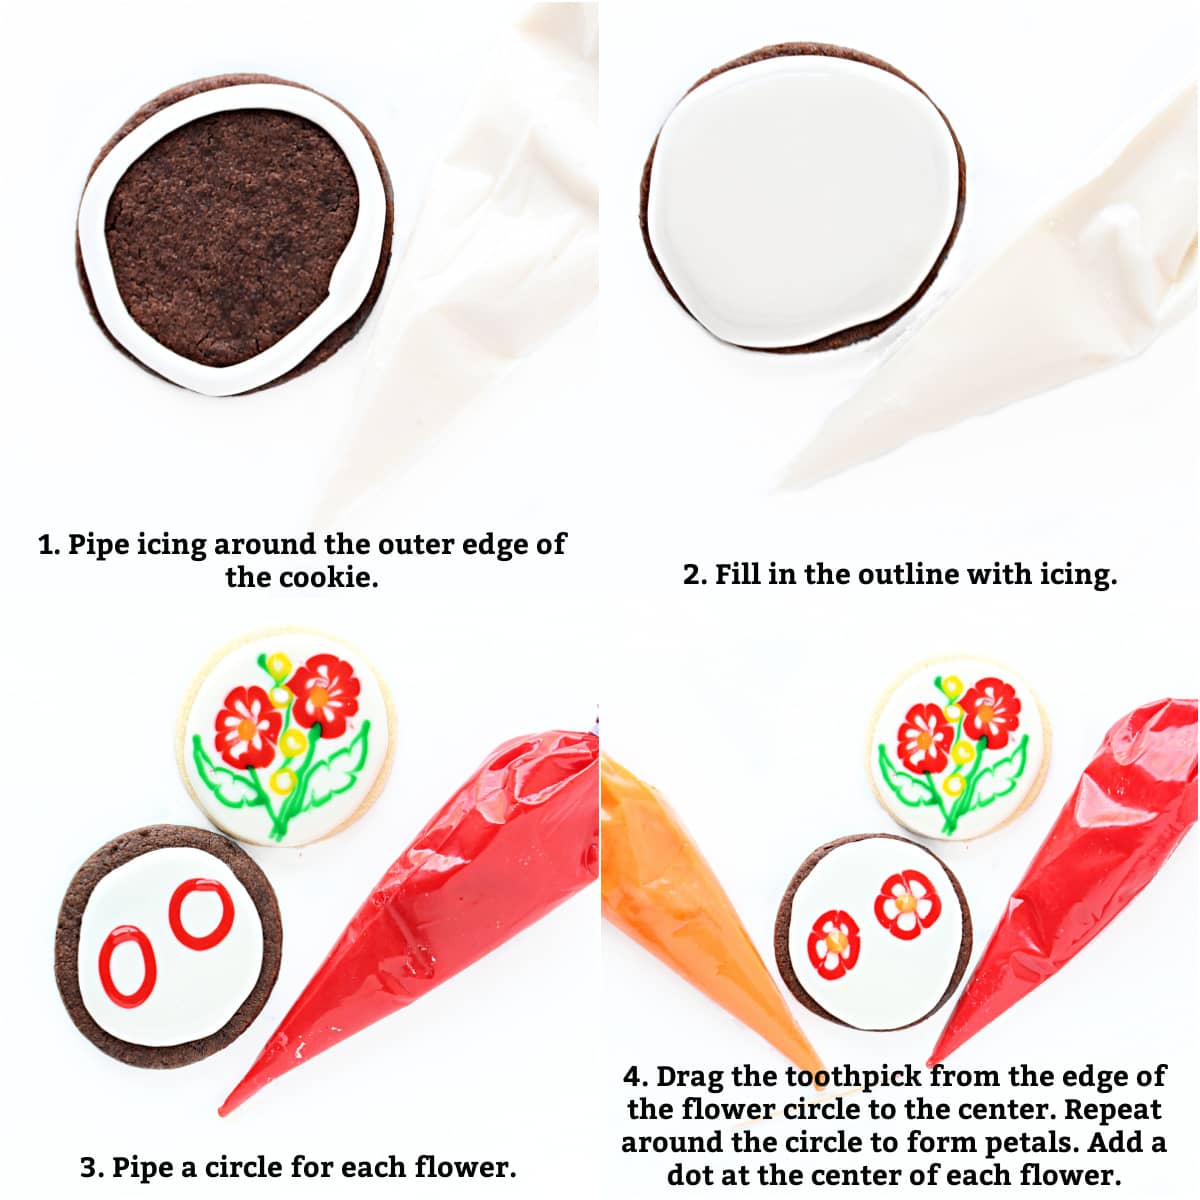
- Pipe icing around the outer edge of the sugar cookie.
- Fill in (flood) the icing out line with more icing of the same color.
- Pipe small cirlcle outlines, in another color, onto the wet icing.
- To make a flower, drag a toothpick tip from the edge of a circle to the center. Repeat dragging from edge to center around the circle to form flower petals. Add a dot of icing at the center of the flower.
Frequently asked questions
Royal icing is made with egg whites or meringue powder, which makes it possible to create crisp, precise edges and decorating details. Royal icing dries with a hard, crunchy texture.
Glaze icing doesn't contain egg whites. It can be used for many decorating designs with softer edges. Glaze icing dries firm enough for stacking, but has a soft, chewy bite.
One teaspoon total of any flavoring or extract can be used in this recipe instead of the one teaspoon of vanilla extract.
This recipe will ice about 25- 2 ½" cookies. The number of the cookies iced varies with the size of the cookies being decorated.
Related Recipes
Lemon Slice Sugar Cookies look like a slice of lemon. These citrus treats are made with vanilla or lemon sugar cookies and have lemon juice in the glaze icing for the perfect finishing touch.
Birthday Cake Cookies look like little cakes but are really stacked sugar cookies coated in simple glaze icing. These special cookies have a candy surprise hidden inside!
Use sugar cookie sticks and these easy icing instructions to make adorable, eye catching Decorated Grinch Cookies.
Cozy Mug Sugar Cookies are a great treat for warming hearts. Piped icing turns circle shaped cookies into mugs of comfort.
Colorful icing and simple designs turn chewy gingerbread men into Gingerbread Pirate Cookies straight from the illustrations in a children's book.
Be sure to check out all of our Decorated Sugar Cookies in the recipe index.
Ready to bake? Join the free membership group to get new recipes and a newsletter delivered to your inbox! You can also stay in touch on Facebook, Pinterest, and Instagram. I'd love to stay in touch!
Glaze Icing Recipe
Ingredients
- 4 cups confectioners sugar
- 3 tablespoons water
- 3 tablespoons light corn syrup
- 1 teaspoon vanilla extract
- gel food coloring
- 8 drops white food coloring otional for white or colored icing
For chocolate glaze icing add:
- 2 tablespoons cocoa powder
- 2-3 drops brown food coloring optional for deeper color
Instructions
- In a medium bowl, combine all of the ingredients. Stir together until smooth and glossy. Add additional water in teaspoon increments until desired consistency. Ideal icing consistency for outlining and filling in/flooding is like honey or white glue. When the icing is drizzled onto the rest of the icing in the bowl it should form ribbons that stay on the surface for a few minutes.
- For making multiple colors, divide the icing into bowls. Mix in food coloring.
- Allow the icing to rest a few minutes in the bowls, to allow any bubbles to rise to the surface. Spoon the icing into piping bags or ziplock bags and twist closed.
- Bagged icing can be stored refrigerated or at room temperature for up to 2 weeks.
Notes
- This recipe makes 1 ½ cups of icing to decorate about 25- 2 ½" cookies.
- Optional white food coloring makes the icing more opaque and can help keep colored icing from bleeding.
- Gel food coloring provides deeper color (with less coloring) than liquid coloring and doesn't add excess liquid. My preferred brand for maximum color using minimum coloring is Americolor.
- Decorate one cookie at a time. For a smooth, flat surface add designs and details with additional icing immediately after flooding while the icing is still wet.
- Add dimension to a design by adding icing on top of dried base icing.
- For the fastest and simplest decorating, add sprinkles to wet flooded icing.
- Use food coloring markers on top of fully dry icing to add designs or fine details to icing designs.
- For the longest freshness, I recommend wrapping the cookies individually in cellopane bags. Use self sealing bags or a heat sealer for airtight packaging.
- Glaze MUST be dried for a minimum of 12 hours before packaging.
- Wrap cookies individually in cellophane cookie bags or in plastic wrap.
- Stack wrapped cookies in a freezer weight ziplock bag or airtight container.

Leave a Reply