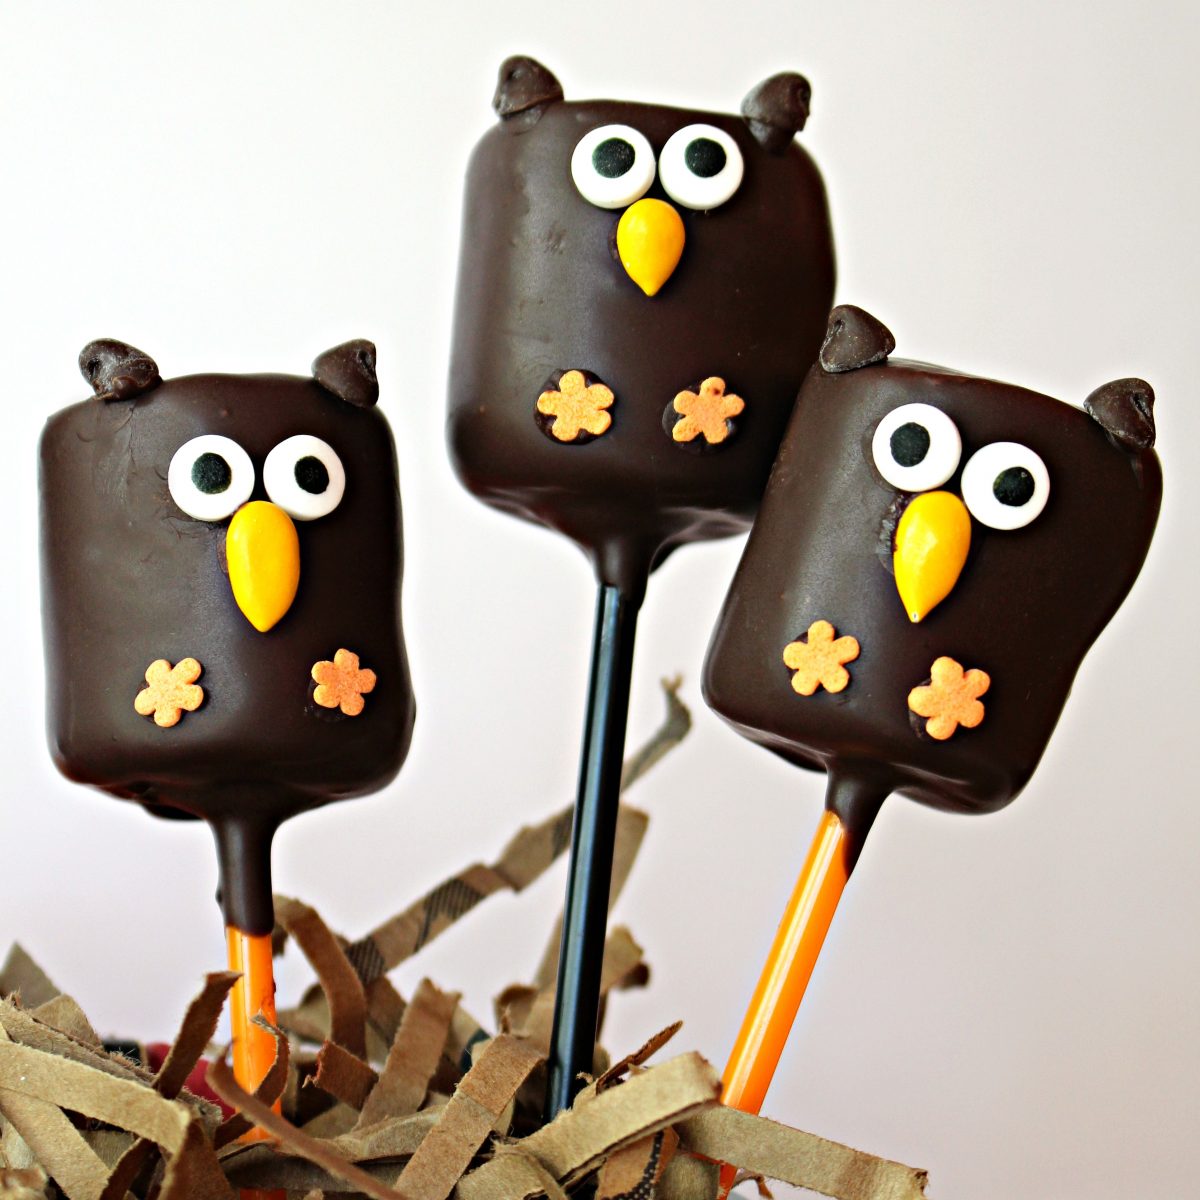
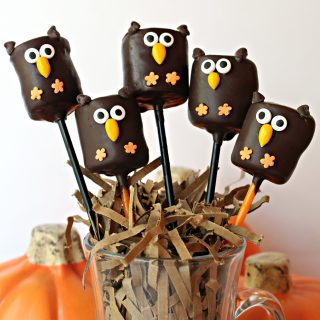
Owl Marshmallow Pops are delicious Halloween treats that are perfect for owl themed party favors, centerpieces, or care packages. Making chocolate covered marshmallows on a stick is fun and easy, a "hoot" for the whole family!
Are you an owl fan? Next time try owl shaped Cinnamon Spritz Cookies, another easy Halloween treat!

Why you'll love this recipe
Share some cuteness this spooky season with a fun Halloween dessert. This easy recipe makes cute owls on a lollipop stick, a perfect treat for snacking or for Halloween parties.
These chocolate covered marshmallows on a stick are made with just a handful of simple ingredients. They are a lot quicker and easier than cake pops. As an added bonus, they can be made to meet many allergy restrictions.
I used Dandies brand marshmallows and dipping allergen free chocolate to make treats that are vegetarian, gluten free, nut free, kosher, and super delicious.
Recipe ingredients
Instructions
This is an overview of the instructions. The full instructions are in the recipe card below.
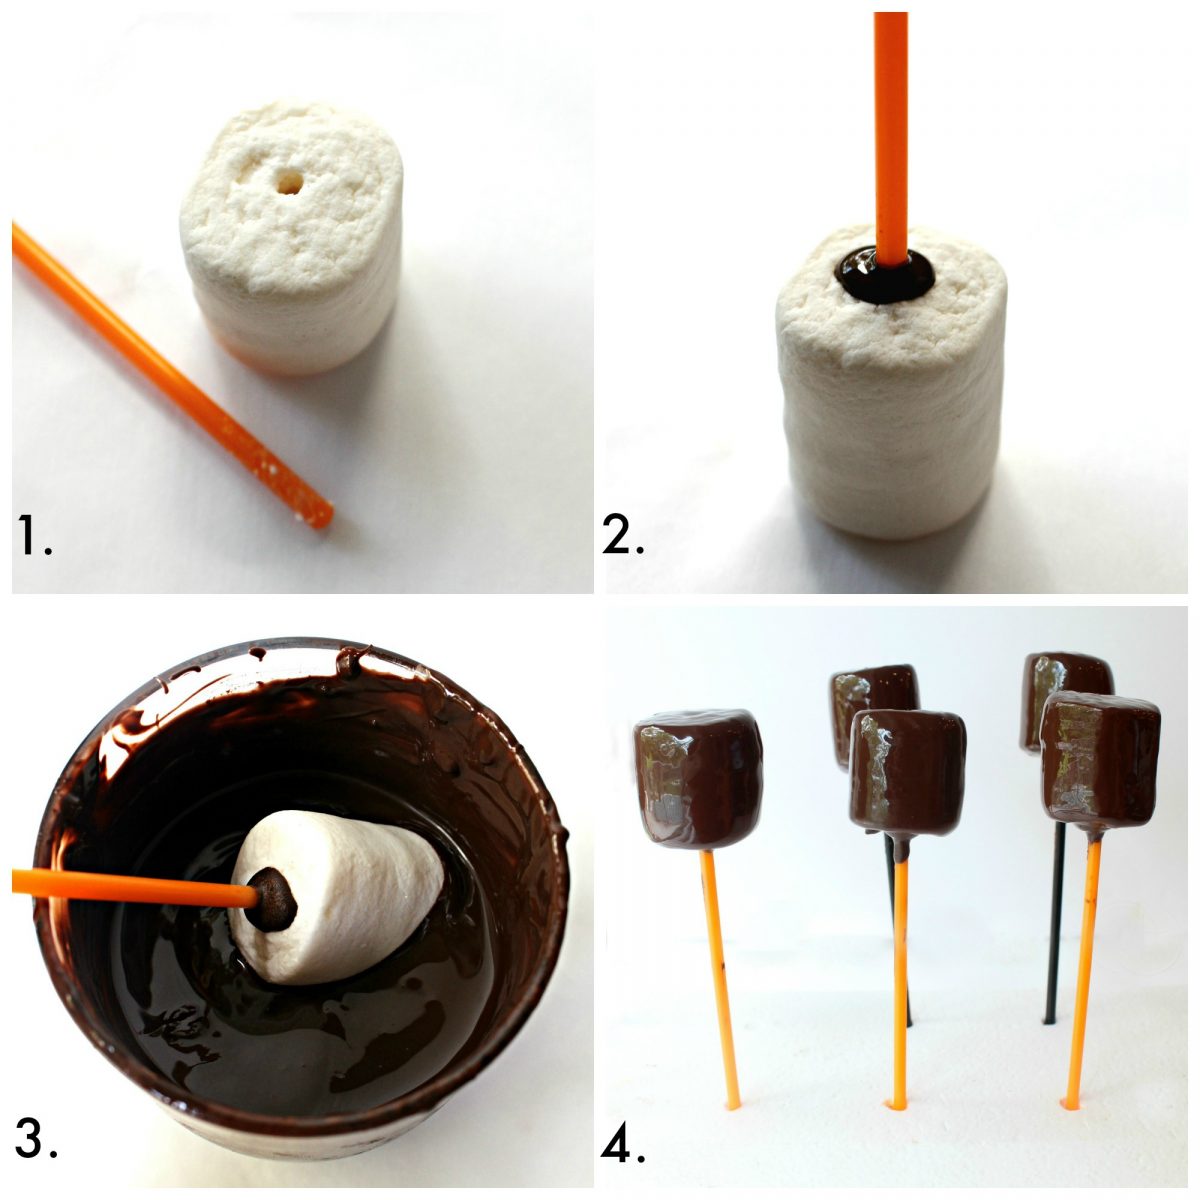
- Use the tip of a pop stick to make a hole in the top of a marshmallow.
- Melt a cup of chocolate pieces in a small bowl at 50% microwave power for 1-2 minutes or until completely smooth when stirred. Dip a tip of a pop stick into the melted chocolate, then insert the stick into the hole on the marshmallow. Allow the chocolate to firm at room temperature for 5-10 minutes.
- Dip and twirl the marshmallow in the melted chocolate to coat completely.
- Gently tap off the excess chocolate, to avoid drips, then stand the pop upright in a block of styrofoam. After coating 6 marshmallows, place the styrofoam block in the refrigerator for about 5 minutes or just until the chocolate is firm.

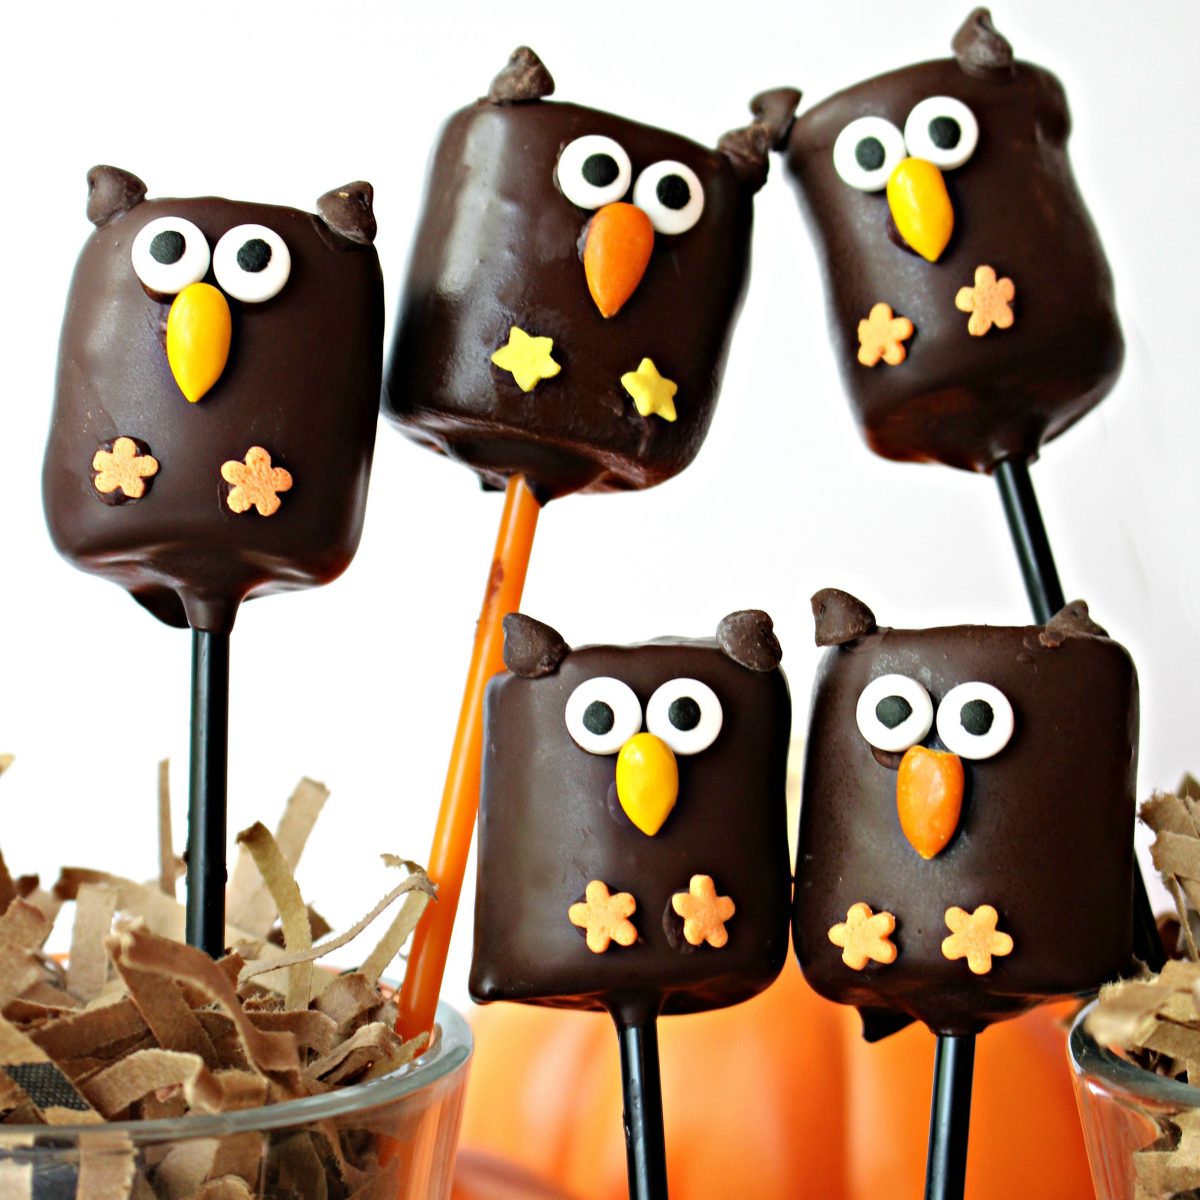
- - 8. Remove from the refrigerator and attach the sprinkles and candy eyes using a little bit of melted chocolate as "glue" applied with the tip of a toothpick. When the melted chocolate "glue" has dried (about 10 minutes), wrap individual pops in cellophane bags and store at room temperature for up to one week.
Tips
- Don't skip the step of "gluing" the pop sticks into the marshmallow with melted chocolate then allowing the chocolate to dry. Without the "glue" marshmallows tend to fall of the stick while being dipped and twirled in the chocolate coating.
- Popsicle sticks can be used instead of lollipop sticks. Follow the same directions for "gluing" on the marshmallow.
- The chocolate used makes a big difference to the flavor and to the look of the pops. I specifically recommend high quality melting chocolate (compound chocolate). Melting chocolate is formulated to melt beautifully, coat easily, require no tempering (yeah!), and are made with real chocolate for real chocolate flavor. In addition, the smooth, surface sheen from melting chocolate stays that way for at least a week. Other chocolate must be tempered in order to avoid the foggy white coating that develops on untempered chocolate.
- If compound melting chocolate is not available, candy melts, candy wafers, or almond bark can be used, but the flavor will differ.
- You may be tempted to add the sprinkle details while the coating is wet. Don't. The sprinkles slip and slide on the wet chocolate leaving bumps and wrinkles on the surface once it dries. For a smooth surface and more control of sprinkle placement, allow the dipped pops to dry completely before attaching the details.
- Seasonal flavored marshmallows (pumpkin, mint) would also be delicious.
- I used Wilton candy eyes which are readily available at Amazon, Target, and Michael's. This is the smaller of the two sizes of Wilton candy eyes.
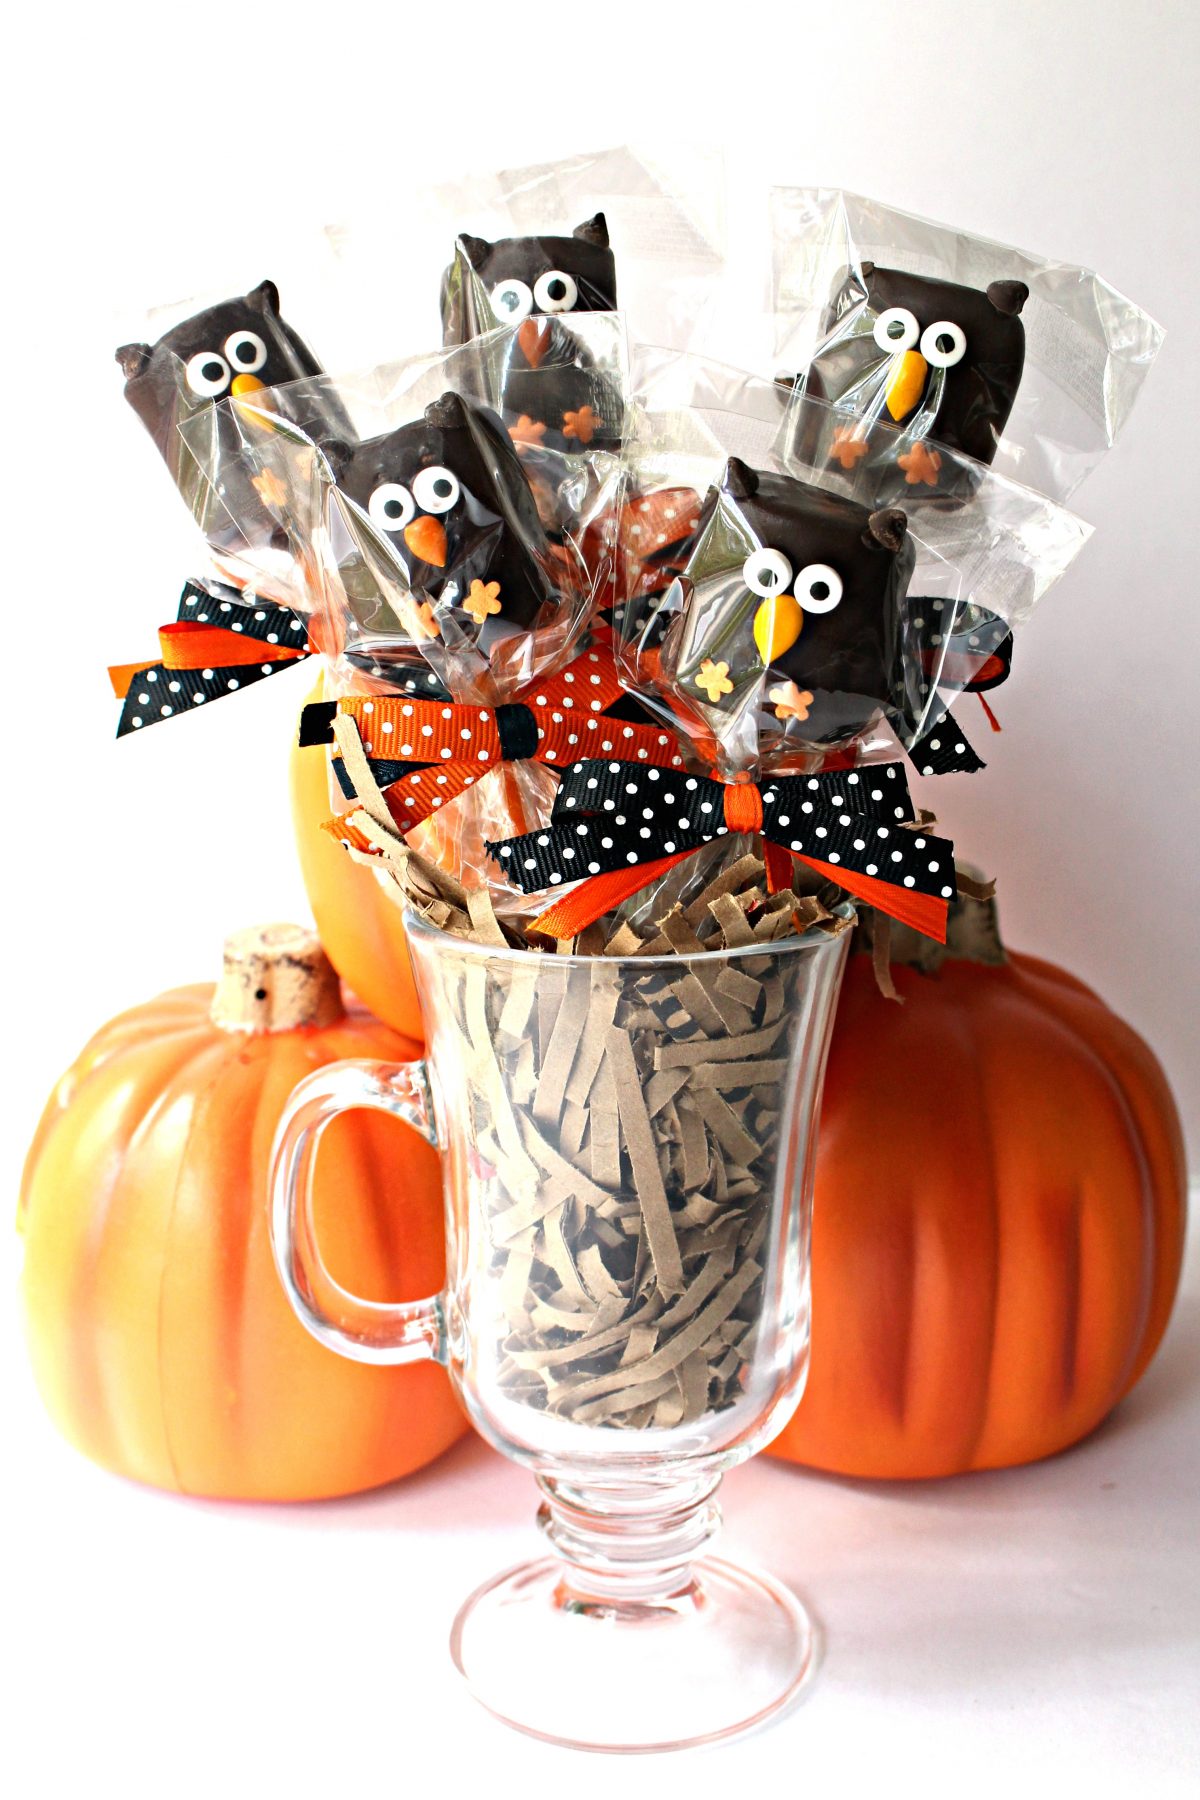
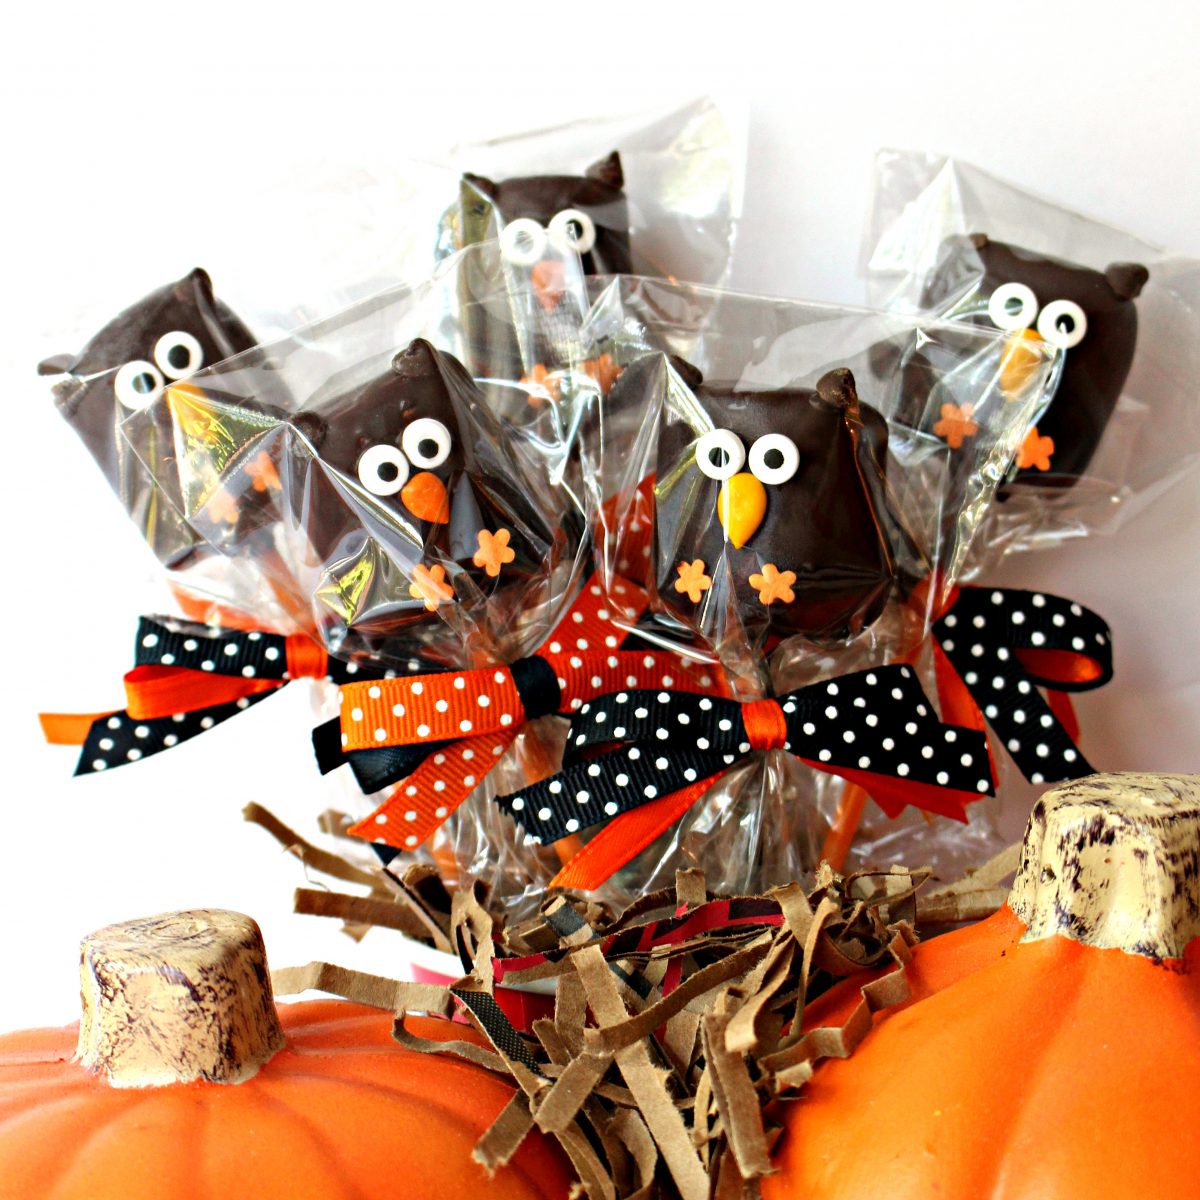
- Brown paper raffia stuffed in a glass or jar makes a perfect holder "nest" for owls on sticks! If you don't have any raffia, putting a brown paper grocery bag through a paper shredder is the perfect way to make your own nesting material!
- Another fun idea for displaying these pops is to fill a glass or jar holder with candy corn, festive sprinkles, or mini marshmallows before inserting the owl pops.
More favorite Halloween recipes
With a quick dip in chocolate and a few sprinkles, you can turn ordinary pretzels into adorable Halloween Pretzels characters. A quick and easy Halloween party snack.
Would you like to save this?
Why settle for plain, ordinary buckeye peanut butter balls when you can make someone smile with Peanut Butter Ball Pumpkins and Cats! These delicious treats are SO cute!
Halloween Graham Crackers are an easy way to turn packaged grahams into ghosts, mummies, monsters, and black cats. A fun treat that party guests will love.
Make dozens of adorable Halloween cookies in minutes using a cookie press! Cinnamon Spritz Owl Cookies are crunchy, melt-in-your-mouth treats you are sure to love.
My experience with this recipe
Owls are a popular theme, not just for Halloween, but all year.
Though not warm, fuzzy creatures in real life (more like vicious rodent hunting machines), their big, blinking eyes and chubby, round bodies make them particularly appealing as an animated character.
Until recently, I had no idea that owls are a craze. Last year, I wrote a tutorial post showing how to easily create chocolate covered Halloween Pretzels.
The pin from that post, showing an owl, pumpkin, and ghost, became wildly popular and was shared a few weeks ago by some big online magazines. I am delighted, but was surprised.
All of the Halloween pretzels are cute and easy to make, but it's the owls that caught everyone's attention. He's cute. He's trendy. He's chocolate. He's easy to make. What's not to love?!
Obviously, I needed to show my appreciation to the owl enthusiasts of the world with another fun food idea this Halloween season. If owls are one of your favorite things, Owl Marshmallow Pops continue the tradition of cute and tasty plus fun and easy to create.
Ready to bake? Join the free membership group to get new recipes and a newsletter delivered to your inbox! You can also stay in touch on Facebook, Pinterest, and Instagram. I'd love to stay in touch!
Halloween Marshmallow Owls
Equipment
- plastic lollipop sticks
- 2-3 styrofoam blocks or lollipop stands
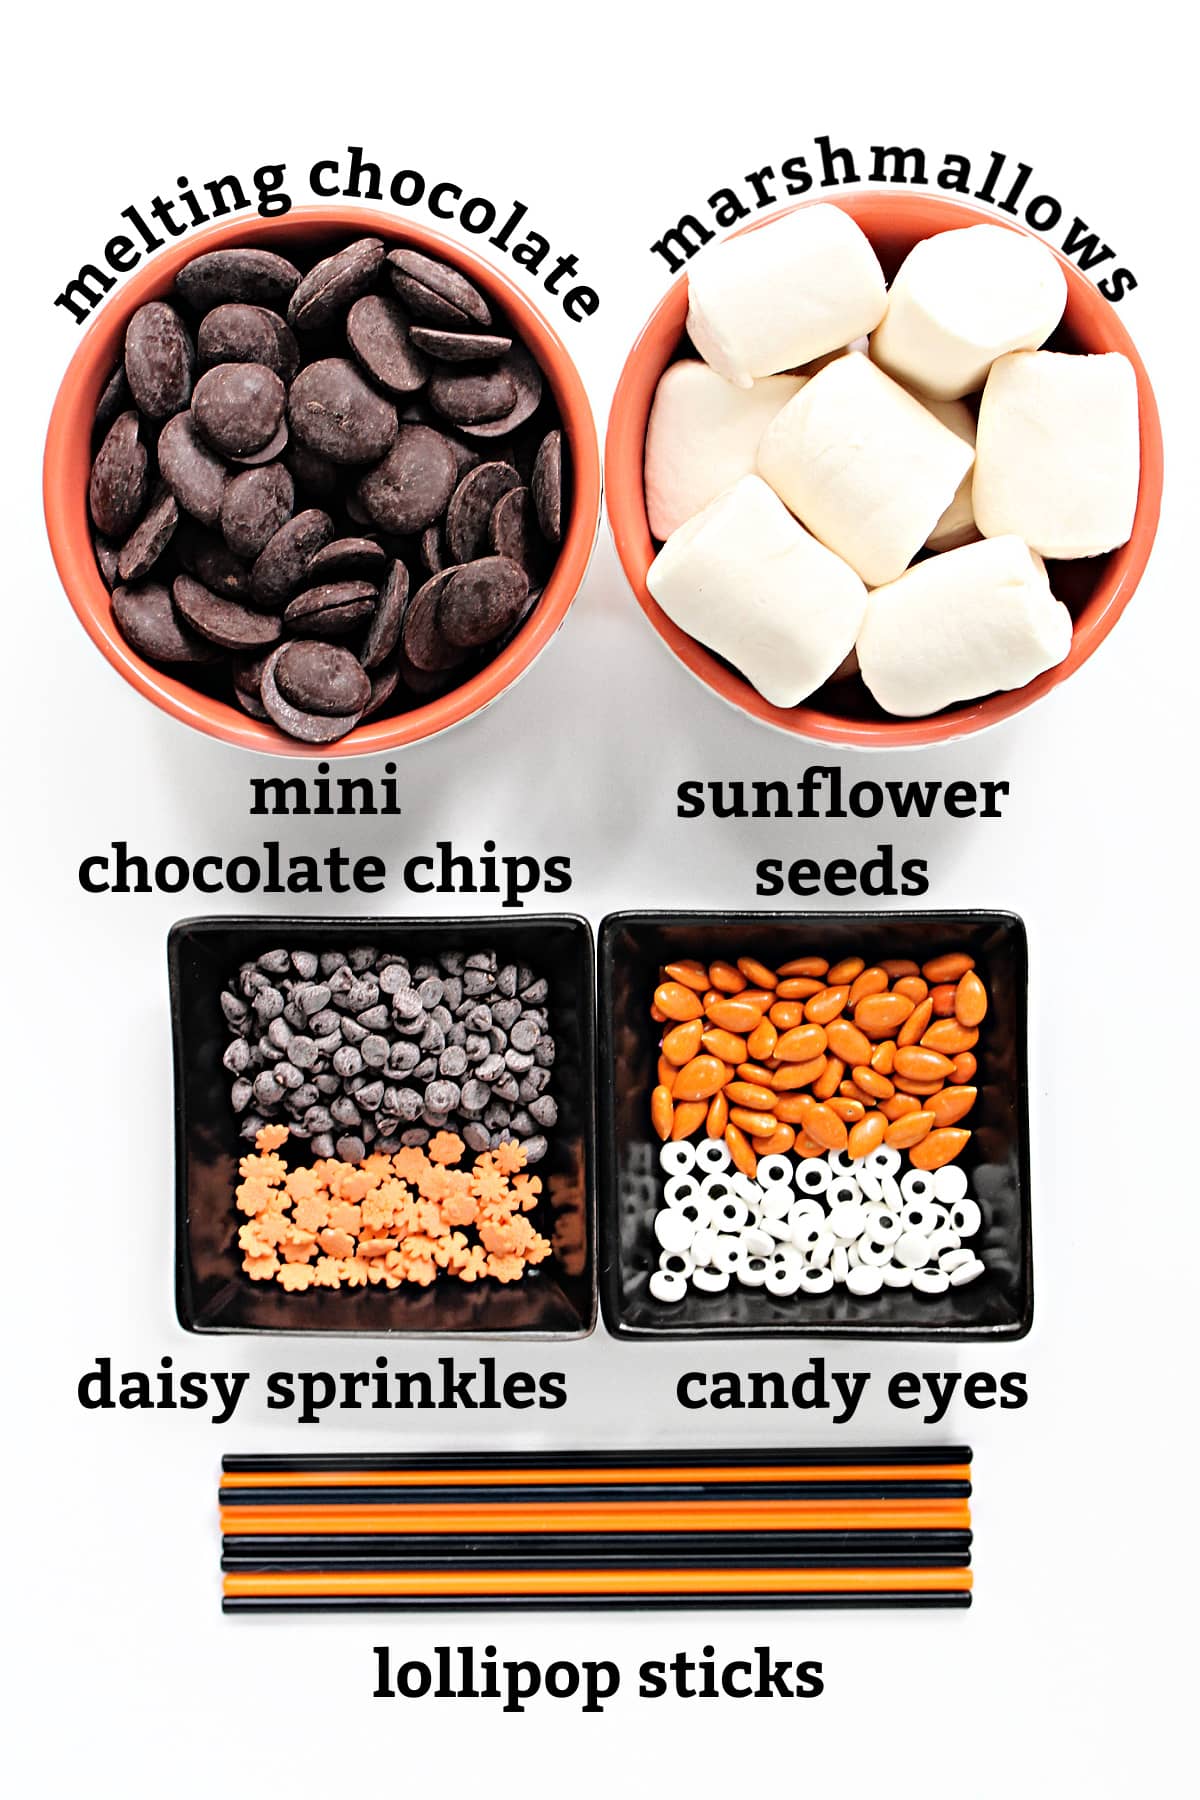
Ingredients
- 1 bag marshmallows
- 1 cup melting chocolate milk chocolate or dark chocolate
- 40 small candy eyes
- 20 yellow or orange candy coated sunflower seeds beaks
- 40 mini chocolate chips ears
- 40 orange daisy sprinkles feet
Instructions
- Melt a cup of chocolate pieces in a small bowl at 50% microwave power for 1-2 minutes or until completely smooth when stirred.
- Use the tip of a pop stick to make a hole in the top of a marshmallow.
- Dip that tip into the melted chocolate, then reinsert the stick into the hole on the marshmallow.
- Allow the chocolate to firm at room temperature for 5-10 minutes.
- Dip and twirl the marshmallow in the melted chocolate to coat completely.
- Gently tap off the excess chocolate, to avoid drips, then stand the pop upright in a block of styrofoam.
- After coating 6 marshmallows, place the styrofoam block in the refrigerator for about 5 minutes or just until the chocolate is firm.
- Remove from the refrigerator and attach the sprinkles and candy eyes using melted chocolate as "glue" applied with the tip of a toothpick.
- When the melted chocolate "glue" has dried (about 10 minutes), wrap individual pops in cellophane bags and store at room temperature for up to one week.
Notes
- Don't skip the step of "gluing" the pop sticks into the marshmallow with melted chocolate then allowing the chocolate to dry. Without the "glue" marshmallows tend to fall of the stick while being dipped and twirled in the chocolate coating.
- The chocolate used makes a big difference to the flavor and to the look of the pops. I specifically recommend high quality melting chocolate (compound chocolate). Melting chocolate is formulated to melt beautifully, coat easily, require no tempering (yeah!), and are made with real chocolate for real chocolate flavor. In addition, the smooth, surface sheen from melting chocolate stays that way for at least a week. Other chocolate must be tempered in order to avoid the foggy white coating that develops on untempered chocolate.
- You may be tempted to add the sprinkle details while the coating is wet. Don't. The sprinkles slip and slide on the wet chocolate leaving bumps and wrinkles on the surface once it dries. For a smooth surface and more control of sprinkle placement, allow the dipped pops to dry completely before attaching the details.
- Seasonal flavored marshmallows (pumpkin, mint) would also be delicious.
- I used Wilton candy eyes which are readily available at Amazon, Target, and Michael's. This is the smaller of the two sizes of Wilton candy eyes.
- Brown paper raffia stuffed in a glass or jar makes a perfect holder "nest" for owls on sticks! If you don't have any raffia, put a brown paper grocery bag through a paper shredder to make your own nesting material!
- Carefully pack wrapped Owl Marshmallow Pops in layers in a plastic storage container. Be sure there is no room for the pops to move when the lid is on.
- Use crinkled tissue paper to fill any empty space between the pops and the lid. Pack the storage container, inside a well-padded shipping box.
Nutrition
First Published: October 11, 2018. Last Updated: October 10, 2021. Updated for additional information, improved photographs, and better reader experience.
Wendy
I was looking for something different for this year and THIS IS IT! Hysterically funny little guys. They are fast, easy and so eye catching! I love the tip about dipping the stick into chocolate first! Great idea!
Wendy Sondov
I am so glad you like these little guys! It is an added bonus, that they can be made gluten free and vegetarian too! I am a firm believer that cute food tastes better 😉 Happy Halloween!
Karren Haller
Your marshmallow pops look so fun for kids, I would imagine they could help in making them.
Not sure if you know but they are being featured this week on Friday Features party.
Pinned to save and will be shared on Instagram.
Hope you have a great weekend!
Catherine Baez Sholl
These are so freaking cute! I think they're very creative and cute for an animal or owl themed party and for Halloween too. Pinned.
Jodie Fitz
We got a late start this week! But you were featured at this week's RTT party. We hope you come join us at this week's party
Love these!!!
The Monday Box
Thank you, Jodie for featuring these Owl Marshmallow Pops! I will definitely come by this week's RTT party for ideas and inspiration!
Helen at the Lazy Gastronome
I'm not a marshmallow fan but these are too cute!! Thanks for sharing at the What's for Dinner party - can't wait to see what you'll bring next week. Have a fabulous week ahead.
The Monday Box
Sorry you don't like marshmallows! I love marshmallows, but haven't eaten them much since becoming a vegetarian. Then I found these Dandies vegan marshmallows and I love them. It was fun making cute treats that everyone (who liked marshmallows) could eat! 😉
Tracy Albiero
This is super cute!!!!! #happinessishomemade
The Monday Box
Thank you, Tracy! Funny how a few sprinkles can make turn a marshmallow into an owl with real personality! 🙂
Amy
Your owls turned out so cute. They look like a fabulous Halloween treat. Found you at Best of the Weekend.
The Monday Box
Thank you, Amy! I am so glad you found The Monday Box! Please sign up for updates and come back often. 🙂
saltandserenity
You have broken the cuteness meter with these. They just make me smile so much. The step by step process photos are fantastic. Love the idea of using shredded raffia as a nest for them. They would also look so cute standing up in a jar filled with candy corn!!
The Monday Box
Thank you, Cindy! You know I am a huge fan of cute. Cute and easy is the best! I agree that these guys would look great in a jar of candy corn!! I thought of that first. I was on the verge of running out to buy some when I thought of shredding the paper bag! 🙂 Brilliant minds 🙂
Carlee
These are super cute and I love how easy they are! They'd be cute for baby showers too!
The Monday Box
Thanks, Carlee! Owls are very popular for all kinds of occasions and these really are both cute and easy!