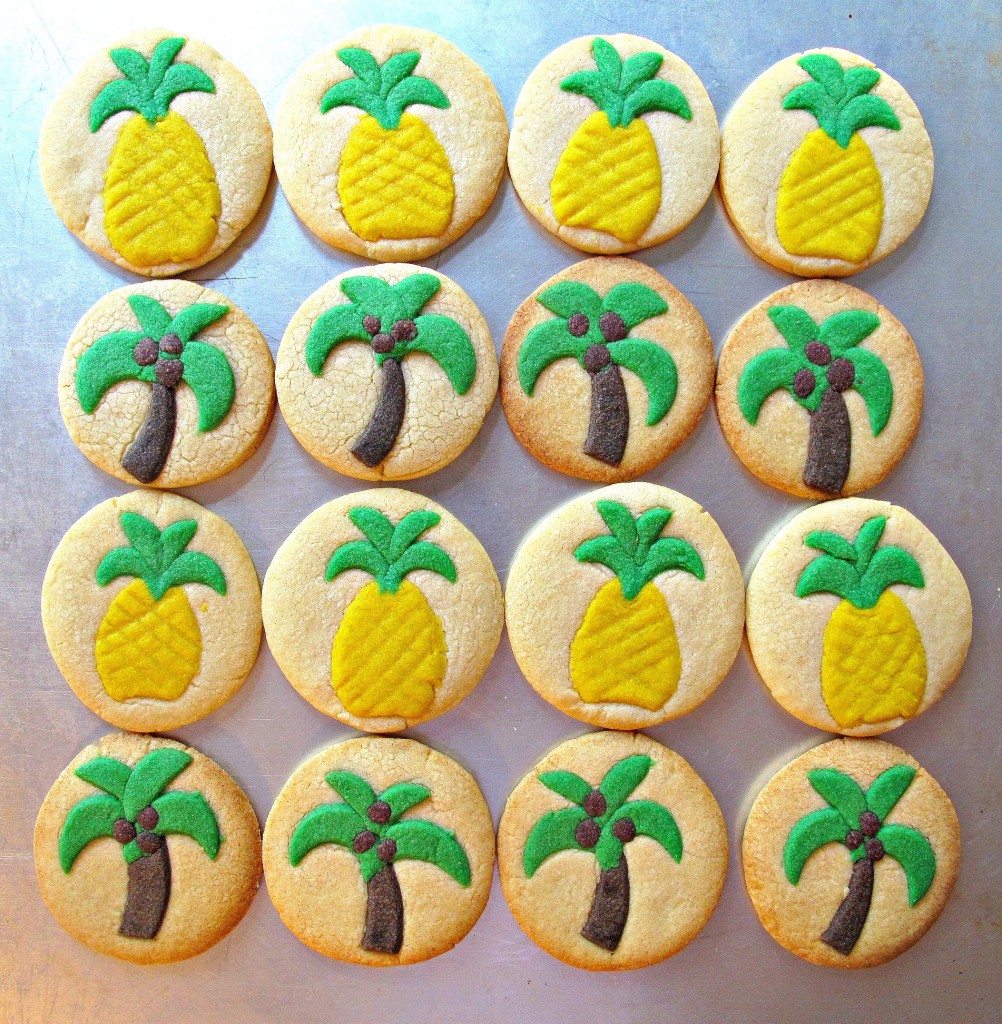
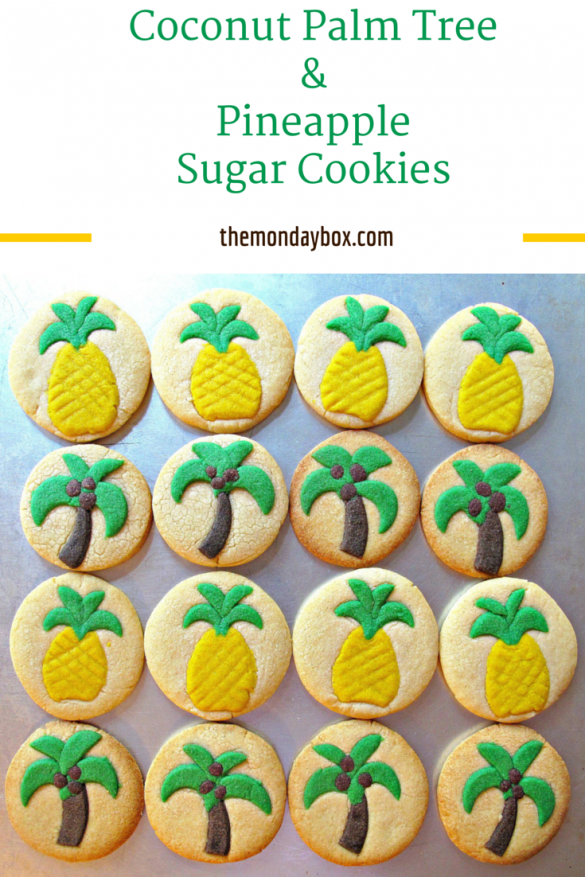
Adult coloring books are very popular. Many people find that revisiting the childhood joy that comes from a box of crayons and a coloring book, promotes peace and tranquility in their lives. I am starting a new trend along the same lines; edible playdoh for adults. You read it here first, #adultplaydoh! Palm Tree and Pineapple Sugar Cookies are created with thin cut-outs of colorful dough pressed onto vanilla sugar cookies, just like playing with playdoh.
As I smushed, rolled, and cut out the little colored dough shapes, I was reminded of the countless hours I had spent as a child making playdoh creations with my paternal grandmother. We lived fairly close to my grandparents until I was 12. That is old enough to have many special memories of the time my grandmother and I spent together.
Our two favorite activities were playing with Betsy McCall (a paper doll who appeared with a new wardrobe each month on the pages of McCall's women's magazine) and turning playdoh into dozens of miniature fruit baskets.
Years of rolling itsy bitsy apples and oranges made me a playdoh pro. Rolling the itsy bitsy coconuts for these cookies made me smile, promoting the promised peace and tranquility. I highly recommend the experience.
I made these Palm Tree and Pineapple Sugar Cookies for a luau themed military care package. Usually, I go to the Dollar Store to stock up on goodies with a theme in mind.
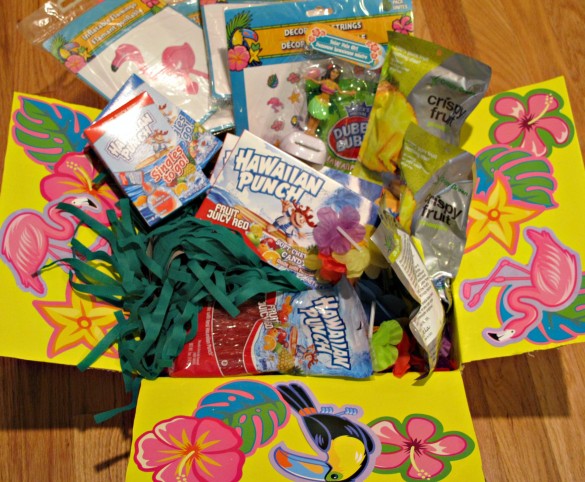
This time the theme picked me. I was gathering items in red, white, and blue when a noticed an aisle overflowing with luau décor. The theme package fully came together when I discovered Hawaiian Punch flavored everything; from drink mix to bubblegum!
Part 1 Care Package Contents: I bought two packages of tropical cardboard decorations. One package went in the box to decorate the barracks. The other cutouts were glued onto the box flaps which I had lined with yellow wrapping paper. Super easy, bright and cheery!
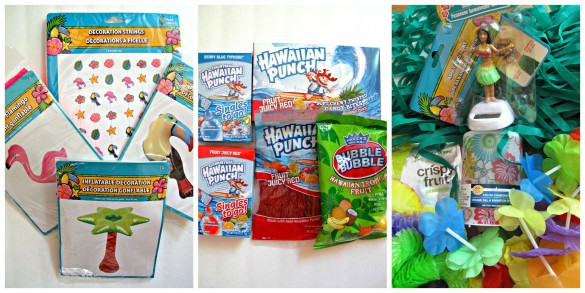
Soldier B. is getting an inflatable flamingo, cockatoo, and palm tree, and cardboard luau shapes. Just for laughs, I added a hula skirt and a solar powered hula dancer! Several bunches of plastic flower leis worked great as stuffing to keep anything in the box from moving around.
Part 2 Circle Sugar Cookies: August heat in Afghanistan requires desert-safe care packages. I used a desert-safe cookie dough using Crisco shortening (though edible playdough would work with any roll-out sugar cookie recipe). Then I decorated the cookies in keeping with my "summer heat shipping challenge" (no icing allowed), by adding pineapples and coconut palm trees with colored cookie dough.
I used one batch of dough to create 14 cookies of each design (28 total). My sugar cookies are flavored with vanilla and I added a tiny bit of other flavors to the colored dough. These cookies are a blank slate for your creativity. Mix and match flavors depending on your design. The ¼ cup of yellow dough is made with 1-2 drops of yellow food coloring gel and 1-2 drops of pineapple flavor. The ¼ cup of brown dough is made with 1 teaspoon of cocoa and 1-2 drops of coconut flavor. The ½ cup of green dough uses 3 drops of food coloring gel.
Would you like to save this?
Roll out each piece of colored dough to about ⅛", between two sheets of parchment. Freeze the dough on a flat surface, such as a cookie sheet, for about 15 minutes or until firm. While the colored dough is firming, the plain dough can be rolled out, cut into circles, and placed at least 1" apart on a parchment lined baking sheet.
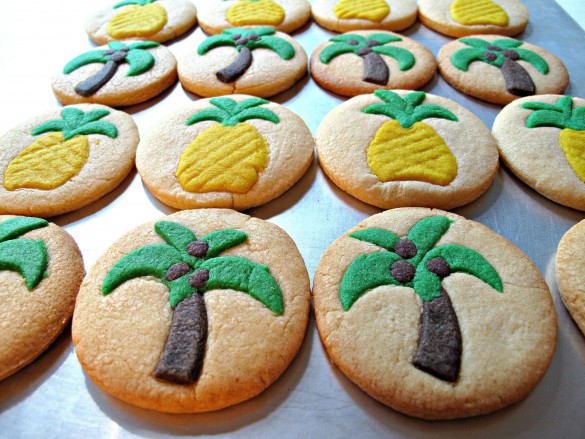
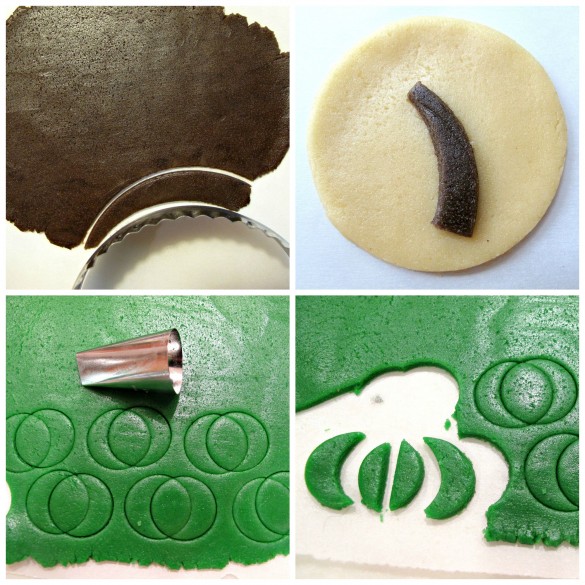
If you aren't already feeling transported back in time to childhood activities, now is when the therapeutic peace and tranquility should surely set in. The palm tree trunks are cut out of the firmed brown dough using a curved edge and trimmed to size with a knife. This can be done free hand, but I used the edge of a circle cookie cutter.
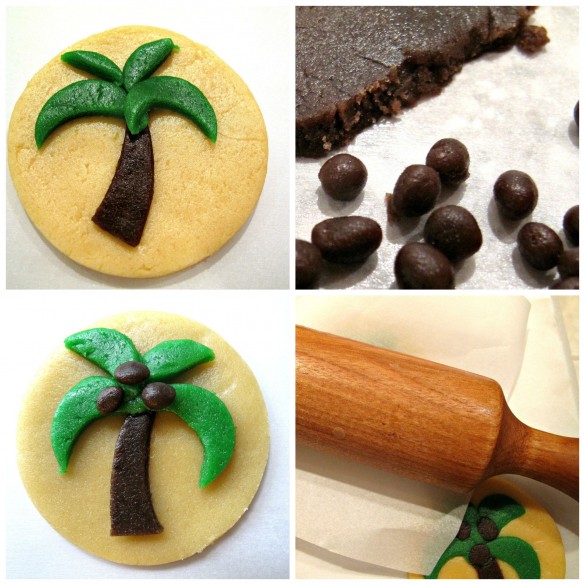
The palm fronds are pieces of two overlapping circles. I used a large piping tip to cut out the circles, then cut the center piece in half with a knife. Tiny balls of brown dough are used for the itsy bitsy coconuts.
Place the colored pieces onto a circle cookie. Cover the cookie with a piece of parchment paper and very gently use a rolling pin to press the design onto the cookie. The edges of the cookie usually crack slightly at this point. No worries. Just press the edges back together before baking.
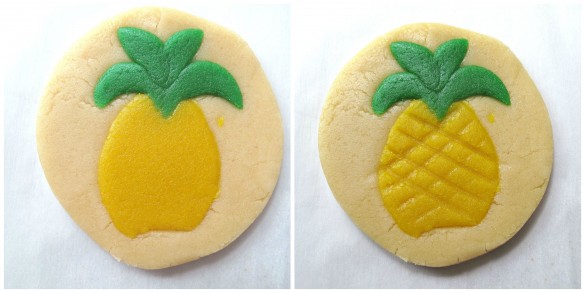
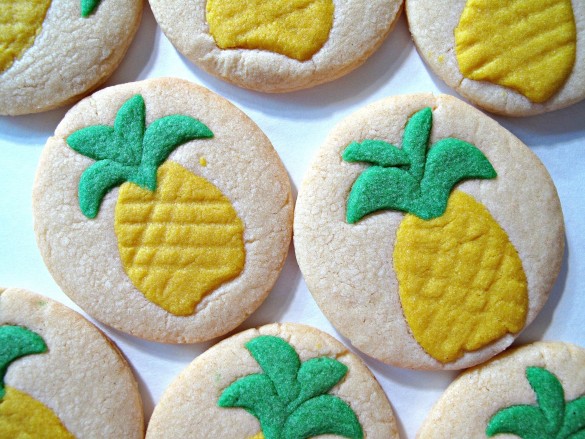
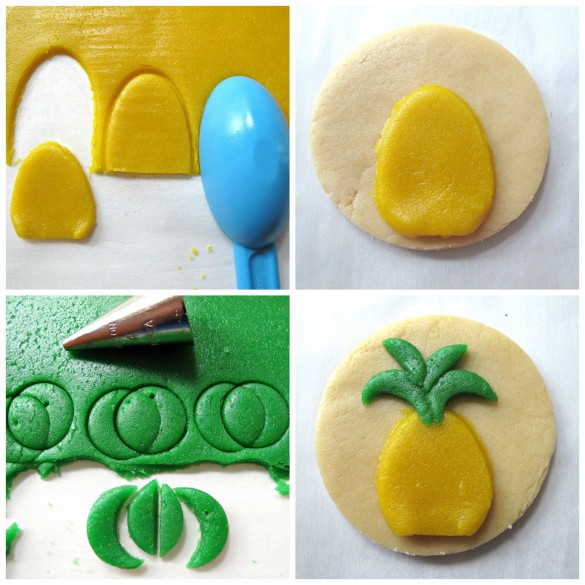
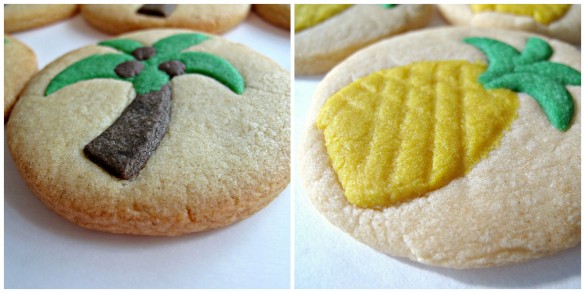
Assemble the design on the circle cookies, cover with parchment paper, and very lightly press in the design with a rolling pin. Gently pull the prongs of a fork diagonally across the yellow shape to resemble a pineapple.
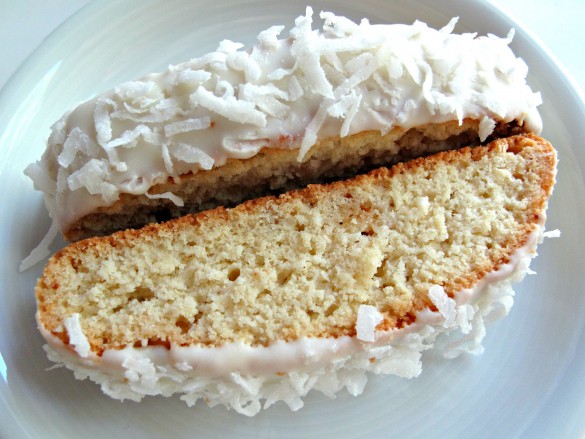
I had so much fun making these "playdoh" Palm Tree and Pineapple Sugar Cookies, that I can't wait to make more in designs to fit every occasion! They look good, taste great, and who can't use a little extra Zen therapy in their lives. #adultplaydoh is the way to go.
You can read more about desert safe ingredients and find an index of all of the desert safe recipes on The Monday Box by clicking here.
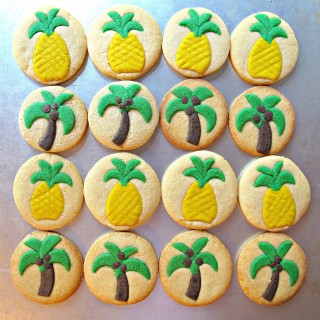
Palm Tree and Pineapple Sugar Cookies
Ingredients
- 1 cup butter flavor vegetable shortening Crisco
- 1 cup granulated sugar
- 1 large egg room temperature
- 2 tablespoons milk
- 1 tablespoon vanilla extract
- 3 cups all-purpose flour
- 1½ teaspoons baking powder
- ¼ teaspoon salt
- Food Coloring: green yellow
- 1 teaspoon cocoa powder
- Coconut and Pineapple flavoring optional
Instructions
- In the bowl of an electric mixer, beat together shortening and sugar until light and fluffy (about 3 minutes)
- Thoroughly mix in egg, milk and vanilla.
- In a medium bowl, whisk together flour, baking powder, and salt.
- Gradually add the flour mixture to the shortening mixture until combined.
- For making the colored doughs, remove 2 portions of dough, ¼ cup each and one ½ cup portion of dough.
- Refrigerate remaining dough for about an hour for easier handling.
- WHEN READY TO BAKE: Preheat oven to 350° F. Line a baking sheet with parchment paper.
- Roll out uncolored dough to ¼" between two sheets of parchment, cut into circles and place on prepared cookie sheet, at least 1" apart.
- FOR COCONUT PALM TREE COOKIES: In a small bowl combine ¼ cup of dough with 1 teaspoon of coco and 1-2 drops of coconut flavoring (optional).Mix with hands or a spoon until evenly colored. In another small bowl combine ½ cup of dough with 2-3 drops of green food coloring gel. Mix with hands or a spoon until evenly colored. Roll out each colored dough to ⅛", between two sheets of parchment paper, . Freeze on a flat surface for about 15 minutes or until firm. Use the edge of a large round cookie cutter (or a knife) to cut tree trunks from the brown dough. Place on cut out circle cookies. Use a large piping tip to cut overlapping circles from the green dough. Use a small knife to cut the oval at the center of the circles in half vertically. Add the green palm fronds to the tops of the tree trunks. Roll three tiny balls of brown dough for each tree and place them on top of the green palms. Place a small square of parchment on top of a cookie and use a rolling pin to very gently press the colored dough into the cookie. Repeat for all of the cookies. If the circle dough cracks on the edges, just press back together before baking.
- FOR PINEAPPLE COOKIES: In a small bowl combine ¼ cup of dough with 2 drops of yellow food coloring gel and 1-2 drops of pineapple flavor. Mix with hands or a spoon until evenly colored. Between two sheets of parchment paper, Roll out to ⅛". Freeze on a flat surface for about 15 minutes or until firm. When the colored dough is firm, use an elongated measuring spoon (or a knife) to cut 14 half ovals from the yellow dough. Press in the bottom corners to resemble the bottom of a pineapple. Place pineapples on circle cookies. Use a piping tip to cut overlapping circles from the green dough. Use a small knife to cut the oval at the center of the circles in half vertically. Add the green leaves to the tops of the pineapples. Place a small square of parchment on top of a cookie and use a rolling pin to very gently press the colored dough into the cookie. Repeat for all of the cookies. If the circle dough cracks on the edges, just press back together before baking. Lightly run the prongs of a fork diagonally across the surface of the pineapples to create texture.
- Bake for 8-10 minutes. Cookies are done when bottom edges are just turning golden.
- Cool for 5 minutes on the baking sheet before transferring to a wire cooling rack.
- Store in an airtight container at room temperature for up to 10 days.


Carlee
These cookies are so cute! What a great care package addition!
The Monday Box
Thanks, Carlee! It was a lot like playing with play doh! But the cookies taste a lot better than play doh. 🙂
Monica
Such a great job on these cookies, Wendy. The color is so bright and I love how it just pops right out at you. Amazing! Hope you've had a great summer. It's been long but as usual, it flies right by!
The Monday Box
Thanks, Monica! I had a lot of fun with this technique and was so pleased with how they turned out. August was crazy busy. I have been away from home most of the month and had to step away from the blog until I had time to breathe! I hope your family enjoyed the summer. Wishing your son a great 4th grade year!
Holly
Wow, these are truly amazing!!! I am already thinking of fun ideas to try with this method!!
The Monday Box
Thank you, Holly! I agree that this method could be used for so many designs! I am thinking of maybe pumpkins and turkeys next.:) I hope you will let me know how it goes if you make some cookies with this technique!
saltandserenity
Wendy, these are so much fun! They just make me smile.
This whole post made me feel so nostalgic. I loved colouring books and paper dolls too!
I must confess, sometimes my sisters and I would eat play-doh. This is a way more delicious option.
Can't wait to see what you come up with next.
The Monday Box
Thanks, Cindy! Should I not know that play-doh is sort of salty? 🙂 I think the squishy texture of play-doh makes it irresistible for nibbling. I always wished it tasted more like cookie dough!
Lokness @ The Missing Lokness
These are SUPER ADORABLE! I love that you used different tools to create the shapes of the trees and pineapples. Very creative and good tips! I am sure these cookies and care packages will make our military very happy. You are the sweetest, Wendy!
The Monday Box
Thank you, Lokness! I rolled and cut out this dough just the way I played with playdoh as a kid. One of my favorite things to do was pressing different objects into the dough to make shapes and textures. I did the same thing with this cookie dough. It was a lot of fun! I enjoy putting extra care into the military care package goodies. I hope that the cookies will communicate that care.
Ashley
Adult playdoh! Now I like the sound of that! My sister and I used to play with that stuff all the time with my grandma!
These cookies came out so pretty - I love how they look! And a luau theme is so fun!
The Monday Box
Thanks, Ashley! These "playdoh" cookies are so much fun! Any design is possible and you are sure to think of the good times you had with your grandma while making them. 🙂
Liz
Wendy! These look so amazing. Because of this post, I am now rethinking my Christmas cookie list. How fun would this be to make with my boys?! Great job as usual.
I hope you are having a wonderful summer!
The Monday Box
Thanks, Liz! I was thinking Christmas cookies while making these. I haven't tried it yet, but I wonder if you could brush shimmer dust on top of the cookie after baking for a more polished "holiday" look? I think the boys would have a great time playing with the dough, then eating it!
Ilana
Those cookies look great and they look fun to make. Now I want to have a luau!
The Monday Box
Thanks, Illana! I felt the same way! I even thought I should have had a tropical drink to sip while baking these. 🙂
Chris Scheuer
These are gorgeous Wendy, what a great idea and so adaptable to seasons, themes, etc!
The Monday Box
Thanks, Chris! I am glad to have stumbled on to this decorating method. I agree, they are very adaptable!
Tricia @ Saving room for dessert
Wendy - I am sitting here with my mouth hanging open. These are some of the most creative cookies - ever! I am so envious of your vision and inspiration. You are a world class cookie artist! Amazing - simply amazing - pinning!
The Monday Box
Thank you so much, Tricia! You are beyond kind! I love the posts that the real cookie artists do where they share incredibly creative ways to use cookie cutters for a variety of final products. I can see it when they point it out but I am in awe of how they see it in the first place! I honestly don't have that vision, but I do have years of playdoh experience which I put to good use on these very fun cookie! 🙂 Thanks for pinning!