Easily make homemade chocolate kisses using your choice of chocolate and a candy mold. Create dozens of bite sized confections in under an hour. Customize your candy kisses with ethically sourced ingredients for any occasion or dietary requirement.
About this recipe
If just the fun of playing with chocolate isn't enough reason to make diy chocolate kisses, I can suggest several more reasons why owning a kisses mold is a good idea.
When you make your own candy, you can purchase Fairtrade, ethically sourced chocolate. Many candy companies, including the world's largest companies, are guilty of sourcing cocoa with links to human rights violations, slavery, and child labor.
You can learn more about this important issue and see a list of slave free companies at slavefreechocolate.org .
Allergies and dietary requirements can be accommodated when you choose the ingredients. Suggested sources for chocolate that is gluten free, dairy free, nut free, vegan, and/or sugar free are listed in the "tips" section at the end of this post.
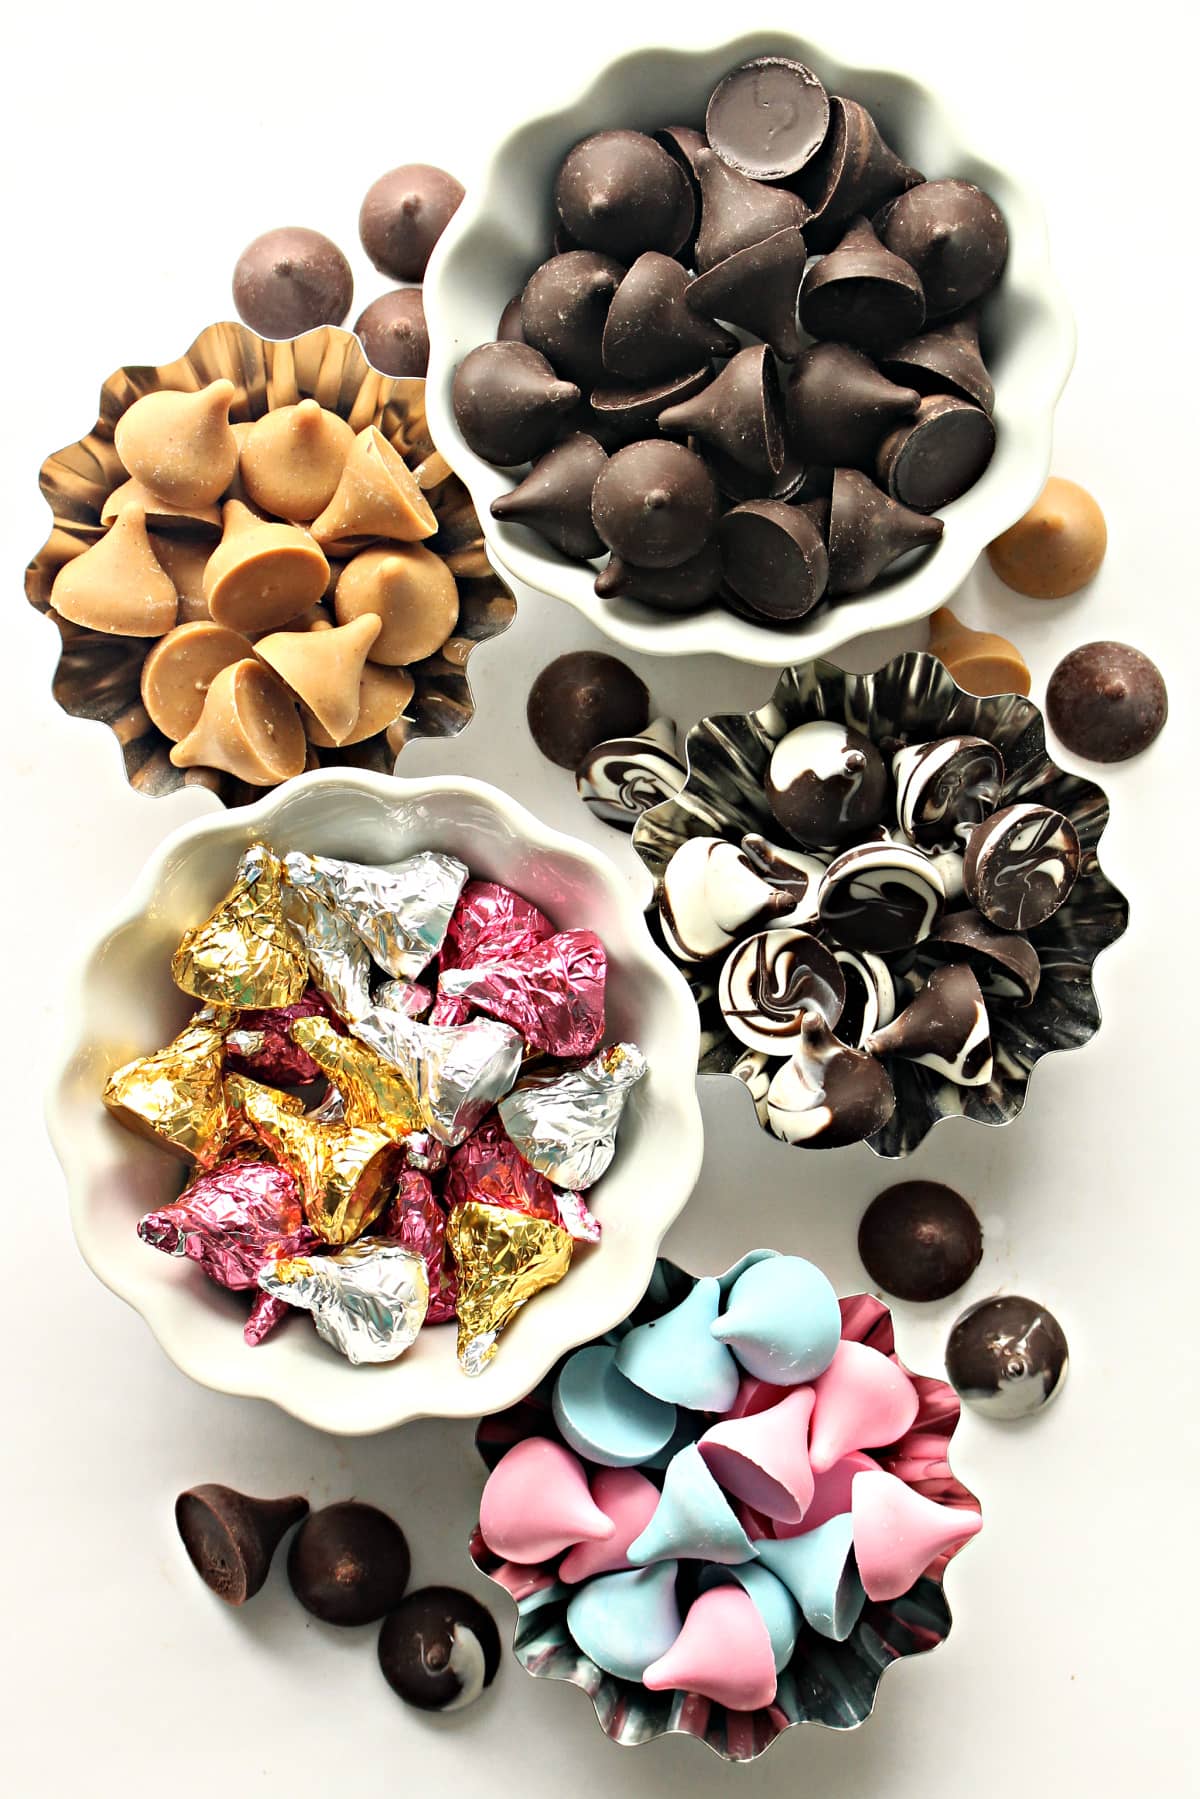
Homemade kisses can be any flavor or color of your choice. Create candy to match your celebration.
Materials needed
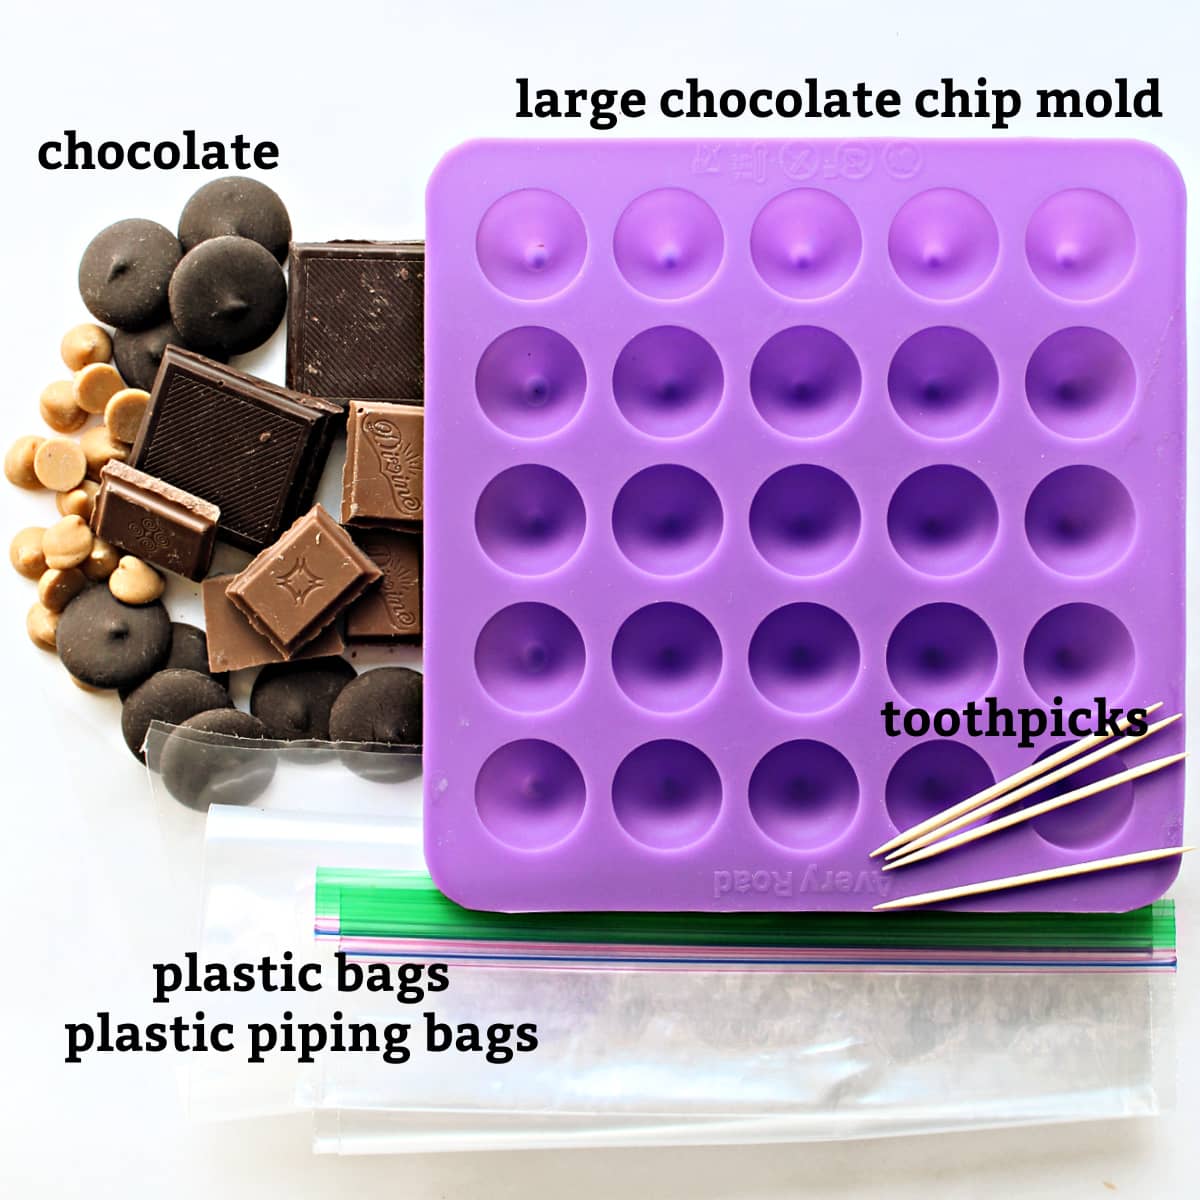
The chocolate kisses mold I used is available online. Molds for this purpose are of called "large chip molds". Unlike small baking chips that can be piped, kisses require a mold to hold their shape.
Directions for solid color kisses
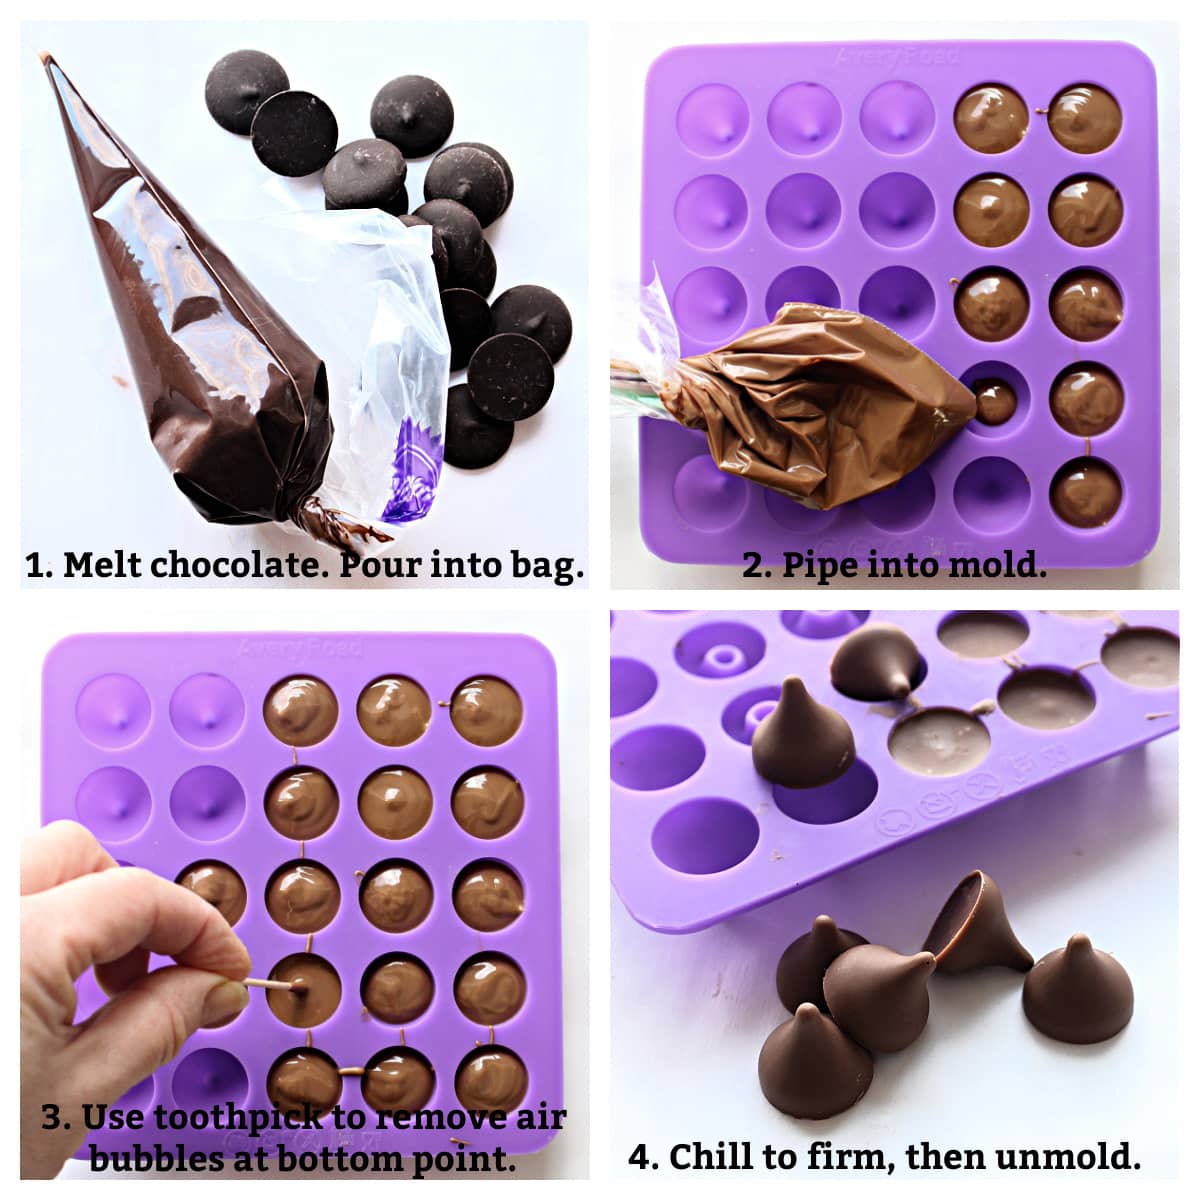
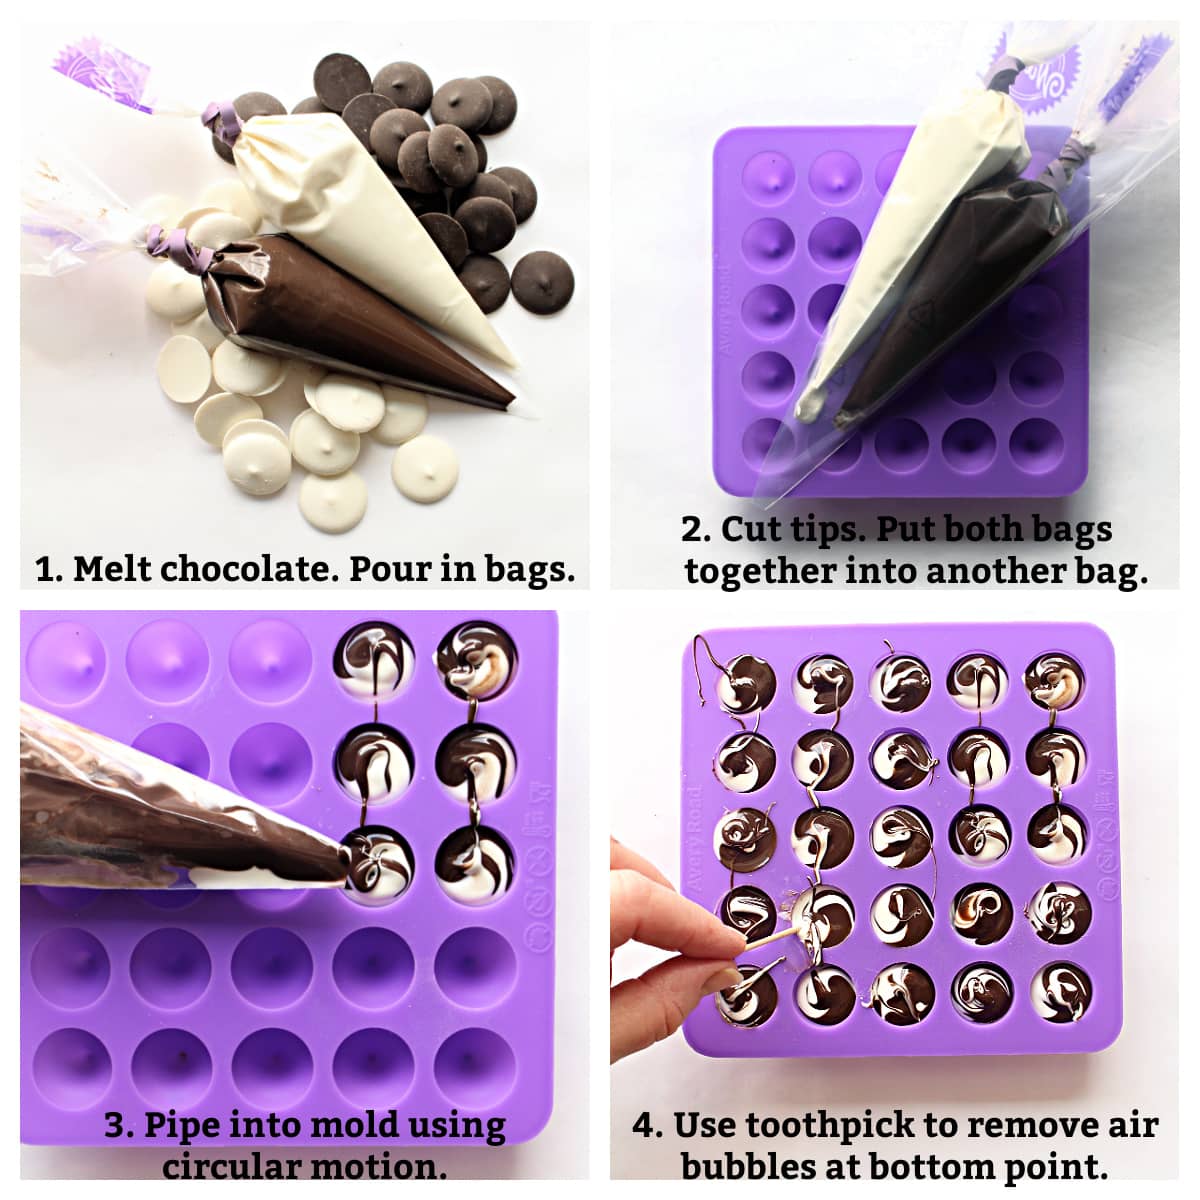
- Melt the chocolate slowly, in a microwave at 50% power or over a double boiler. Transfer to a piping bag or plastic sandwich bag.
- Place the kisses mold on flat moveable surface, such as a baking pan or cutting board. Cut the tip from the bag and pipe the chocolate into the mold.
- Swirl a toothpick in each mold all the way down to the pointed tip to release any air bubbles, then tap the pan holding the mold several times on a countertop to bring any released bubbles to the surface.
- Refrigerate the mold on the pan until completely set. Times vary depending on the chocolate used (10 minutes to 30 minutes). Once firm, gently push the kisses out of the mold.
Directions for swirled kisses
Would you like to save this?
- Separately, melt the dark and the white chocolate, in a microwave at 50% power or over a double boiler. Transfer each to a separate piping bag. Cut a small piece off each tip.
- Place both melted chocolate bags into a piping bag together.
- Place the mold on flat moveable surface, such as a baking pan or cutting board. Fill by holding the piping bag over each cavity and moving the piping bag in a circle, creating a spiral as you squeeze out both chocolates simultaneously.
- Swirl a toothpick in each mold all the way down to the pointed tip to release any air bubbles, then tap the pan holding the mold several times on a countertop to bring any released bubbles to the surface.
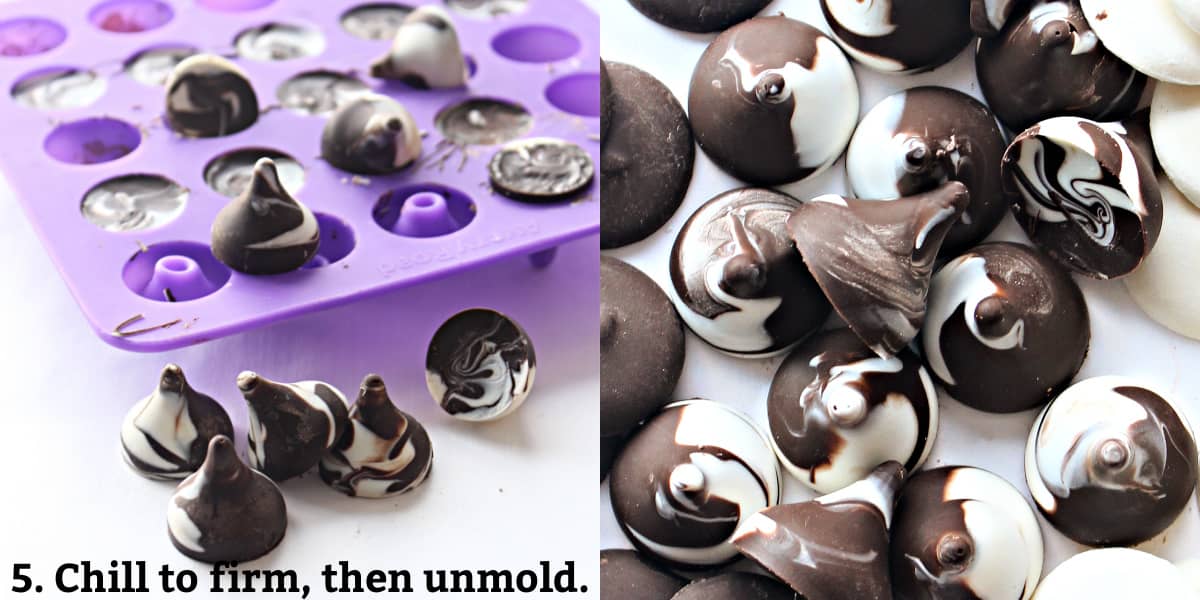
- Refrigerate until completely set. Times vary depending on the chocolate used (10 minutes to 30 minutes). Once firm, gently push the kisses out of the mold.
Tips
- I highly discourage the use of dark, semisweet, or milk chocolate chips for this recipe. Kisses made with dark or milk chocolate chips will quickly develop a white coating called bloom. Only use these chips if you are going to bake or eat the molded candies immediately.
- White chips or flavored chips (butterscotch, mint, cinnamon, peanut butter) work well for molding.
- Baking bars or chocolate bars work well in these molds. Guittard, Whole Foods, and Divine are brands I tested successfully.
- Don't use candy melts if you want your kisses to taste like chocolate. Candy melts are made of flavoring and wax. They usually contain no cocoa or cocoa butter.
- Melting chocolate, like Guittard A'Peels, are the easiest to work with because they have flavor from cocoa, but no cocoa butter that could separate out.
- Each type of chocolate used takes different amounts of time to firm. Watch carefully to determine the correct chilling time for the type of chocolate you are using.
- If the kiss is hard to get out of the mold or if the pointed tip is breaking off, freeze the filled mold for 2-3 minutes.
- Only oil based candy coloring or flavoring should be used. Water based food coloring and flavoring will cause chocolate to seize and become grainy.
- Using oil based candy coloring, color white chocolate to make candies for showers and gender reveals, sports teams, wedding favors, holiday treats.
- Homemade candies allow you to control the ingredients to accommodate dietary requirements for treats that are vegan, dairy free, gluten free, nut free, kosher. Santa Barbara Chocolate is a great source for specialty chocolate.
Frequently asked questions
Compound melting chocolate, like Guittard A'Peels is the easiest to use for or white, dark, semisweet, or milk chocolate kisses with beautiful results.
Chocolate bars or baking bars, and flavored chips (such as butterscotch, peanut butter, mint, or cinnamon) work successfully.
Chocolate chips are not recommended for melting and molding unless they will be eaten immediately.
Use oil based candy flavoring or flavored baking chips.
Use oil based candy coloring or natural food coloring powders.
Recipes with chocolate kisses
Chocolate Chip Brownies are even better when you use kisses instead of chips.
Kiss Cookies are soft, chocolaty and delicious! Each cookie has a surprise kiss tucked inside.
Shortbread Thumbprint Cookies are delicious butter cookies that are the classic kiss thumbprint cookie adaptable for any occasion.
Add dark chocolate or pink kisses to Strawberry Shortbread Cookies for a Valentine's Day treat!
Ready to bake? Join the free membership group to get new recipes and a newsletter delivered to your inbox! You can also stay in touch on Facebook, Pinterest, and Instagram. I'd love to stay in touch!

Chocolate Kisses
As an Amazon Associate I earn from qualifying purchases.
Materials
- ¾ cup chocolate melting chocolate, baking bars, or flavored chips recommended
- 25 3" x 3" foil squares if wrapping individual candies
Instructions
Solid color kisses
- Melt the chocolate slowly, in a microwave at 50% power or over a double boiler. Transfer to a piping bag or plastic sandwich bag.
- Place the kisses mold on flat, moveable surface, such as a baking pan or cutting board.
- Cut the tip from the bag and pipe the chocolate into the mold.
- Swirl a toothpick in each mold cavity all the way down to the pointed tip to release any air bubbles. Then tap the pan holding the mold several times on a countertop to bring any released bubbles to the surface.
- Refrigerate the mold on the pan until the chocolate is completely set. Times vary depending on the chocolate used (10 minutes to 30 minutes).
- Once firm, gently push the kisses out of the mold. If the kisses are difficult to unmold or if the tips are breaking off, freeze the mold for 2-3 minutes before unmolding.
Directions for swirled kisses
- Separately, melt the dark and the white chocolate, in a microwave at 50% power or over a double boiler. Transfer each to a separate piping bag. Cut a small piece off each tip.
- Place both melted chocolate bags into a piping bag together.
- Place the mold on flat, moveable surface, such as a baking pan or cutting board. Fill the mold holding the piping bag over each cavity and move the piping bag in a circle, creating a spiral as you squeeze out both chocolates simultaneously.
- Swirl a toothpick in each mold cavity all the way down to the pointed tip to release any air bubbles, then tap the pan holding the mold several times on a countertop to bring any released bubbles to the surface.
- Refrigerate the mold on the pan until completely set. Times vary depending on the chocolate used (10 minutes to 30 minutes).
- Once firm, gently push the kisses out of the mold. If the kisses are difficult to unmold or if the tips are breaking off, freeze the mold for 2-3 minutes before unmolding.
- Store in an airtight container at room temperature for up to 2 weeks.
Notes
- I highly discourage the use of dark, semisweet, or milk chocolate chips for this recipe. Chocolate kisses made with dark or milk chocolate chips will quickly develop a white coating called bloom. Only use these chips if you are going to bake or eat the molded candies immediately.
- White chocolate chips or flavored chips (butterscotch, mint, cinnamon, peanut butter) work well for molding.
- Baking bars or chocolate bars work well in these molds. Guittard, Whole Foods, and Divine are brands I tested successfully.
- Don't use candy melts if you want your candy to taste like chocolate. Candy melts are made of flavoring and wax. They usually contain no cocoa or cocoa butter.
- Melting chocolate, like Guittard A'Peels, are the easiest to work with because they have chocolate flavor from cocoa but no cocoa butter that could separate out.
- Each type of chocolate used takes different amounts of time to firm in the mold. Watch carefully to determine the correct chilling time for the type of chocolate you are using.
- If the chocolate is hard to get out of the mold or if the pointed tip is breaking off, freeze the filled mold for 2-3 minutes.
- Only oil based candy coloring or flavoring should be used with chocolate. Water based food coloring and flavoring will cause the chocolate to seize and become grainy.
- Using oil based candy coloring, color white chocolate to make candies for showers and gender reveals, sports teams, wedding favors, holiday treats.
- Homemade candies allow you to control the ingredients to accommodate dietary requirements for candies that are vegan, dairy free, gluten free, nut free, kosher. Santa Barbara Chocolate is a great source for specialty chocolate.
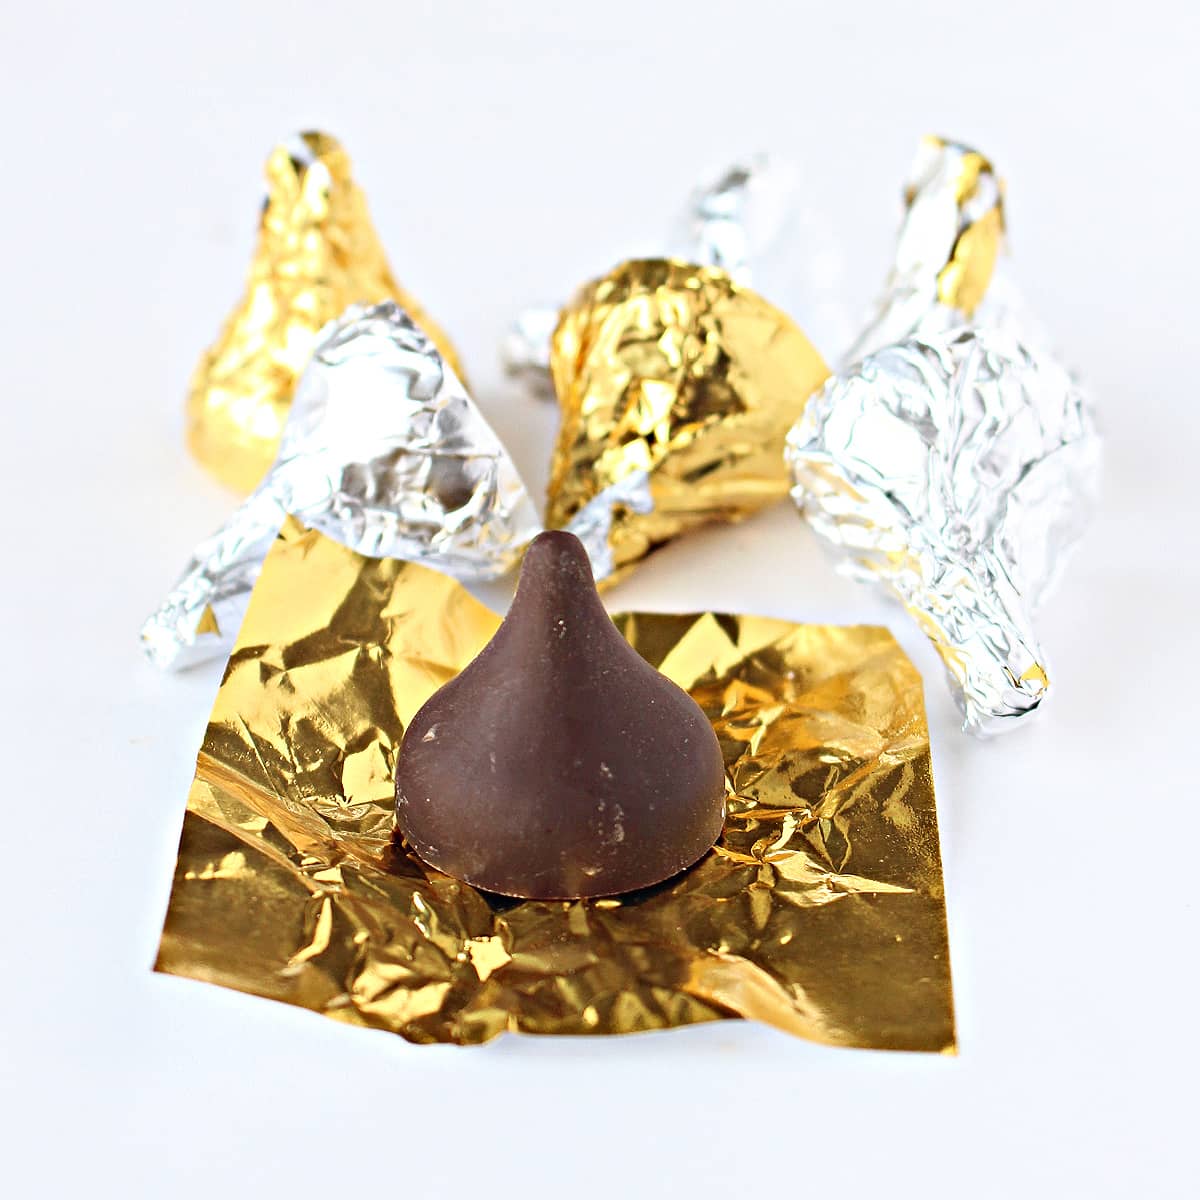
- To foil wrap kisses, place the candy in the middle of a 3" x 3" foil square. One at a time, bring the foil corners up to the point of the kiss. Press the foil against the kiss and twist at the top.
CJ Franklin
Wendy, I always learn so much from each recipe you offer! Your research into ingredients, chemistry, ethical practices and so much more always expands my mind. And it is all so beautiful and delicious. Thank you !!
Wendy Sondov
Thank you, CJ! I really do appreciate your very kind words.
Stephanie
I love this so much! Endless possibilities. Have you attempted filled ones? Your kisses are absolutely beautiful (lol).
Wendy Sondov
Hi, Stephanie. Thank you! I didn't try filling with something hard (peanut, almond, etc.) but I did try painting the mold with white chocolate, letting that firm, then adding dark chocolate inside (so, kind of like a white chocolate kiss filled with dark chocolate). It definitely worked and for someone who enjoys the process it might even be fun. However, it did take a lot more effort than just squeezing in some chocolate, which is why I went with the swirl kisses instead.