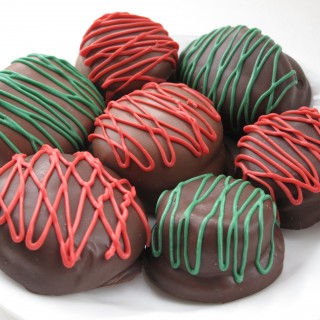
Chocolate Covered Marshmallow Cookies are a chewy cookie with a crunchy graham cracker base topped with a fluffy marshmallow and chocolate coating.
 Cookies- This cookie is the first to be grabbed on holiday platters! A graham cracker base topped with a marshmallow and coated in chocolate. Drizzle with colors to match your holiday! | The Monday Box")
Why you will love this recipe
Chocolate marshmallow cookies have an irresitable flavor and texture combination that makes them the favorite cookies for many people.
People who enjoy packaged marshmallow cookies, Mallomar or Krembo, are going to love this homemade version. Just like s'mores cookies, these cookies have three main components: graham cracker, marshmallow, and chocolate.
Homemade graham cracker circles are topped with a large marshmallow, then coated in melted chocolate which firms to a crisp coating. Add some colorful zigzags or sprinkles for holiday flair.
 Cookies- This cookie is the first to be grabbed on holiday platters! A graham cracker base topped with a marshmallow and coated in chocolate. Drizzle with colors to match your holiday! | The Monday Box")
You can make your own marshmallows to use in these cookies , however, that's a little bit of a project. In order to make this recipe less time consuming (and easily adapted for vegetarian ingredients) this recipe skips homemade marshmallows and uses packaged ones instead.
For best results, chocolate melting discs or compound chocolate, is recommended for coating the cookies. It melts like a dream in the microwave, covers the cookies in a smooth even coating, and quickly sets up shiny and hard after 15 minutes in the fridge.
The next day (and numerous days after that) the cookies still looks as pretty as the day you dipped them. Best of all, combined with the marshmallow and graham cracker, it tastes really good.
These are great cookies for holiday gifts, but be sure to keep some for yourself. Chocolate marshmallow cookies are the perfect cookie to enjoy with a cup of hot chocolate.
 Cookies- This cookie is the first to be grabbed on holiday platters! A graham cracker base topped with a marshmallow and coated in chocolate. Drizzle with colors to match your holiday! | The Monday Box")
Instructions
This is an overview of the instructions. The full instructions are in the recipe card below.
- In a food processor add flours, sugar, salt, baking powder, and baking soda. Pulse to combine. Add butter cubes. Pulse until crumbly mixture forms.
- In a bowl mix milk, honey, and vanilla.
- Add the liquid to the flour mixture in the food processor. Pulse until the dough comes together in a ball. Flatten the dough into a disc, wrap in plastic wrap, and refrigerate until firm. (about 30 minutes) (Can be left overnight)
- Remove the cookie dough from the refrigerator and place between two sheets of parchment. Roll out to ⅛ inch thickness.
- Remove the top sheet of parchment. Use a 1.75" round cookie cutter to cut out rounds of dough and place on a parchment lined baking sheet about 1" apart. (scraps can to reused)
- Bake cookies for 12-15 minutes until golden brown with light brown edges. Remove from oven.
- Place a marshmallow (or a jumbo marshmallow half, cut side down) on top of each cookie. Return to oven for about 2 minutes until marshmallows are soft. Remove from oven and use a spatula to slightly flatten each marshmallow. Transfer cookies to a wire rack to cool completely.
- Melt chocolate discs in a microwave safe, small bowl. Using a fork and large spoon, place a marshmallow cookie in the melted chocolate. Turn to coat. Lift on the fork and let excess chocolate drip off. Place the cookie on the wax paper lined cookie sheet.
- When all of the cookies have been dipped, place the cookie sheets in the refrigerator until the coating is set, about 15 minutes.
- Decorating colors of candy discs can be melted inside of a plastic piping bag or a plastic sandwich bag. Microwave (10-15 second intervals) the a handful of discs until liquid.
- Cut off a tiny opening at the tip of the bag. Zig-zag colored stripes over the tops of the cookies.
- Return the cookie sheets to the refrigerator for another 15 minutes to set the decorating candy coating.
Storage
Store cookies in airtight containers at room temperature for at least 1 week.
Chocolate Covered Marshmallow Cookies are very sturdy cookies. Package them like bonbons, sitting individually on cupcake papers in a tissue paper lined box.
Would you like to save this?
For shipping, encase the box in plastic wrap to help keep the cookies fresh. As always the keys to shipping cookies are to be sure the cookies can't move at all in their container and to pad the container inside the shipping box.
 Cookies- This cookie is the first to be grabbed on holiday platters! A graham cracker base topped with a marshmallow and coated in chocolate. Drizzle with colors to match your holiday! | The Monday Box")
Tips
- Don't use chocolate chips for coating. The chocolate will bloom with white spots (due to fat separating out of the heated chocolate, and will ruin the look of your cookies.
- Vegetarian/vegan marshmallows (Dandies brand) work well with this recipe.
- Changing the color of the decorating candy could make these cookies a special addition to all kinds of care packages or holiday cookie trays.
- Think red/green for Christmas, blue/white for Chanukah, orange/black for Halloween, any school color or favorite color for a birthday or graduation.
- Most people, however, don't need a special occasion to eat chocolate. So feel free to skip the zig-zags or zig-zag in contrasting colored chocolate.
 Cookies- This cookie is the first to be grabbed on holiday platters! A graham cracker base topped with a marshmallow and coated in chocolate. Drizzle with colors to match your holiday! | The Monday Box")
Related recipes
Peanut Chews Candy Pops are delicious chewy peanut candy dipped in chocolate. Easily decorate for any holiday!
Chocolate Mint Cookies are delicious cookies that taste just like Girl Scout Thin Mints!
Unicorn Grahams get coated in a swirl of pastel colored white chocolate plus plenty of unicorn colored sprinkles.
Milano Cookie Easter Eggs and Chocolate Covered Graham Cracker Easter Eggs make it easy to create beautiful chocolate dipped Easter treats using package cookies.
Chocolate Covered Oreos , decorated or plain, are everyone's favorite!
Chocolate Covered Graham Crackers are a gourmet treat and welcome gift that is so simple to make!
Ready to bake? Join the free membership group to get new recipes and a newsletter delivered to your inbox! You can also stay in touch on Facebook, Pinterest, and Instagram. I'd love to stay in touch!
Chocolate Marshmallow Cookies
Ingredients
- 1 ¾ cups whole wheat graham flour I used Hodgson Mills
- ½ cup + 1 tablespoon oat flour or ½ C + 1 T rolled oats ground fine in food processor
- ¼ cup granulated sugar
- ½ teaspoon salt
- ½ teaspoon baking powder
- ½ teaspoon baking soda
- 6 tablespoons cold unsalted butter cut into 1 inch cubes
- 3 tablespoons milk
- 3 tablespoons honey
- 1 teaspoon vanilla extract
- 24 marshmallows regular marshmallows or jumbo marshmallows cut in half
- 1 lb Chocolate candy coating discs light or dark
- Colored candy coating discs for decorating
Instructions
- In a food processor add flours, sugar, salt, baking powder, and baking soda. Pulse to combine.
- Add butter cubes. Pulse until crumbly mixture forms.
- In a bowl mix milk, honey, and vanilla.
- Add the liquid to the flour mixture in the food processor. Pulse until the dough comes together in a ball.
- Flatten the dough into a disc, wrap in plastic wrap, and refrigerate until firm. (about 30 minutes) (Can be left overnight)
- Preheat oven to 350 degrees F. Line two baking sheets with parchment paper.
- Remove the dough from the refrigerator and place between the sheets of parchment.
- Roll out to ⅛ inch thickness.
- Remove the top sheet of parchment.
- Use a 1.75" circle cookie cutter to cut out rounds of dough and place on prepared baking sheets about 1" apart. (scraps can to reused)
- Bake for 12-15 minutes until golden brown with light brown edges. Remove from oven.
- Place marshmallows, cut side down on graham cracker circles. Return to oven for about 2 minutes until marshmallows are soft
- Remove from oven and use a spatula to slightly flatten each marshmallow.
- Cool completely on wire racks.
- Line two cookie sheets with wax paper.
- Melt chocolate discs in a microwave safe bowl.
- Using a fork and large spoon, place a marshmallow cookie in the chocolate. Turn to coat. Lift on the fork and let excess chocolate drip off.
- Place the cookie on the wax paper lined cookie sheet.
- When all of the cookies have been dipped, place the cookie sheets in the refrigerator until the coating is set, about 15 minutes.
- Decorating colors of candy discs can be melted inside of a plastic decorating bag or a plastic sandwich bag. Microwave (10-15 second intervals) the a handful of discs until liquid.
- Cut off a tiny opening at the tip of the bag. Zig-zag colored stripes over the cookies.
- Return the cookie sheets to the refrigerator for another 15 minutes to set the decorating candy coating.
- Store cookies in airtight containers at room temperature for at least 1 week.
Notes
Nutrition
First Published: December 12, 2012. Last Updated: December 23, 2021. Updated for better reader experience.
 Cookies- This cookie is the first to be grabbed on holiday platters! A graham cracker base topped with a marshmallow and coated in chocolate. Drizzle with colors to match your holiday! | The Monday Box")

Jan
I think my grandbabies would love these! I may try these this year! Thanks for the recipe on Celebrate365 Cookie Exchange!
The Monday Box
Thank you, Jan! I hope your grandbabies enjoy them. Mallowmars are my husband's childhood favorite. Thank you for hosting this linkup for so many fun and delicious Christmas cookie ideas!
Miz Helen
Your Chocolate Marshmellow Mallomar Cookies look awesome! Hope you are having a great week and thanks so much for sharing with us at Full Plate Thursday!
Come Back Soon
Miz Helen
Karly
Love these cute cookies! Thanks for linkin' up with What's Cookin' Wednesday!
The Monday Box
Thanks, Karly! They are nostalgia cookies at my house. 🙂 Thanks for hosting!