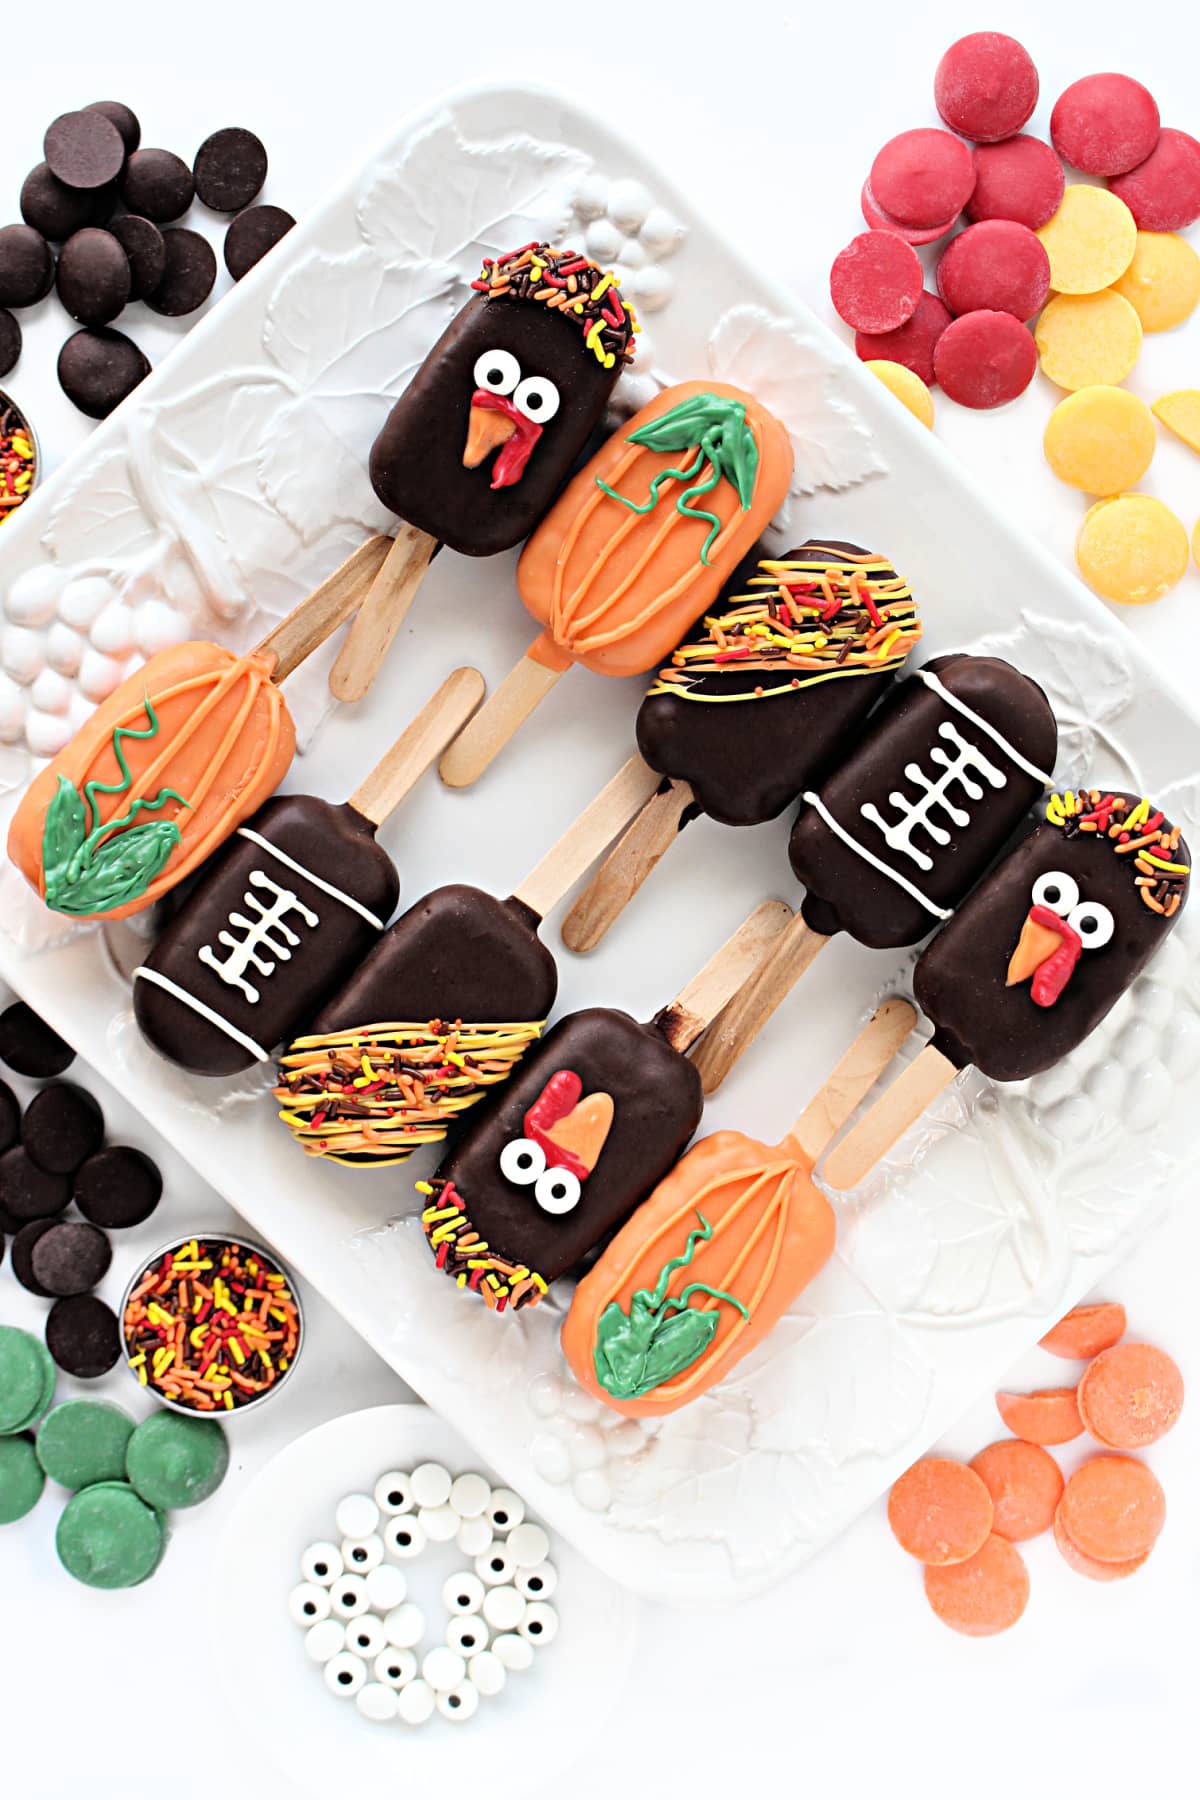
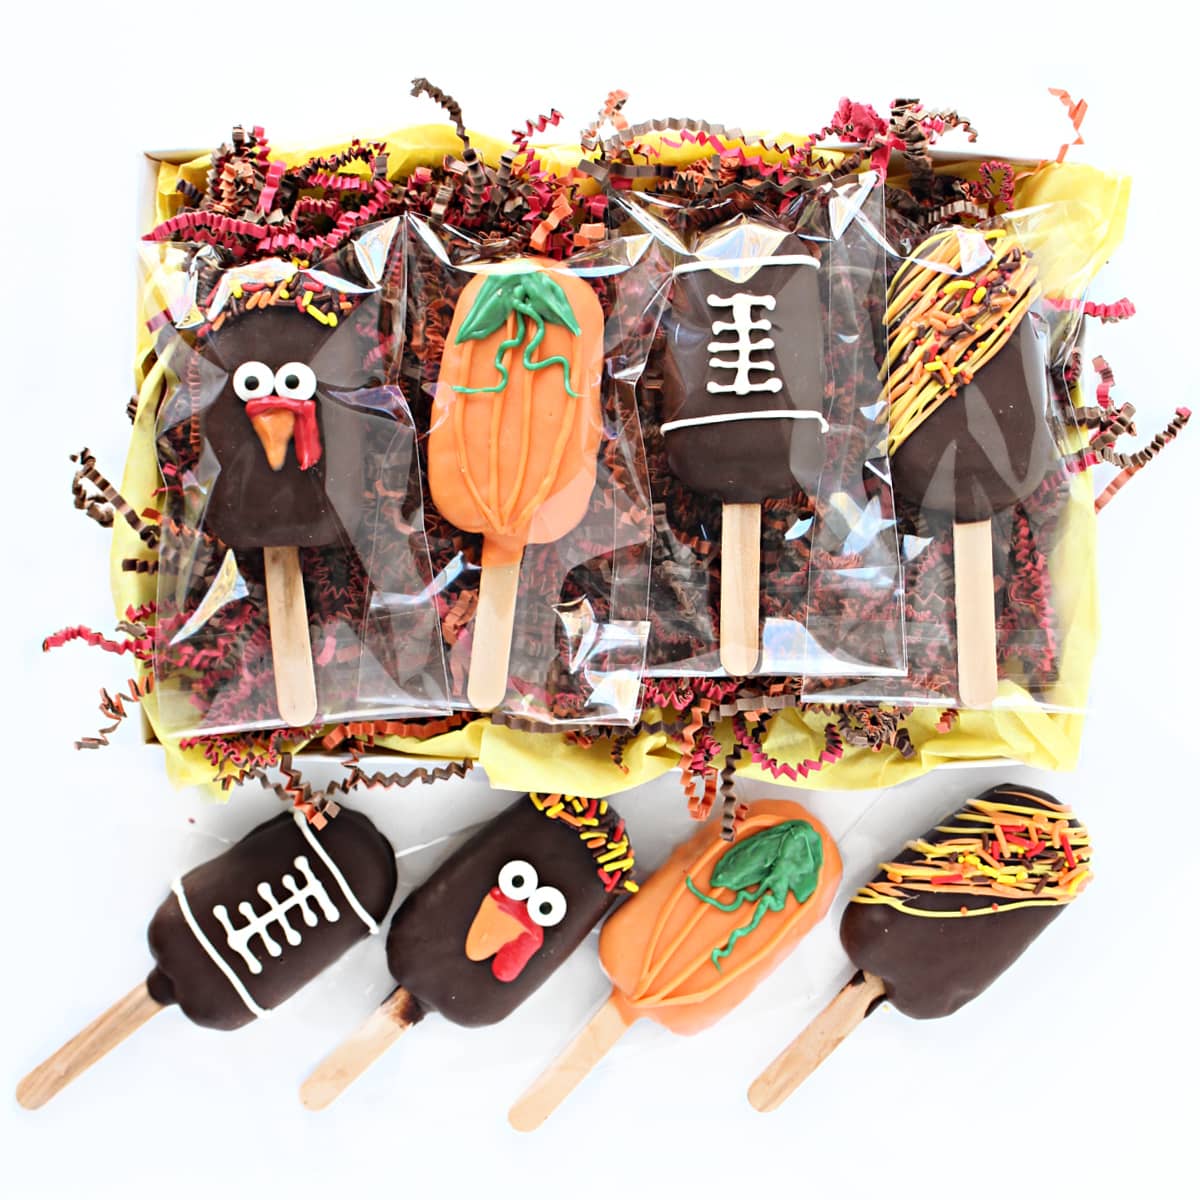
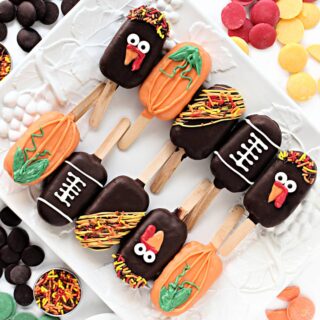
Easily decorate Thanksgiving peanut chews candy pops with an adorable turkey, pumpkin, or football. These tasty treats look so pretty on a holiday platter and are great for gifting and care packages.
Why you'll love this recipe
- Kids and adults are sure to smile when they see these adorable Thanksgiving treats.
- The peanut chew pops make great gifts or colorful holiday desserts.
- Fully coated pops stay soft and fresh for over a month which is great for making ahead or for long distance care packages.
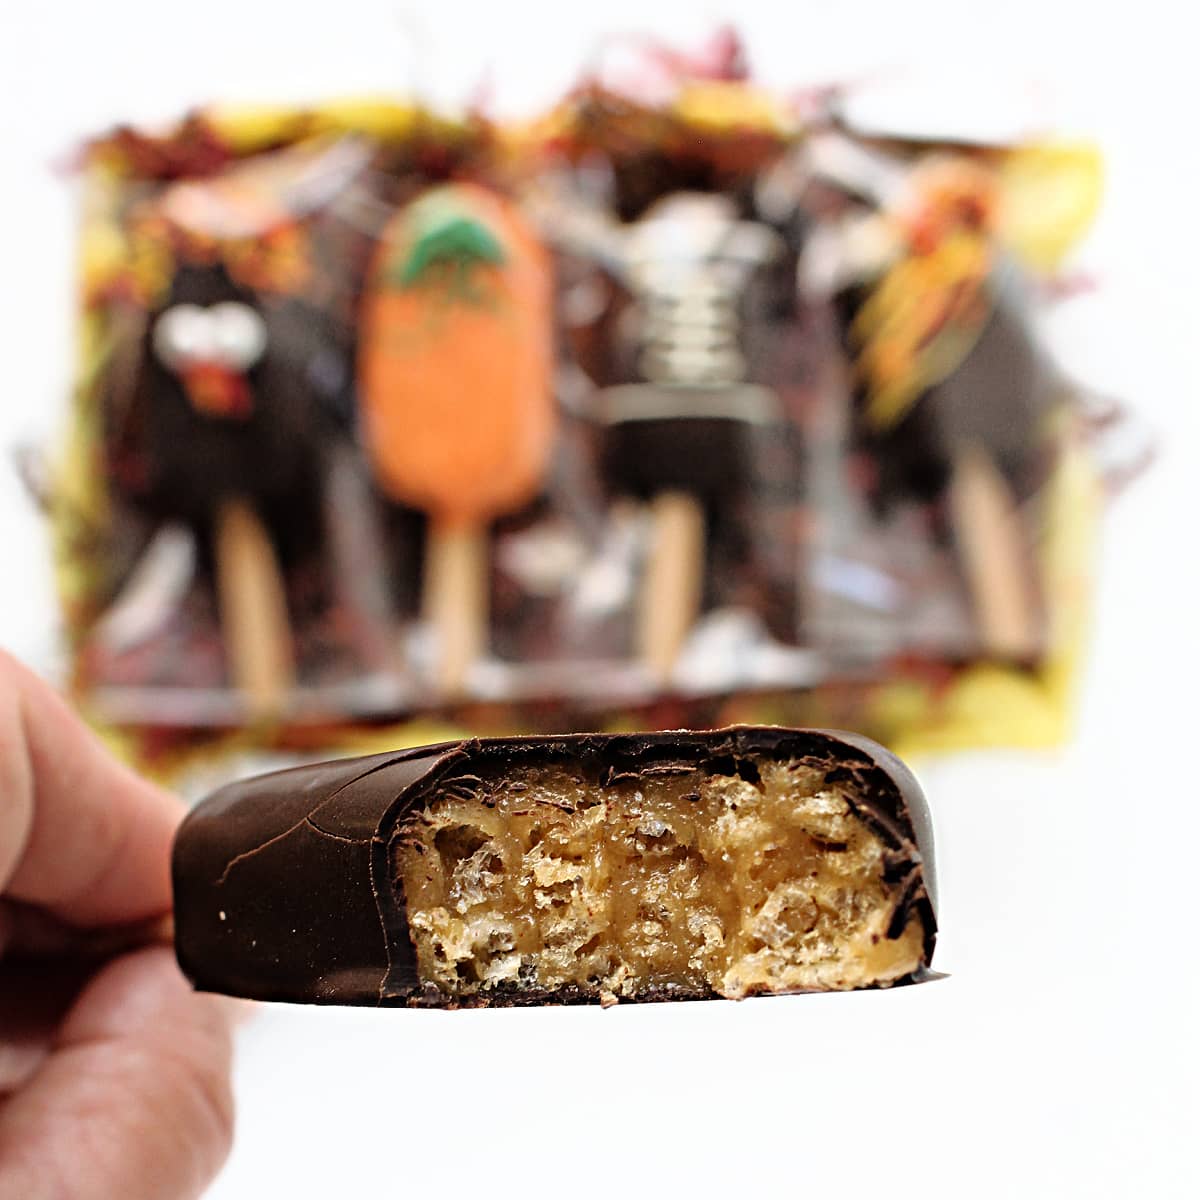
Thanksgiving Peanut Chews Candy Pops are an easy to make treat with lots of peanuty flavor and crispy, crunchy chew. The no bake mixture is shaped in a mold and frozen until you are ready to decorate.
Candy melts, sprinkles, and candy eyes turn the chocolate coated peanut candy into turkeys, pumpkins, and footballs for Thanksgiving fun!
Decorate a whole batch (25) or decorate a few. The uncoated pops can be kept frozen for a month or more to decorate as needed.
Use the recipe and instructions for how to make Peanut chews Candy Pops to make a batch. Then use these instructions to decorate your candy for Thanksgiving.
Ingredients
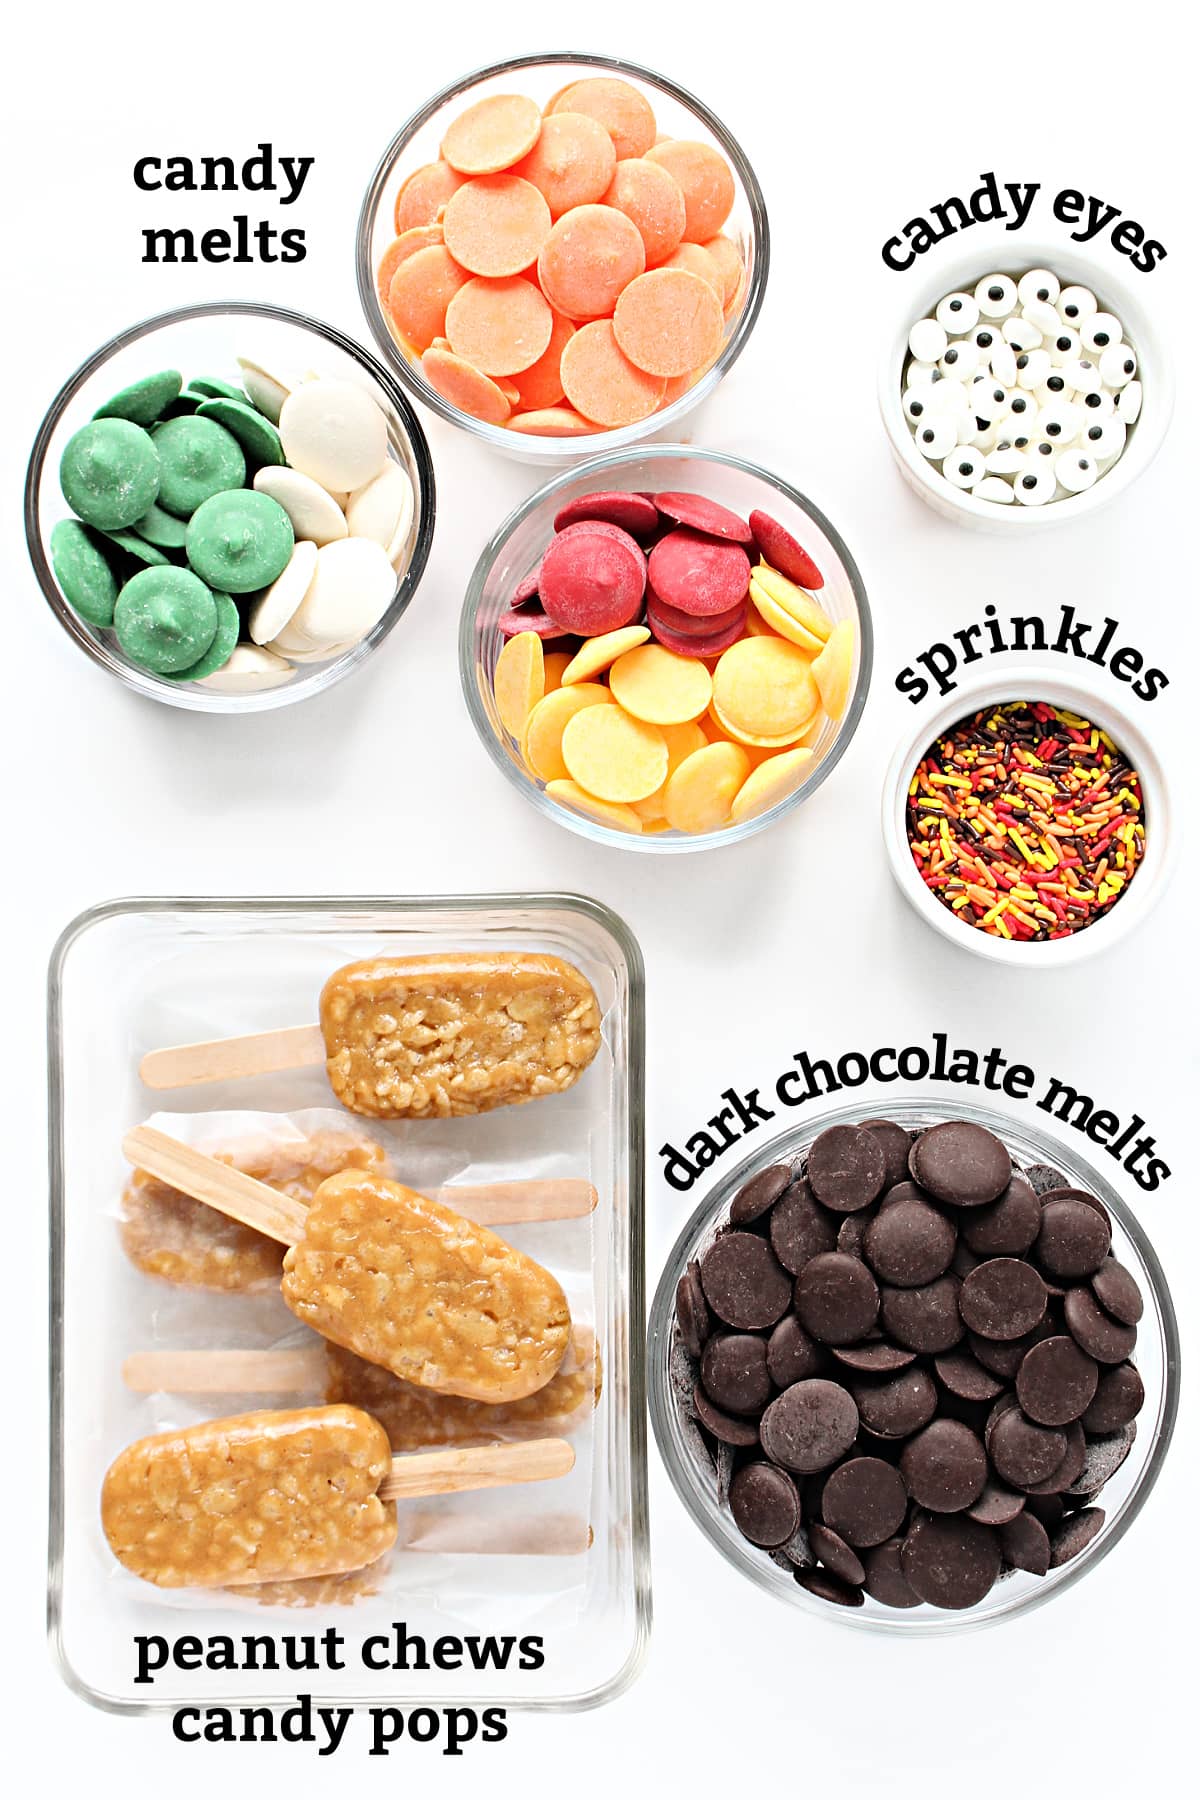
- Use the easy recipe for Peanut Chews Candy Pops to prepare the pops the same day as decorating or freeze the pops until ready to use.
Instructions
This is an overview of the instructions. The full instructions are in the recipe card below.
Follow instructions to make 1 batch of 25 Peanut Butter Candy pops.
Turkey
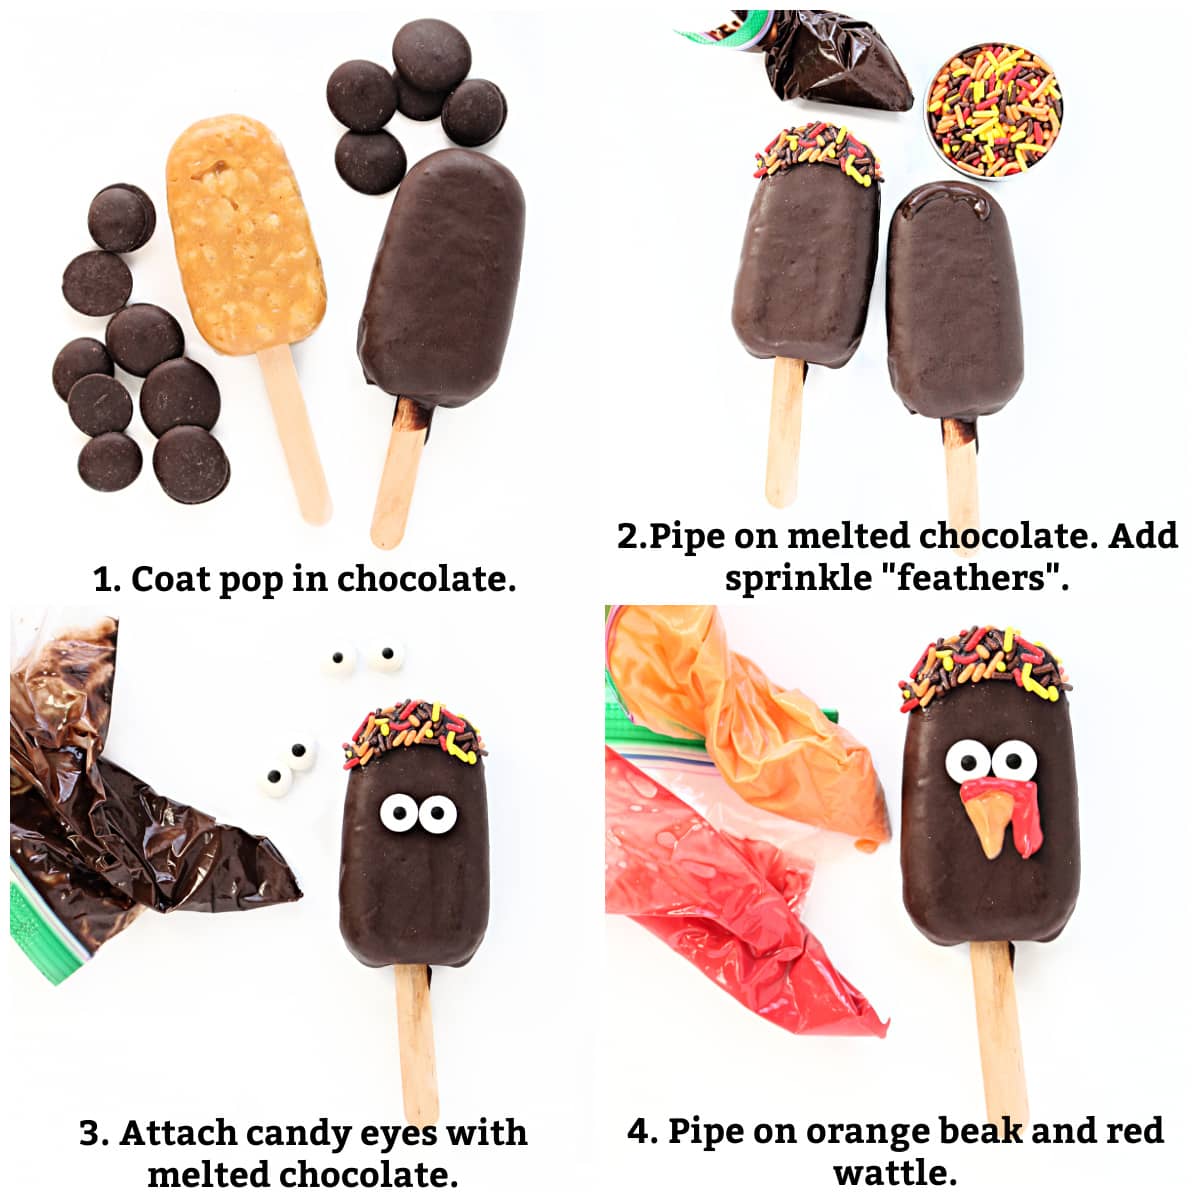
- Melt dark chocolate melts, then dip and coat 6 pops.
- Pipe melted chocolate at top of pop and add sprinkles.
- Attach candy eyes with melted chocolate as glue.
- Pipe on melted candy melt beak and wattle.
Pumpkin
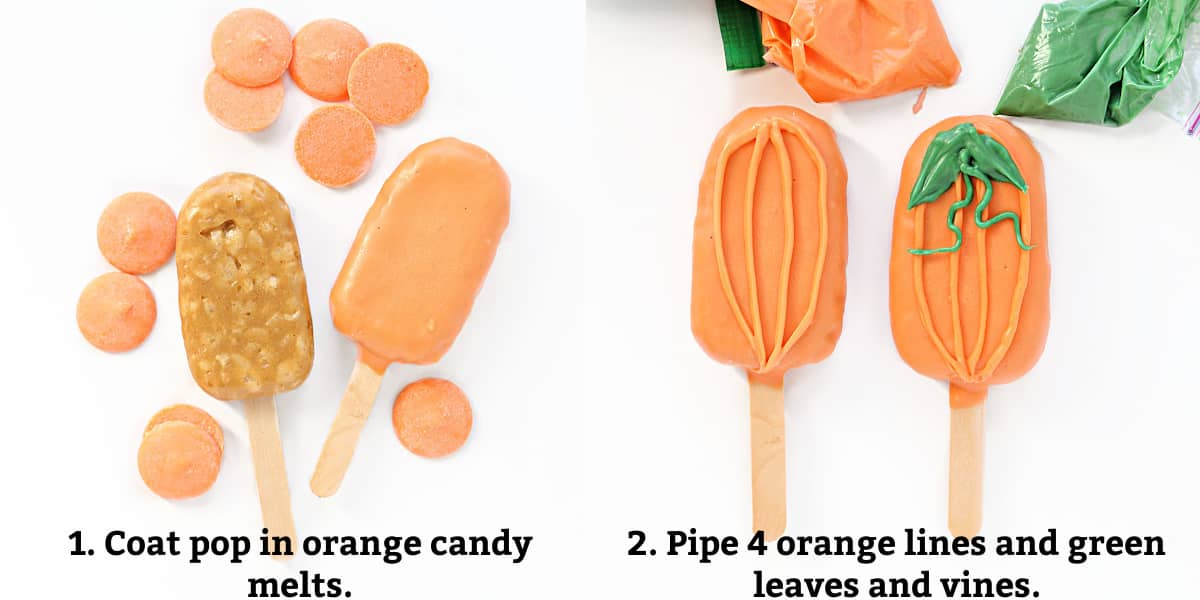
- Melt orange candy melts, then dip and coat 6 pops.
- Pipe orange candy melt lines and green candy melt leaves and vines.
Football
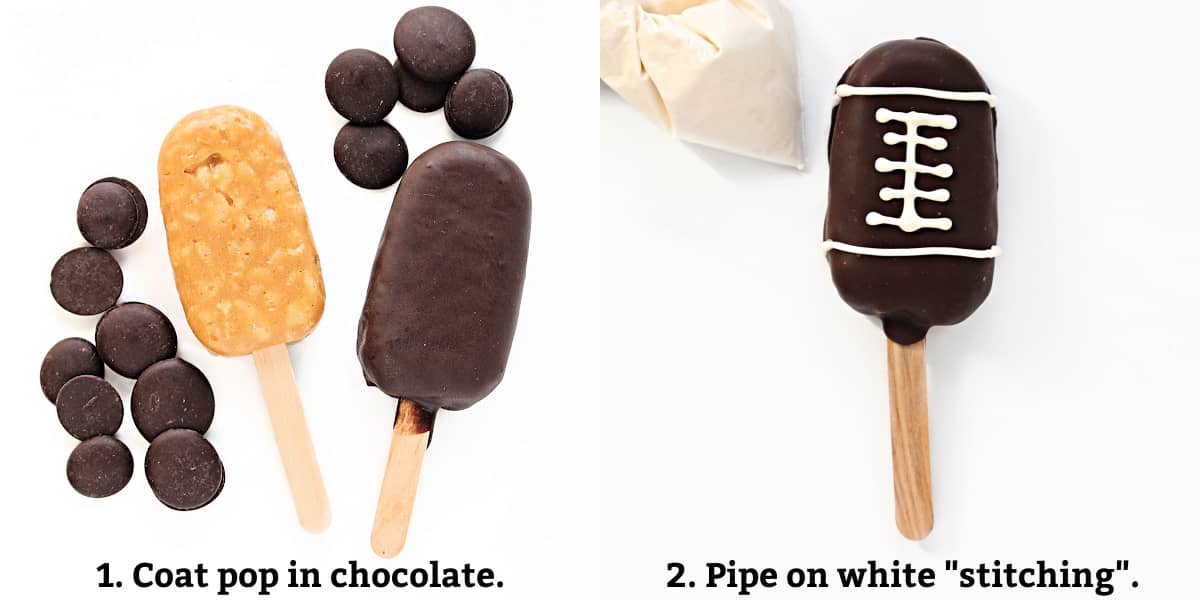
- Melt dark chocolate melts, then dip and coat 6 pops.
- Pipe white candy melt stitching.
Would you like to save this?
Drizzle and Sprinkles
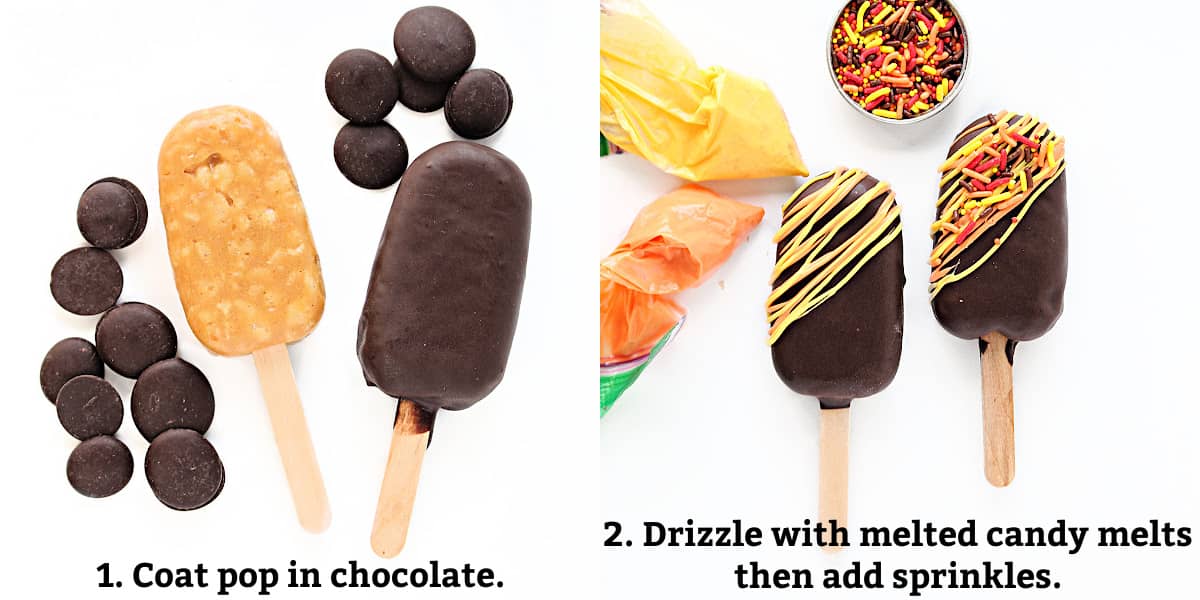
- Melt dark chocolate melts, then dip and coat 7 pops.
- Pipe candy melt drizzle, then add sprinkles.
Storage
Store coated pops at room temperature in an airtight container for up to one month. Separate layers with a sheet of wax paper.
For best freshness results, seal coated pops inside individual 3" x 5" bags before storing.
Tips
- When using frozen peanut candy pops, allow the pops to warm slightly at room temperature for about 10 minutes before dipping in chocolate. If the pop is too cold the coating can crack as it firms.
- Use a glass bowl to melt coating for dipping. The chocolate will melt more smoothly and evenly. Transfer, if needed, into a dipping bowl or piping bag.
- Melt the candy wafers in the microwave at 50% power for 1 minute, then stir. Return to the microwave and continue cooking at 50% power for 15 minute intervals, stirring between intervals, until completely melted and smooth.
- If your coating is too thick, stir in a table spoon of paramount crystals or 1-2 teaspoons of coconut oil or vegetable shortening.
- My favorite containers for dipping are OXO silicone measuring cups.
- Oil based food coloring can be used with white melting chocolate instead of using candy melts.
- To keep the pops fresh longer, enclose each pop in a self sealing 3" x 5" plastic bag.
- These 9 ½" x 6" boxes are the perfect size for gifting 4 peanut candy pops.
Frequently asked questions
If your melting chocolate or candy melts are too thick for dipping, for best results about a tablespoon of paramount crystals to make the coating more fluid. You can also add 1-2 teaspoons of vegetable shortening or coconut oil.
Paramount crystals are chips of partially hydrogenated palm kernel oil combined with lecithin and citric acid. You can buy them at cake and candy supply stores or online.
Peanut butter chews can be made with gluten free ingredients. However, Kelloggs Rice Krispies are not gluten free.
Related Recipes
Valentine's Day Peanut Chews Candy Pops, decorated like love birds or swirled with chocolate drizzle and sprinkles, are perfect for gifting to those you love.
Easter Peanut Chews Candy Pops are chewy, crunchy peanut butter candy decorated with candy melts to look like adorable chicks and bunnies.
With a Thanksgiving Care Package you can bring Thanksgiving to loved ones far away. This smile filled box offers lots to snack on.
These adorable Chocolate Bark Thanksgiving Turkeys would be colorful additions to place settings or dessert platters.
Get the kids to join in decorating these beautiful Thanksgiving Sugar Cookies.
This Thanksgiving White Chocolate Bark is a show stopper! The candy is quick and easy to make decorated with chocolate trees and fall leaf sprinkles.
You don't need a special cookie cutter to make these colorful, 3-dimensional Turkey Sugar Cookies.
Gingerbread Fall Leaves are a chewy, cut out cookie with easy to make painted icing.
Ready to bake? Join the free membership group to get new recipes and a newsletter delivered to your inbox! You can also stay in touch on Facebook, Pinterest, and Instagram. I'd love to stay in touch!
Thanksgiving Peanut Chews Candy Pops
Ingredients
- 25 peanut chews candy pops 1 batch
- 2 cups dark melting chocolate or candy melts
- ¼ cup white melting chocolate or candy melts
- 1 cup orange candy melts
- 2 tablespoons red candy melts
- ¼ cup yellow candy melts
- ¼ cup green candy melts
- 12 candy eyes
- ¼ cup jimmies sprinkles fall colors
Instructions
- Prepare the Peanut Chews Candy Pops according to the recipe. Bring the pops to room temperature for about 10 minutes before dipping and coating.
Turkeys
- Dip 6 pops in melted dark brown chocolate. Place them on a wax paper lined baking sheet until firm.
- Place about 2 tablespoons of melted brown chocolate in a ziplock sandwich bag. Cut off a small corner piece of the bag.
- For the turkey feathers, pipe a line of the melted chocolate at the top of a pop and sprinkle with fall colored jimmy sprinkles. Repeat with all 6 pops.
- Pipe a drop of melted chocolate onto the back of the candy eyes as "glue" and attach the eyes to the front of the pop below the sprinkle feathers.
- Place about 2 tablespoons of melted orange candy melts in a ziplock sandwich bag. Cut off a small corner piece of the bag.
- Pipe orange beaks directly below the candy eyes.
- Place about 2 tablespoons of melted red candy melts in a ziplock sandwich bag. Cut off a small corner piece of the bag.
- Pipe a red wattles across the top and down one side of each beak,
Pumpkins
- Dip 6 pops in melted orange candy melts. Place them on a wax paper lined baking sheet until firm.
- Place about ¼ cup of melted orange candy melts in a ziplock sandwich bag. Cut off a small corner piece of the bag.
- Pipe 4 lines down the front of each pop.
- Place about ¼ cup of melted green candy melts in a ziplock sandwich bag. Cut off a small corner piece of the bag.
- Pipe two leaves and two vines at the top of each pop.
Footballs
- Dip 6 pops in melted dark brown chocolate. Place them on a wax paper lined baking sheet until firm.
- Place about 2 tablespoons of melted white candy melts in a ziplock sandwich bag. Cut off a small corner piece of the bag.
- Pipe a horizontal line at the top and at the bottom front of the pop, then add the football stitching down the middle.
Drizzle and Sprinkle
- Dip 6 pops in melted dark brown chocolate. Place them on a wax paper lined baking sheet until firm.
- Place ¼ cup of melted orange candy melts in one ziplock sandwich bag and ¼ cup of melted yellow candy melts in another bag. Cut off a small corner piece of each bag.
- Drizzle the orange and yellow candy melts diagonally across each pop and top with fall colored jimmies sprinkles.
- Allow the melted candy to firm completely before storing or placing in bags.
- Store coated pops at room temperature in an airtight container for up to one month. Separate layers with a sheet of wax paper.
Notes
-
- When using frozen peanut candy pops, allow the pops to warm slightly at room temperature for about 10 minutes before dipping in chocolate. If the pop is too cold the coating can crack as it firms.
-
- Use a glass bowl to melt coating for dipping. The chocolate will melt more smoothly and evenly. Transfer, if needed, into a dipping bowl or piping bag.
-
- Melt the candy wafers in the microwave at 50% power for 1 minute, then stir. Return to the microwave and continue cooking at 50% power for 15 minute intervals, stirring between intervals, until completely melted and smooth.
-
- If your coating is too thick, stir in a table spoon of paramount crystals or 1-2 teaspoons of coconut oil or vegetable shortening.
- Do not send Peanut Chews Pops during hot weather months.
- For best freshness results, seal coated pops inside individual 3" x 5" bags before further packaging.
- Place bagged pops in an airtight storage container with padding, if needed, to prevent any movement.


Leave a Reply