
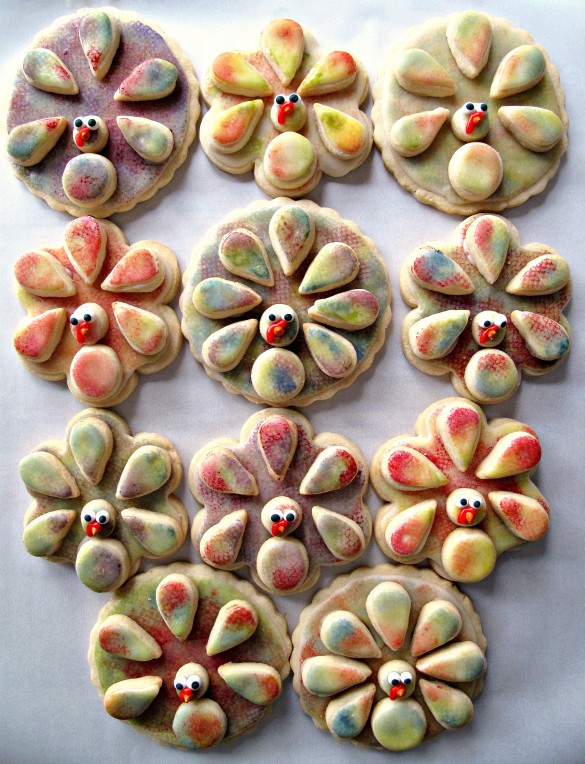
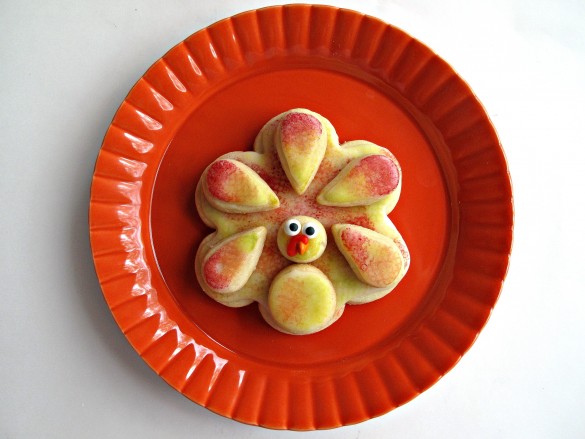
Painted Turkey Sugar Cookies are edible art for Thanksgiving gifting, holiday table decorating, or Thanksgiving care package mailing. Crunchy, citrus-vanilla sugar cookies are cut out in pieces, then easily assembled into 3D turkeys. Sponge painting with food coloring to create beautiful, multi-colored feathers is fun and easy.
About this recipe
Food gifts are always appreciated. Not only are they delicious, but they don't need to be stored or displayed. Just receive, smile, savor, and feel loved.
Scientific studies show that baking for others provides mental health benefits for both the baker and the recipient. Baking can be meditative and a source of stress relief. It is also a creative outlet. When we bake for others, we promote happiness within ourselves and share that happiness with others.
There could be no better time than now to do some stress relieving baking to promote happiness and connection. Consider creating Painted Turkey Sugar Cookies as a Thanksgiving happiness project.
The recipe, assembly, and decorating are all easy and kid-friendly, but please note that this is a multi-step project with time required for the icing to dry. I recommend spreading the steps over a few days.
On day 1, make the dough, wrap, and refrigerate. The dough is easiest to work with when chilled overnight.
Day 2 is baking day. Roll out the chilled dough and cut out the different shapes. Bake the cutouts. When the cookies are cool, store them for decorating the next day.
Do all decorating on day 3. Coat all of the cookies with white icing and let the icing dry for several hours. Then, sponge paint the cookies using food coloring.
Day 4 is all about details. Assemble using icing as glue. Add the candy eyes, orange beak, and red icing snood. When the icing glue is dry, package your Painted Turkey Sugar Cookies for sharing.
Cookie ingredients
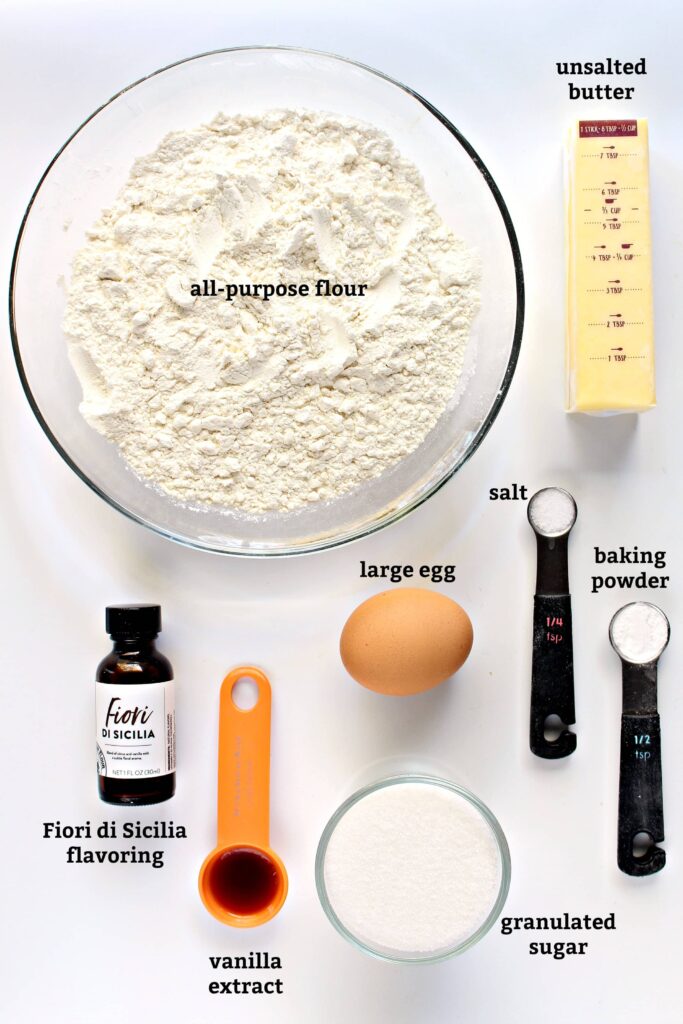
These cookies get their exceptional flavor from a combination of two extracts, vanilla and fiori di sicilia. If you are unfamiliar with fiori di sicilia, it's a delicious flavoring often used in Italian sweet breads and pastries.
The aroma and flavor is citrus, vanilla, and floral. Fiori di sicilia definitely provides special flavor, however, lemon flavoring can be used as a substitute.
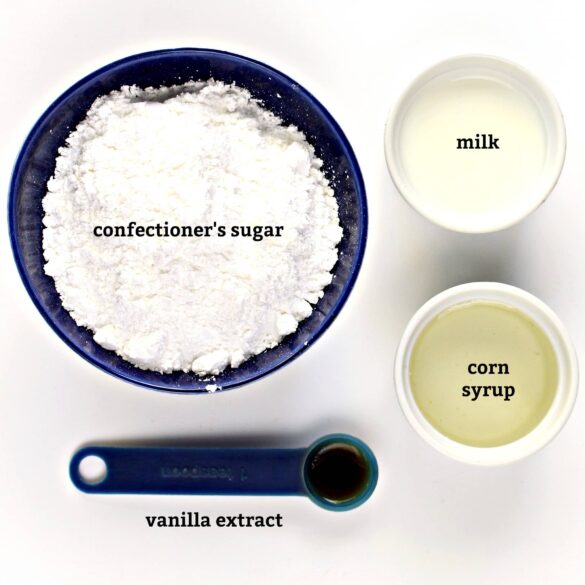
Icing ingredients
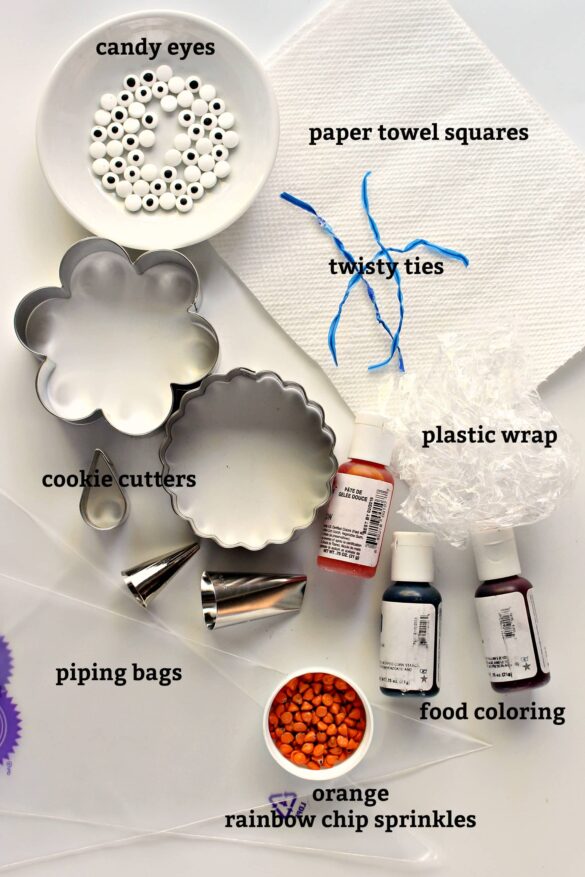
Decorating materials
(The Monday Box participates in affiliate marketing programs. As an Amazon Associate I earn from qualifying purchases. If you choose to purchase a product after following a link on this page, I will receive a small commission, at no cost to you, which helps make The Monday Box possible.)
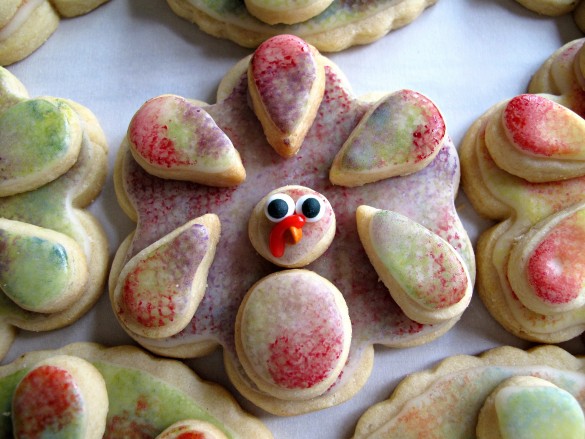
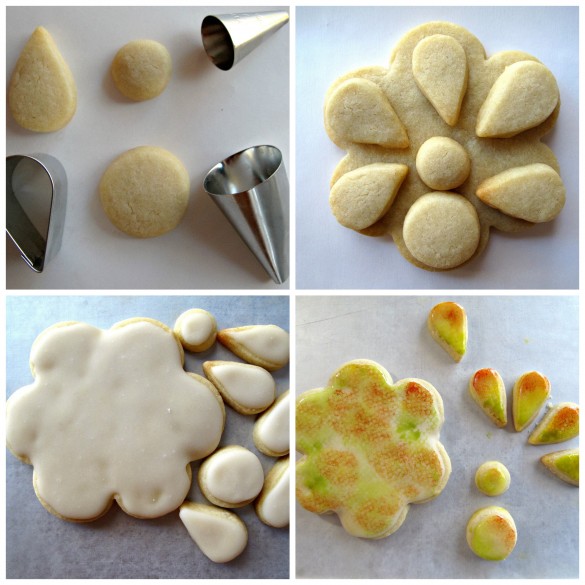
Use a 3" scalloped round cookie cutter to cut out the background cookie.
The bottom of one large and one regular piping tip are used as improvised mini circle cutters for the head and body.
Would you like to save this?
Use a 1 ¼" teardrop shaped cutter for the feathers.
Add candy eyes and an orange rainbow chip sprinkle beak and you have turkey cookies with personality!
I recommend using natural food coloring for this project. The natural dyes give the muted, watercolor look to the painted icing.
Directions
- Whisk together the flour, baking powder, and salt. Set aside.
- In the bowl of an electric mixer, cream together the butter and sugar. Beat in the egg and extracts.
- Gradually add the flour mixture and mix just until combined.
- Form the dough into a disc, wrap in plastic wrap, and refrigerate until firm (30 minutes- overnight).
- WHEN READY TO BAKE: Roll out the dough to ⅛" thickness.
- Cut out 9 large scalloped circles, 5-7 tear-drop shaped feathers for each cookie, and 1 head and 1 body circle for each cookie. Place cookies on a parchment lined baking sheet about 2" apart. Bake the large cookies separately from the feather and head/body pieces, because they will take longer to bake.
- Bake for 10-12 minutes until the edges begin to turn golden brown.
- ICING: In a medium bowl, mix together the confectioner's sugar, milk, corn syrup and vanilla. Remove ¼ cup of icing into a small bowl. Color the icing red, then place in a piping bag with a tiny corner of the bag cut off for piping the red icing over the turkey beak (snood).
- Spoon the icing or use a piping bag to place some icing onto a cookie and use a knife or offset spatula to spread the icing evenly over the surface of the cookie. Allow the icing to dry overnight. (Reserve left over icing to attach head, body, and feathers later.)
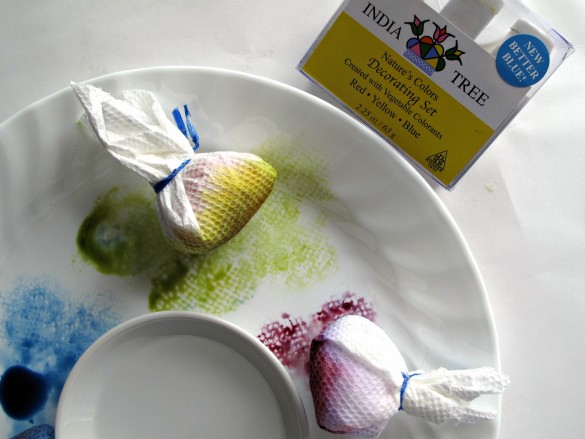
- DECORATING (ADDING COLOR): You will need a paint dauber for each color. To make paint daubers, cut a paper towel sheet into 4 squares. Scrunch a piece of plastic wrap into a ball and place at the center of a paper towel square. Twist the paper towel around the plastic wrap and secure with a twisty tie.
- Dispense food coloring onto a plate. Moisten a dauber slightly in the water. Dip the dauber in a food color, then pat onto the cookie. Allow icing to dry completely overnight.
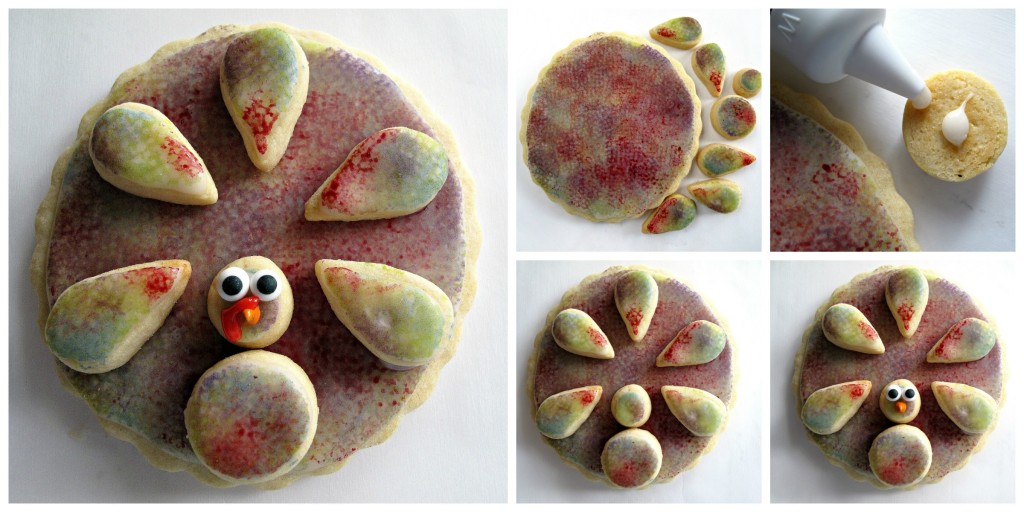
- When dry, glue the body, head, and feather onto the matching circle base using icing as glue. Add the eyes and beak. Use the red icing to pipe on the snood (the red thing that hangs off a turkey beak). Allow the icing glue and snood to dry completely (1-2 hours) before wrapping or storing.
Tips
- India Tree makes natural food colors (no chemicals) that produce beautiful muted fall colors, perfect for fall leaves and turkeys. Regular food coloring can be used, but the colors will be brighter with a slightly less watercolor effect.
- Fiori di Sicilia gives these cookies exceptional flavor and is available to purchase online. Lemon flavoring can be used with similar results.
- Make the beak using orange chips from Wilton Rainbow Chips Sprinkles. You could also use orange candy coated sunflower seeds or a dot of orange icing.
- This recipe is as much a craft project as a baking project. Plan to do this project over several days, because time is required between steps for drying.
- Use the cookies at place settings on Thanksgiving to brighten your table.
- Turkey cookies are a delicious way to send Thanksgiving greetings in a care package.
More Thanksgiving treats
Pumpkin Pie Cookies are chewy pumpkin butter cookies that look like little pumpkin pies!
Thanksgiving Peanut Chews Candy Pops are chocolate dipped candy decorated like adorable turkeys, pumpkins, and footballs.
Pumpkin White Chocolate Chip Cookies are soft, chewy pumpkin cookies full of fall spices and creamy white chocolate.
Thanksgiving White Chocolate Bark is a show stopping treat that's quick and easy to make.
Chocolate Bark Thanksgiving Turkeys are delicious and colorful candy that is perfect as a Thanksgiving dessert or as decoration at table settings.
Pumpkin Cranberry Biscotti is the crunchy cookie you will want with your coffee or tea all fall and winter!
Each colorful cookie is a unique work of delectable art! They are super for care package travel, whether the destination is nearby or across the globe.
Packaged in individual clear plastic gift bags, these Painted Turkey Sugar Cookies would also make great gifts or edible decorations on a Thanksgiving table.

Painted Turkey Sugar Cookies
Equipment
- 1 large piping tip
- 1 regular piping tip
Ingredients
- DOUGH
- 2 ¾ cups all-purpose flour
- ½ teaspoon baking powder
- ¼ teaspoon salt
- 1 cup unsalted butter room temperature
- ⅔ cup granulated sugar
- 2 teaspoons lightly beaten egg
- 1 ½ teaspoons vanilla extract
- ⅛ teaspoon Fiori di Sicilia flavoring
- ICING
- 4 cups confectioner's sugar
- 3 tablespoons milk add more to thin icing to desired consistency
- 3 tablespoons light corn syrup
- 1 teaspoon vanilla extract
- DECORATING
- natural food coloring gel or liquid (regular food coloring can be used)
- paper towel squares 1 for each color being used
- plastic wrap 1- 6" strip for each color being used
- twisty ties 1 for each color being used
- small bowl of water
- candy eyes
- orange rainbow chip sprinkles
Instructions
- In a medium bowl, whisk together the flour, baking powder, and salt. Set aside.
- In the bowl of an electric mixer, cream together the butter and sugar until light and fluffy.
- Beat in the egg and extracts.
- Gradually add the flour mixture and mix just until combined.
- Form the dough into a disc, wrap in plastic wrap, and refrigerate until firm (30 minutes- overnight).
- WHEN READY TO BAKE: Preheat oven to 350° F. Line a baking sheet with parchment paper.
- Use ½ of the dough at a time, keeping the remaining dough refrigerated until ready to use. Between two sheets of plastic wrap, roll out the dough to ⅛ " thickness.
- Remove the top plastic wrap and cut out cookies, 5-7 tear-drop shaped feathers for each scalloped round cookie, and 1 head and 1 body circle for each cookie. Place cookies on the prepared baking sheet about 2" apart. The large cookies should be baked separately from the feather and head/body cookies.
- Bake for 10-12 minutes until the edges begin to turn golden brown. The small cookies will require less time than the larger ones, so should be baked separately and watched carefully to avoid burning.
- Allow the cookies to cool 10 minutes on the baking sheet before removing to a wire rack to cool completely.
- ICING: In a medium bowl, mix together the confectioner's sugar, milk, corn syrup and vanilla until smooth and glossy. Add additional milk in teaspoon increments until desired consistency. (Icing consistency should be thin enough to spread easily but thick enough not to drip off the cookies. It should resemble a thin paste but not glue.)
- Remove ¼ cup of icing into a small bowl. Color the icing red, then place in a piping bag and cut off a tiny bit of the tip when ready to add the red icing over the turkey beak (snood).
- Spoon the icing or use a piping bag or ziplock bag with a small part of a bottom corner cut off to place some icing onto a cookie and use a knife or offset spatula to spread the icing evenly over the surface of the cookie. Allow the icing to dry overnight. (Reserve left over icing to attach head, body, and feathers later.)
- DECORATING (ADDING COLOR): You will need 1 paint dauber for each color. To make paint daubers, cut a paper towel sheet into 4 pieces. Scrunch a piece of plastic wrap into a ball and place at the center of a paper towel square. Twist the paper towel around the plastic wrap and secure with a twisty tie.
- Dispense about 5 drops of each color food coloring onto a plate. Leave room between colors.
- Moisten a dauber slightly in the water. Dip the dauber in a food color, blot off excess color, then pat onto the cookie. Use a different dauber for each color.
- Cookies should be dry before they are stored. Drying times vary between several hours and overnight.
- When the coloring is completely dry, the body, head, and feathers can be "glued" onto the cookie using the leftover icing as glue. Add the eyes and beak to the head. Use the red icing to pipe on the snood (the red thing that hangs off a turkey beak).
- Allow the icing glue and snood to dry completely (2 hours) before wrapping or storing.
- Store cookies in an airtight container at room temperature for up to 2 weeks.
Notes
- India Tree makes natural food colors (no chemicals) that produce beautiful muted fall colors, perfect for fall leaves and turkeys. Regular food coloring can be used, but the colors will be brighter with a slightly less watercolor effect.
- Fiori di Sicilia gives these cookies exceptional flavor and is available to purchase online. Lemon flavoring can be used with similar results.
- The beak is made using orange chips from Wilton Rainbow Chips Sprinkles. You could also use orange candy coated sunflower seeds or a dot of orange icing.
- This recipe is as much a craft project as a baking project. Because time is required between steps for drying, planning to do this project over several days is recommended. Day 1 make the cookie dough, wrap, and refrigerate. Day 2 bake. Roll out the chilled dough and cut out the different shapes. Bake the cutouts. When the cookies are cool, store them for decorating the next day. Day 3 decorate. Coat all of the cookies with white icing and let the icing dry for several hours. Then, sponge paint the cookies using food coloring. Day 4 assemble the cookies using more icing as glue. Add the candy eyes, orange beak, and red icing snood. When the icing glue is dry, package your Painted Turkey Sugar Cookies for sharing.
- Use the cookies at place settings on Thanksgiving to brighten your table.
- Turkey cookies are a delicious way to send Thanksgiving greetings in a care package.
- Place cookies is self-sealing cellophane cookie bags or double wrap each cookie in plastic wrap, then place in an airtight container or freezer weight ziplock bag.
- Use crushed tissue paper or other packing material to assure that the cookies do not move during transit.
Nutrition
First published November 12, 2015. Last updated November 6, 2020 with improved images, ingredient images, and information for a better user experience.
Carlee
Well if these aren't just the cutest thing! I am putting them on my must make list!
swathi
Wendy, these cookies are so beautiful and real art, Glad to know that Solider B is back home. Love your gesture. Thanks for sharing this wonderful post with Hearth and soul blog hop, pinning and tweeting
Leigh
Adorable!
Lokness @ The Missing Lokness
Awww... These turkey cookies are ADORABLE! They would be really great gifts. Hope you are going to figure out the care package situation soon. I am sure that they are missing your baked goods. 🙂 By the way, I love your new profile picture! It is a really nice picture of you.
Diane
These are so cute and look great! Mine would probably show up on a Pinterest fail board, but yours are fab!
The Monday Box
Thank you, Diane! Honestly, though parts of this "project" are time consuming, the turkeys are really very easy to make! I am sure you could create equally cute turkeys and yours would probably speak French!! 🙂
Lindsey Bomgren
Ok I'm not a huge baker, but these are so stinking adorable -- talk about the perfect holiday treat/fun kids activity! I'm going to give these a shot but I might clean up the ingredients a bit -- we'll see how almond flour holds up in the cookies and I'm thinking a coconut milk or avocado frosting :)! Thanks for the adorable idea!
The Monday Box
Thank you, Lindsey! My daughter has to eat gluten free, so though I don't blog about it, I do collect and try out gluten free baking recipes. I have used one for Cut-Out Coconut Flour Cookies and I think you could easily make coconut flour turkey cookies with this dough. ( http://www.healthextremist.com ) Have fun baking and happy Thanksgiving!
Reeni
These truly are works of art Wendy! I love that you sponged painted them! I never saw that done on cookies before - they're beautiful. So glad to hear Soldier B. is home safe. And I just saw the gorgeous picture of you! It's nice to be able to match your personality to your face! 🙂
The Monday Box
Thank you, Reeni! The sponge painting is an easy way to apply lots of different colors and tap into your inner preschooler! 🙂 I love the way the colors blend. Thanks also for your kind words about Soldier B.! I am hoping for a day when all of our troops will be home and safe! I have such admiration not only for the troops but also for their families. It has to be such a HUGE relief to know your loved one is out of harms way! (The photo has been a long time coming. I wanted to share a photo but never had one I was happy with before. I agree, it IS nice to be able to match a personality to a face!)
Monica
First of all, Wendy...it is lovely to stop by and be greeted by your very pretty face! : )
These 3D cookies are so impressive...they would make a great favor/gift for guests to take home after Thanksgiving dinner. I'd love to see them on the Thanksgiving table and eaten (if anyone would have the heart to eat them!) as dessert. You've got the sponge painting down!
The Monday Box
Thank you, Monica! I went to ChoppedCon in Kansas City in October. In addition to coming away with blogging inspiration and new blogging friends, I came away with a professional headshot! A wonderful KC photographer offered free headshots to participants and I finally got a photo for the blog! As for the cookies, I do believe I have sponge painting down...what is the next preschool art activity I should conquer?! 😉
Tricia @ Saving room for dessert
Very cute and perfect for Thanksgiving! Gobble gobble!
The Monday Box
Thanks, Tricia! If we lived close to each other, I could swap you a platter of turkey cookies for one of your gorgeous pies! 🙂
Tennille @ Two Kids And a Budget
Wow! Those are so cute and look very easy to make. I may have to give them a try next weekend with my two boys.
The Monday Box
Thank you, Tennille! The boys can definitely do most (if not all) of these cookies. They might get bored with the white icing part, but are sure to have a great time sponge painting and gluing the turkeys together!
Ashley
These cookies are just too fun Wendy! I love that watercolor look - I would have never thought to try that!
The Monday Box
Thanks, Ashley! I used the sponge painting last year for gingerbread fall leaves and loved it so much, I HAD to find another way to use the method. The effect is so pretty and it is way easier than making/piping lots of frosting colors. 🙂
Elaina Newton (@TheRisingSpoon)
Wendy, these cookies are so creative! I love that you sponge painted them with natural food colors. Pinning for later!
The Monday Box
Thanks, Elaina! The colors from the natural food colors are perfect for fall themes (leaves, turkeys, etc.). Thanks for pinning!
Kim
So cute and they look yummy
The Monday Box
Thanks, Kim!
Sheila @ BrainPowerBoy
These are great! I love fun food and am always looking for neat ideas. These are really, really nice. Pinning!
The Monday Box
Thanks, Sheila! Sponge painting with food coloring is great for kids and adults. Creating the textures and color combinations is a lot of fun! Thanks for pinning! 🙂
Ada Plainaki
These are sooooo cute!!
The Monday Box
Thanks so much, Ada! You are THE cookie lady, so your compliments mean a lot to me!