
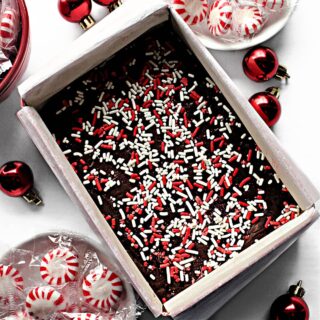
This Quick and Easy Peppermint Fudge recipe creates delicious Christmas candy with no fuss. The lusciously smooth chocolate fudge takes just minutes to prepare and is poured right into the decorative tins used for gifting! No slicing and no wrapping necessary!

Why you'll love this recipe
- Fudge is fast and easy to make.
- Just 4 simple ingredients.
- Tins of fudge make great gifts for everyone.
- Making fudge right in the gifting tin saves time and is perfect for care packages.
Still looking for some sweet treats to share at holiday gatherings and for tasty homemade gifts? Delight friends and neighbors with a homemade gift they will love.
Not only do you need just minutes to prepare these confections, but the longest ingredient list has just 4 items! These are great sweets for dessert trays, gift baskets, and care packages.
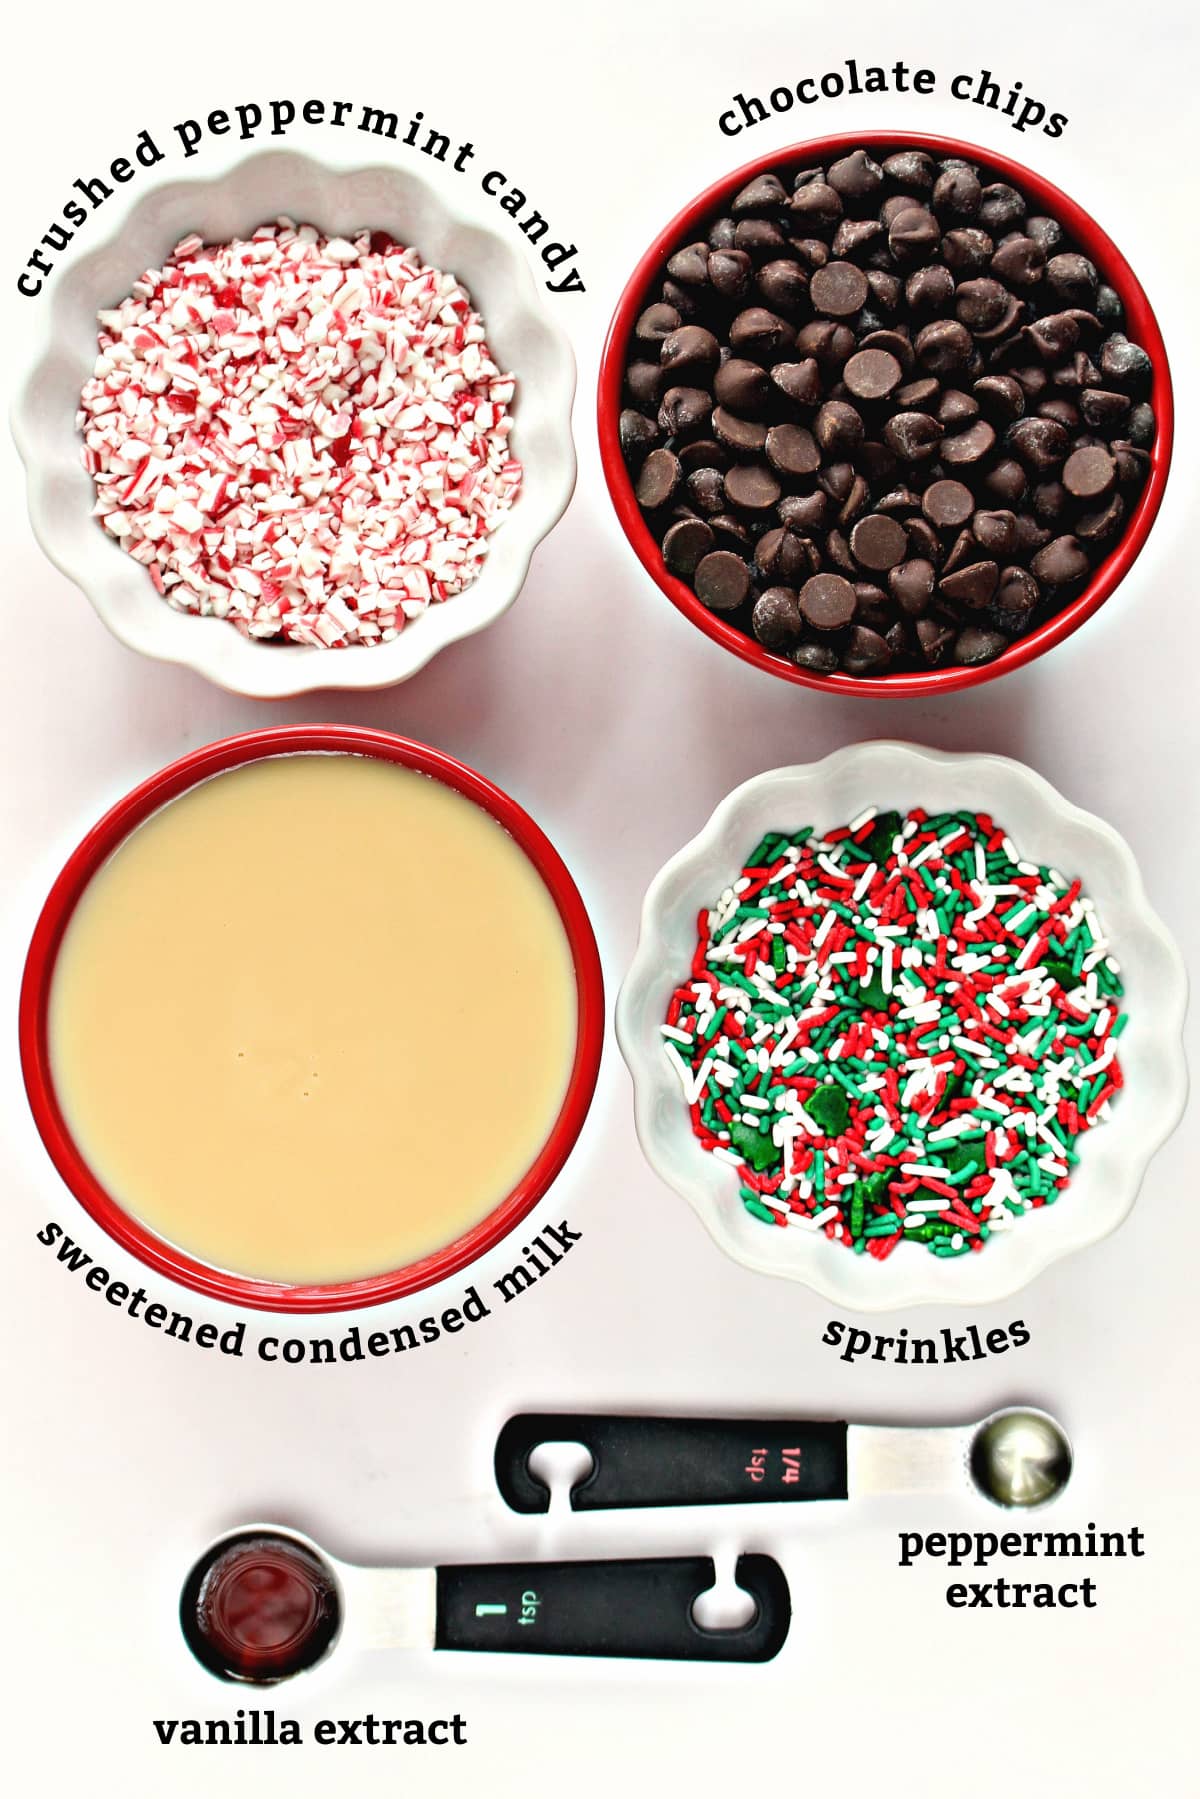
Ingredients
Instructions
This is an overview of the instructions. The full recipe is in the recipe card below.
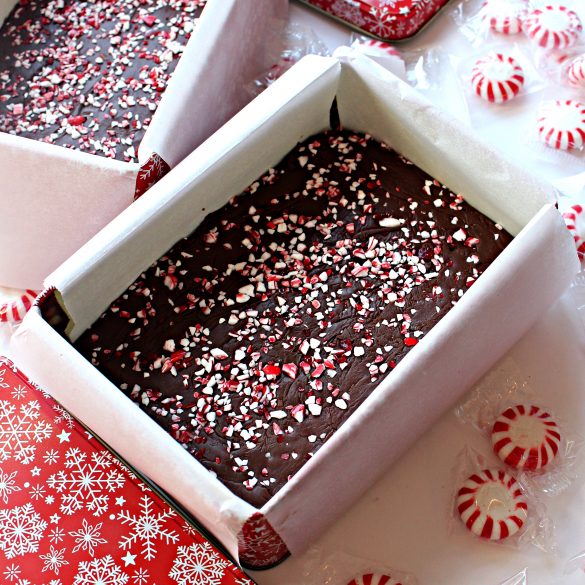
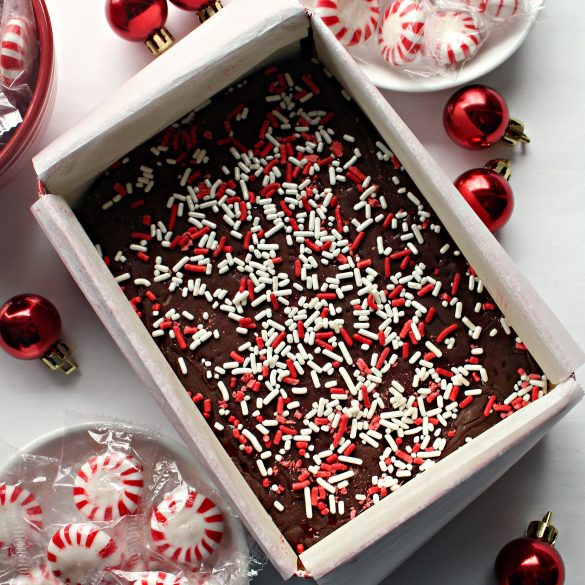
- Line two small (about 4.25" x 6.25") containers with parchment paper, leaving about 3 inches of overhang on all sides.
- In a microwave safe bowl, heat the chocolate and sweetened condensed milk in the microwave at 50% power for 1 minute. Stir and repeat for 30 second intervals until the chocolate is completely melted and smooth. Stir in the vanilla and peppermint extracts.
- Pour half of the mixture into each of the prepared containers. Use a rubber spatula to smooth and spread the fudge evenly.
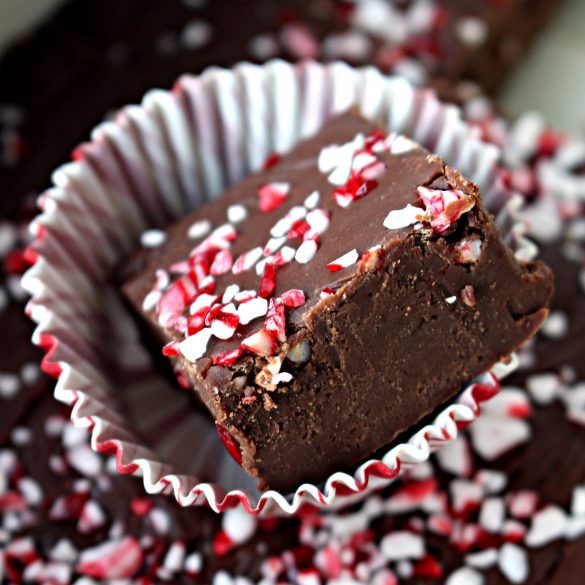
- When the fudge is only slightly warm to the touch, decorate with sprinkles or crushed peppermint candy.
- Refrigerate, uncovered, until completely chilled (about 30 minutes).
Would you like to save this?
Tips
- The exact dimensions of the tins don't matter. The fudge will just be a little bit thicker or thinner. For optimal thickness, try to use containers with a similar area (25.5") to the tins I used.
- Round tins can be used, but are more difficult to line.
- Be sure to line the tin with parchment paper to protect the candy from the surface of the tin and to make slicing and removal easy.
- Better quality chocolate produces better quality fudge.
- Peppermint extract is strong. A little goes a long way. I found that the peppermint flavor intensifies over time. If the Peppermint Fudge will be eaten right away, then you might want to use ½ teaspoon of peppermint extract. However, if the fudge will be mailed or not used for a few days, I recommend using just ¼ teaspoon of peppermint extract.
- IMPORTANT. Use crushed candy cane for decorating ONLY if the fudge will be eaten within 24 hours. Three days after making (and photographing) the Quick and Easy Peppermint Fudge, I opened the container to find that the pretty, red and white candy chips had dissolved into a sticky red syrup that tasted fine but looked awful! For longer storage, I recommend using red and white sprinkles (bottom photo) instead.
Related recipes
Make delicious homemade Marzipan Candy in just 5 minutes! You won't believe how easy it is and how much less expensive than packaged marzipan.
Peppermint Crunch Cookies are chewy sugar cookies that start with packaged refrigerator cookie dough!
Sugar Cookie Chocolate Bark has a sugar cookie base covered in chocolate and sprinkles for fabulous holiday snacking and delicious gifting.
Christmas Pretzels are a fun holiday snack filled with chocolate and festive sprinkles designs.
Christmas Oreos Rudolph Cookies are adorable chocolate dipped sandwich cookies that are quick and easy to make for the whole family. They make great gifts and are fun for party cookie platters.
Spicy, sweet Cinnamon Hard Candy is a nostalgic holiday treat. Great for gifting.
Ready to bake? Join the free membership group to get new recipes and a newsletter delivered to your inbox! You can also stay in touch on Facebook, Pinterest, and Instagram. I'd love to stay in touch!
Quick and Easy Peppermint Fudge
Equipment
- small gift tins (about 4.25" x 6.25")
Ingredients
- 2 cups chocolate chips
- 1 can sweetened condensed milk 14 ounces
- 1 teaspoon vanilla extract
- ¼ - ½ teaspoon peppermint extract
- 2-4 tablespoons red and white sprinkles or crushed peppermint candies or mini candy canes
Instructions
- Line two small (about 4.25" x 6.25") containers with parchment paper, leaving about 3 inches of overhang on all sides. Overhang will be used for wrapping the fudge and can be used to remove the fudge from the container.
- In a microwave safe bowl, heat the chocolate and sweetened condensed milk in the microwave at 50% power for 1 minute. Stir and repeat for 30 second intervals until the chocolate is completely melted and smooth.
- Stir in the vanilla and peppermint extracts.
- Pour half of the mixture into each prepared airtight container. Use a rubber spatula to smooth and spread the fudge into an even layer.
- When the fudge is only slightly warm to the touch, add sprinkles (recommended) or crushed peppermint candy (for immediate eating only) on top of the fudge.
- Refrigerate, uncovered, until completely chilled (about 30 minutes).
- Place the lid on each container and store at room temperature for up to 10 days.
Notes
- The exact dimensions of the tins don't matter. The fudge will just be a little bit thicker or thinner. For optimal thickness, try to use containers with a similar area (25.5") to the tins I used.
- Round tins can be used, but are more difficult to line.
- Be sure to line the tin with parchment paper to protect the candy from the surface of the tin and to make slicing and removal easy.
- Better quality chocolate produces better quality fudge.
- Peppermint extract is strong. A little goes a long way. I found that the peppermint flavor intensifies over time. If the Peppermint Fudge will be eaten right away, then you might want to use ½ teaspoon of peppermint extract. However, if the fudge will be mailed or not used for a few days, I recommend using just ¼ teaspoon of peppermint extract.
- To make white chocolate peppermint fudge use white chocolate chips instead of the semisweet chocolate chips.
- IMPORTANT. Use crushed peppermints for decorating ONLY if the fudge will be eaten within 24 hours. Three days after making (and photographing) the Quick and Easy Peppermint Fudge, I opened the container to find that the pretty, red and white candy chips had dissolved into a sticky red syrup that tasted fine but looked awful! For longer storage, I recommend using red and white sprinkles (bottom photo) instead.
- Use crinkled wax paper to fill the space between the parchment wrapped fudge and the lid to prevent the fudge from moving during shipping.
- Wrap each sealed container of fudge with plastic wrap or place fudge containers in a freezer weight ziplock plastic bag.
Nutrition
First published December 22, 2018. Last updated January 2, 2024 with additional information for a better user experience.


Michele
Can this be made in the stove top?
Wendy Sondov
Absolutely! Just heat and stir until the chocolate is melted.
Geri
Hi there~can this Recipe be made with vegan chocolate chips like “Bake Believe” or “Enjoy Life” chips and sweetened condensed coconut milk for a Vegan Treat?
Wendy Sondov
Hi, Geri. I've successfully made this fudge with condensed coconut milk and it was delicious with a slightly softer texture than with standard condensed milk. However, I haven't tried the vegan chips you mention and don't know how well they melt. I do suggest that you take a look at Guittard dark and semi-sweet chocolate chips. The other brands you mention do not ethically source their cocoa and could potentially be using cocoa harvested with child slave labor. Guittard is the only major brand found in supermarkets that is ethically sourced. Plus it's on every list for the very best flavor. 🙂