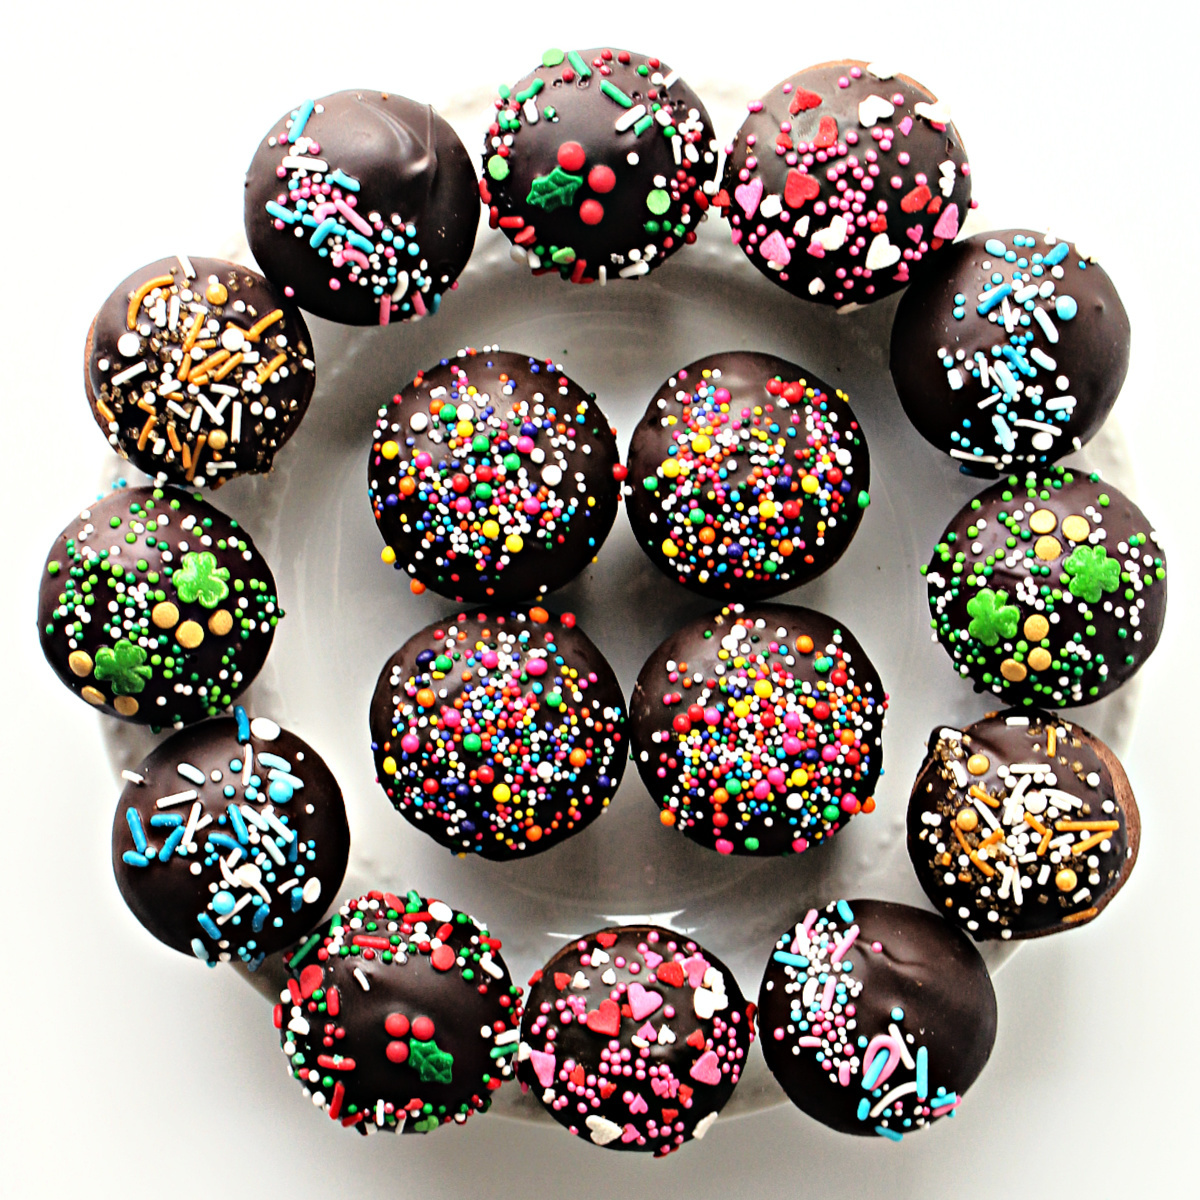
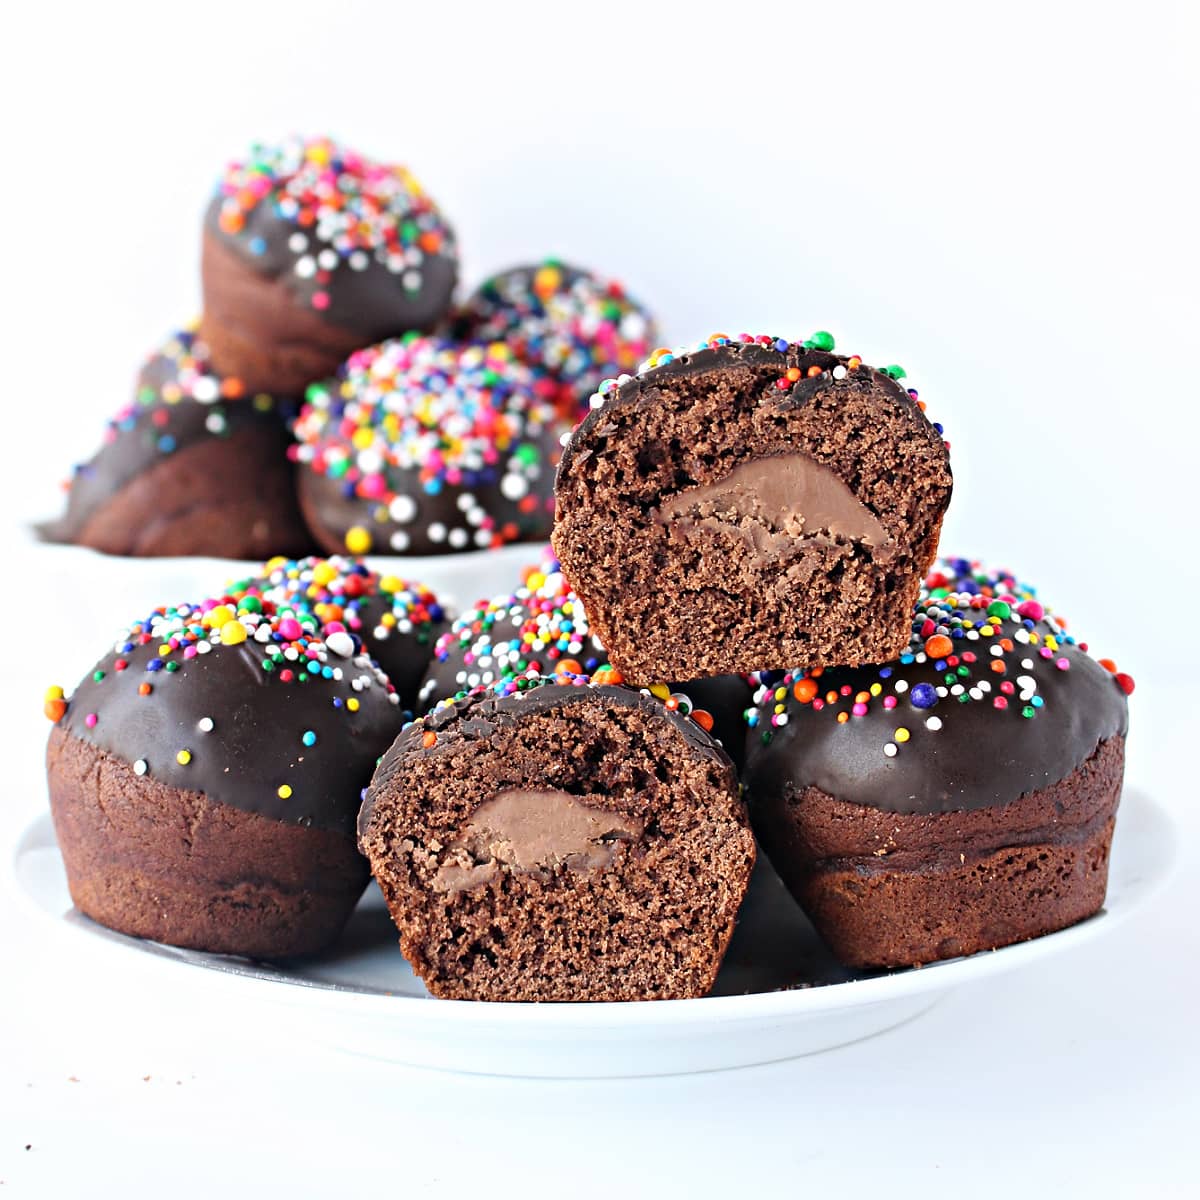
Secret Kiss Cookies are soft, cake-like morsels with rich chocolaty flavor. Baking in a mini muffin pan gives these treats their distinctive round shape, perfect for hiding a candy kiss inside.

Why you'll love this recipe
Unlike some recipes that you bake once a year for a particular holiday or season, Secret Kiss cookies are an incredibly versatile year round treat. Their festive sprinkles brighten holidays, gatherings, gifts, and care packages.
The bonbon-like shape is formed by baking in mini muffin pans. The result is a soft cookie with the airy texture of a little cake.
There are so many ways to customize these.
- Add sprinkles for holidays or team colors.
- Use kisses with holiday flavors.
- Get fancy with kisses that are layered or swirled.
- Color the kisses pink or blue for a gender reveal party surprise.
- Skip the sprinkles and pipe zigzags of chocolate on top.
Ingredients
Instead of buying packaged candy, I recommend using homemade chocolate kisses, giving you control over ethical cocoa sourcing, allergens, color, and flavor.
Instructions
This is an overview of the instructions. The full instructions are in the recipe card below.
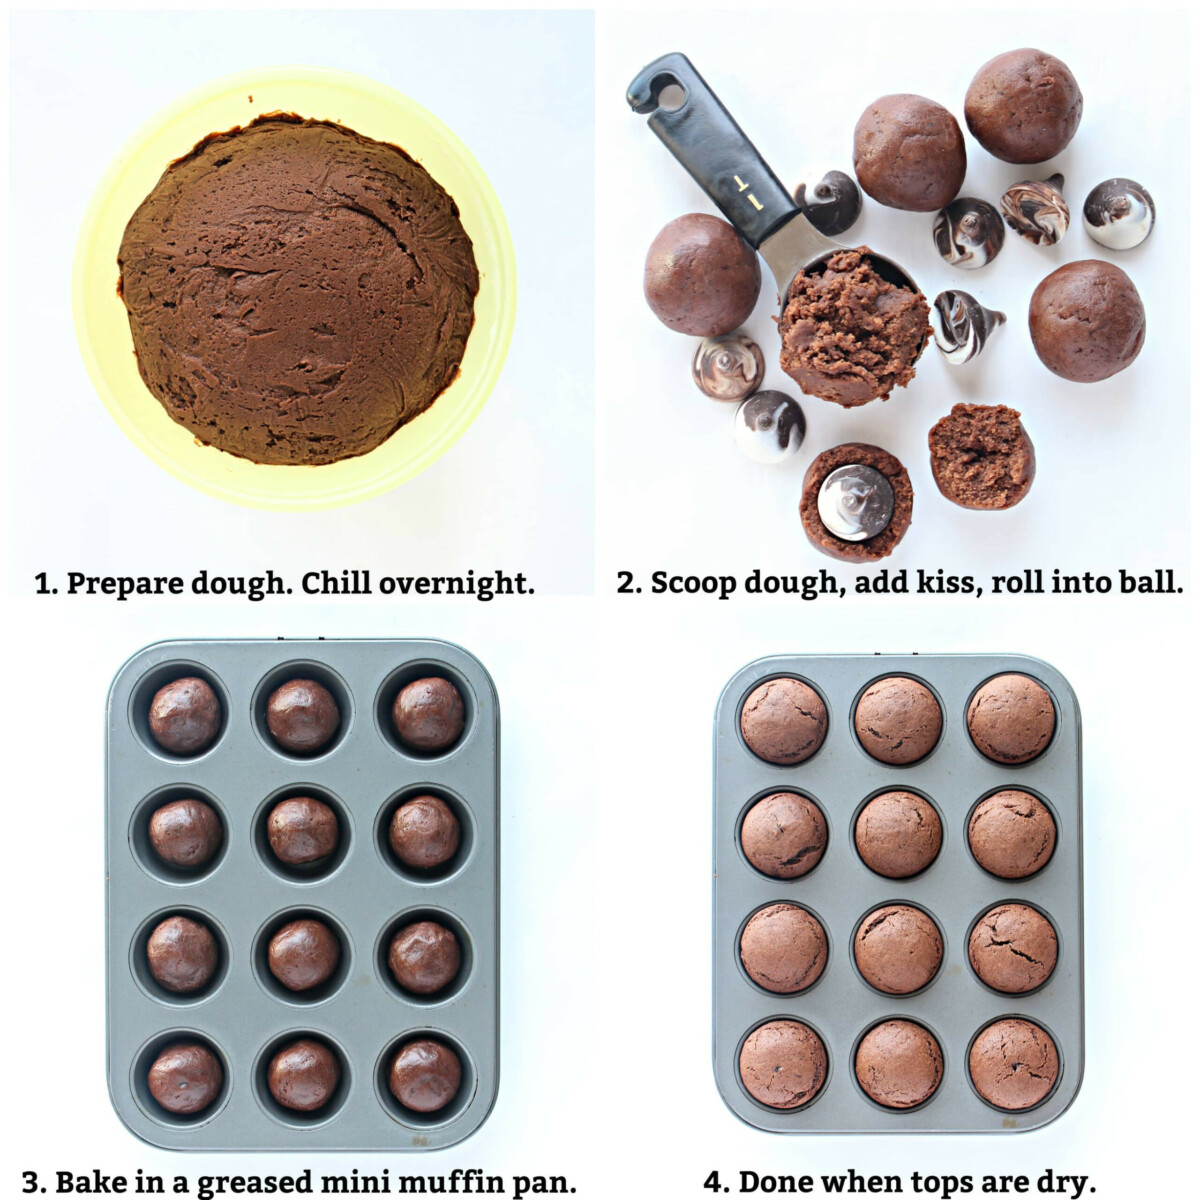
- In the bowl of an electric mixer, beat melted butter and sugar until combined. Mix in the remaining ingredients. Refrigerate the dough overnight.
- When dough is chilled and ready to bake, scoop 1 tablespoon sized dough balls. Tear the ball in half and insert a chocolate kiss. Mold the dough into a ball covering the kiss inside.
- Place one dough ball in each mini muffin cup and bake at 350° F for 10-12 minutes. They are done when the top looks evenly dry.
- Don’t worry about any wrinkles or cracks. They will be covered with the chocolate coating. Cool in the pan for 10 minutes before transferring to wire racks to cool completely.
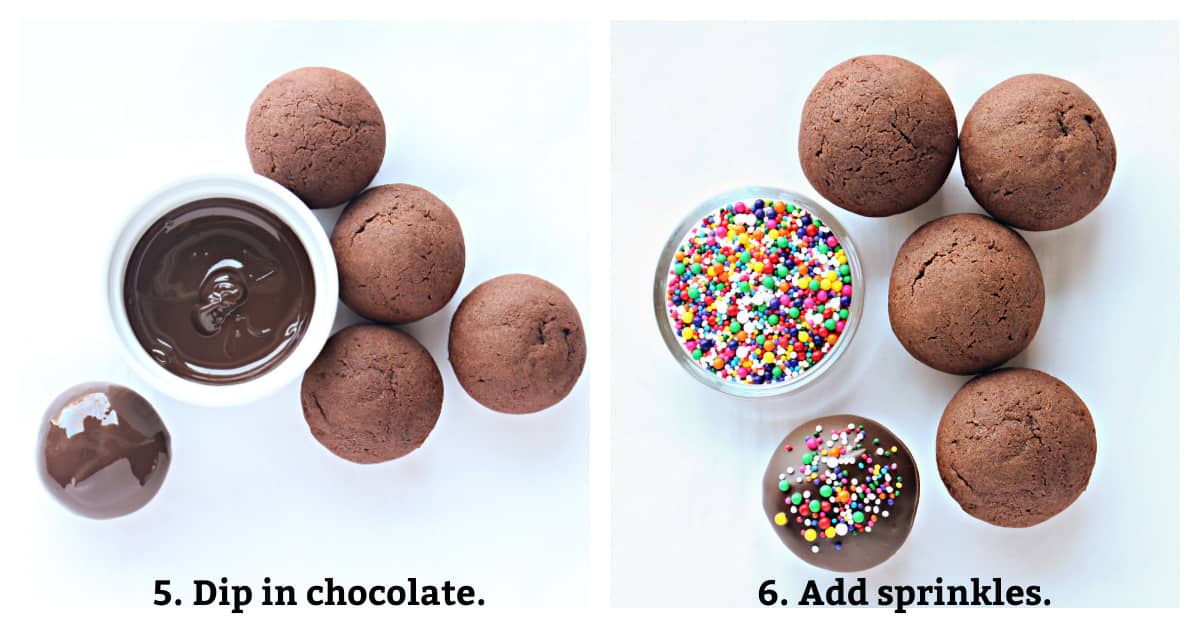
- Melt the chocolate and dip the cookies directly into the bowl. Place on a tray lined with wax paper.
- Add sprinkles immediately after dipping. After completing 6 cookies, place the tray in the refrigerator for about 10 minutes to set the chocolate.
Would you like to save this?
Tips
- Chill overnight for easiest handling of this sticky dough.
- For more mocha flavor, double the espresso powder in the recipe.
- Do not try to bake these on a baking sheet. The dough won’t hold its shape and will flatten.
- Using homemade kisses allows for unlimited variations in flavors and colors to match holidays and special events.
- Colorful sprinkles make these treats ideal for snacking or gifting for New Years, Valentine's Day, St. Patrick's Day, Easter, Christmas, Hanukkah, and gender reveal parties.
- Do not use melted chocolate chips for coating the cookies unless they will be eaten the same day. The chocolate will “bloom”, appearing white and spotty after a day or two.
- For dipping, use only melting chocolate (compound coating) or tempered chocolate for a topping that remains smooth and shiny.
- Packaging or serving these treats in mini cupcake papers makes a pretty presentation that looks like candy bonbons.
Frequently asked questions
When stored in an airtight container at room temperature, they stay wonderfully soft and chewy for at least 10 days.
Yes, they can be frozen for up to one month.
Place completely cooled, undecorated cookies in an airtight plastic storage container or freezer weight zip lock bag.
Bring to room temperature before decorating.
Related recipes
Chocolate Chunk Brownies are soft and chewy brownies you will want to bake all year!
Thumbprint Cookies can be decorated with sprinkles and filling to match any occasion.
Chocolate Pretzel Cookies are made with an ultra chocolaty dough in a fun shape.
Chocolate Covered Chocolate Mint Cookies will remind you of Girl Scout cookies, but better!
These Chocolate Cookies get extra crunch when you mix in cocoa nibs or chocolate chips.
Chocolate Marshmallow Cookies are a graham cookie, topped with a marshmallow and completely coated in chocolate. Great for gifting!
Ready to bake? Join the free membership group to get new recipes and a newsletter delivered to your inbox! You can also stay in touch on Facebook, Pinterest, and Instagram. I’d love to stay in touch!

Secret Kiss Cookies
Ingredients
- 1 cup unsalted butter melted
- 4 ½ cups all-purpose flour
- ½ cup unsweetened cocoa I use Whole Foods 365 brand fairly traded baking cocoa
- 4 ½ teaspoons baking powder
- 1 teaspoon baking soda
- 1 ½ teaspoons espresso powder
- ½ teaspoon salt
- 1 ½ cups granulated sugar
- 3 large eggs
- ⅓ cup plain yogurt
- 7 tablespoons milk
- 2 teaspoons vanilla extract
- 48 chocolate kisses
- 3-4 cups melting chocolate discs
- Sprinkles
Instructions
- In a small bowl, microwave butter until melted. Set aside to cool slightly.
- In a large bowl whisk together flour, cocoa powder, baking powder, baking soda, espresso powder, and salt.
- In the bowl of a stand mixer, beat butter and sugar until combined, about 2-3 minutes.
- Mix in the eggs, yogurt, milk, and vanilla.
- Reduce the speed of mixer and slowly add dry ingredients until just combined.
- Cover dough with plastic wrap, then chill dough in the refrigerator overnight.
- When ready to bake, heat oven to 350˚F. Lightly coat the cups of a mini muffin pan with cooking spray. Remove the chilled dough from the fridge.
- Scoop 1 tablespoon of dough. Tear the ball in half and insert an unwrapped kiss at the center of the cookie dough. Put the dough ball halves back together and roll into a ball covering the chocolate kiss inside.
- Place one dough ball in each mini muffin cup and bake for 10-12 minutes. The cookies are done when the top looks evenly dry. Don’t worry about any wrinkles or cracks. They will be covered with the chocolate coating.
- Cool cookies in the pan for 10 minutes before transferring the cookies onto wire racks to cool completely.
- Melt the chocolate coating discs in a small bowl in the microwave at 50% power for 30 seconds. Stir, then return to the microwave for 10-20 second intervals at 50% power just until completely melted.
- Dip the cookie directly into the bowl of melted chocolate. Place the cookies on a tray lined with wax paper or parchment paper and sprinkle each cookie immediately after coating. After completing 6 cookies, place the tray in the refrigerator for about 10 minutes to set the chocolate.
- The cookies will remain soft and cakey stored in an airtight container at room temperature for up to 10 days.
Notes
- For easiest handling of this sticky dough, overnight chilling is recommended.
- For more mocha flavor, double the espresso powder in the recipe.
- Do not try to bake these cookies on a cookie tray. The dough won’t hold its shape and will flatten.
- Homemade chocolate kisses allows for unlimited variations in flavors and colors to match holidays and special events.
- Colorful sprinkles make this secret kiss cookies recipe ideal for snacking or gifting for New Years, Valentine's Day, St. Patrick's Day, Easter, Christmas, Hanukkah, and gender reveal parties.
- Do not use melted chocolate chips for coating the cookies unless they will be eaten the same day. The chocolate will “bloom”, appearing white and spotty after a day or two.
- For dipping, use only melting chocolate (compound chocolate) or tempered chocolate for a topping that remains smooth and shiny.
- Packaging or plating these cookies in mini cupcake papers makes a pretty presentation that looks like candy bonbons.
- In a plastic food storage container, Place cookies in layers separated by wax paper, in a plastic storage container.
- Balled up wax paper can be placed between the top cookies and the lid to ensure no movement within the container during shipping.
- Wrap the entire container in plastic wrap or place in a freezer weight ziplock bag.
Nutrition
SaveFirst Published: January 30, 2015. Last Updated: March 8, 2021. Updated for additional information and improved photographs.

Save

Deb
Are you sure of the amount of baking powder (4 teaspoons!!!) It reads a lot and my finished product tasted of baking powder. I chose not to share these secret kiss cookies due to the taste.
Wendy Sondov
Hi, Deb. The amount of baking powder is correct. The finished product shouldn't taste like baking powder at all. Did you whisk the dry ingredients together as indicated in the recipe. It sounds like your baking powder wasn't dispersed throughout the flour before being added to the liquid ingredients.
Carina
Secret Kiss Cookies, can you mix the baking powder and soda into the buttermilk before adding it to the dry ingredients, so that the cookies don't taste like soda?
Wendy Sondov
I haven't tried mixing the baking powder and soda in the buttermilk, but I also haven't ever had these cookie taste like soda. The purpose of whisking the baking soda into the flour is to distribute it well so that it can't end up in a clump and ruin the flavor of a cookie. If you try the buttermilk idea, let me know how it turns out. 🙂
Jessica
Can you use unsweetened cocoa powder?
Wendy Sondov
Hi, Jessica. Yes. This recipe calls for unsweetened cocoa powder, not hot chocolate powder.
Create With Joy
Dear Wendy,
Thank you for sharing your creativity with us at Create With Joy - I just LOVE your blog and your amazing recipes (especially this one!) I've been wanting to feature you on our site for awhile now but have been waiting for the right moment - with Valentine's Day just around the corner, this week seems like the perfect time!
So, congratulations to you - you are our Featured Blogger and Friend of the Week at this week's Friendship Friday Party #365 at Create With Joy!
I hope you meet a lot of new friends this week and have an amazing time in the spotlight! 🙂
Helen at the Lazy Gastronome
So beautifully rich!! These look incredible! Thanks for sharing at the What's for Dinner party. Hope the rest of your week is amazing!
The Monday Box
Thank you Helen!
Miz Helen
Your Kiss Cookies look fantastic, we will love these cookies! Hope you are having a great week and thanks so much for sharing your awesome post with us at Full Plate Thursday!
Miz Helen
The Monday Box
Thank you so much, Miz Helen!
April J Harris
I still love these cookies, Wendy - and I agree, I would choose Biscotti con Baci too! Thank you so much for sharing with the Hearth and Soul Link Party. I’m featuring this post at the party this week. Hope to ‘see’ you there! Have a wonderful week ahead!