
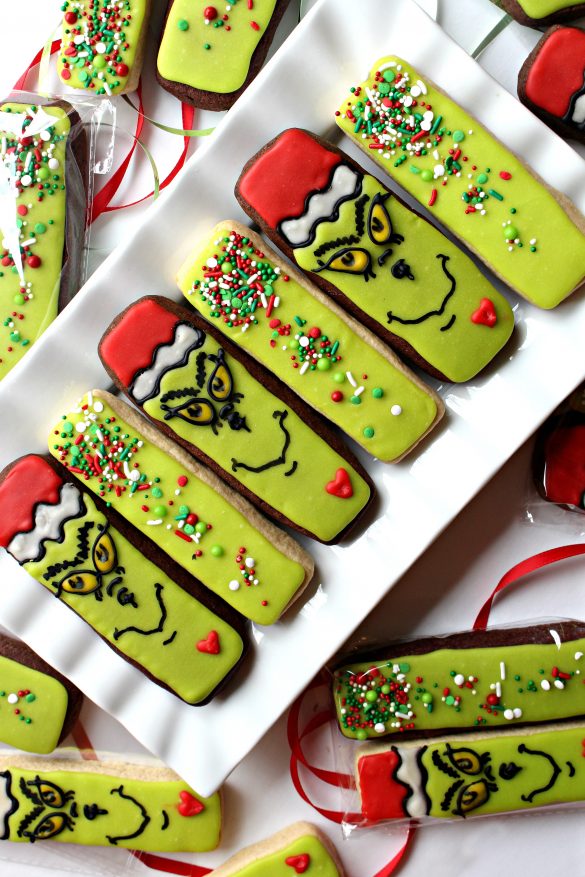
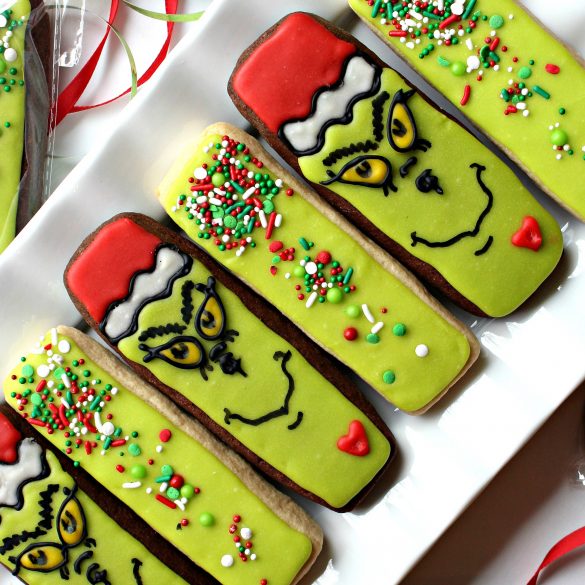
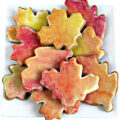
Decorated Grinch Cookies are smile inspiring. Everyone who looks at the Grinch's wobbly grin just has to grin back. The chocolate or vanilla sugar cookie sticks are perfectly shaped for dunking in a glass of milk or a mug of hot chocolate. Bake and share some Christmas cookie cheer Grinch-style!
(The Monday Box participates in affiliate marketing programs. As an Amazon Associate I earn from qualifying purchases. If you choose to purchase a product after following a link on this page, I will receive a small commission, at no cost to you, which helps make The Monday Box possible.)
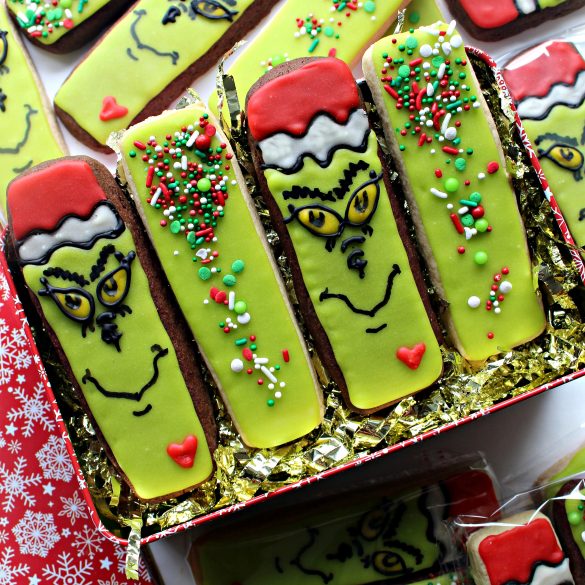
I made these Decorated Grinch Cookies for the Grinch themed military care package I sent to my adopted soldier for Christmas. I'm sharing the details and recipes in a series of three posts; today's Decorated Grinch Cookies, Grinch Brownies, and a Grinch Care Package resource guide.
I like including decorated sugar cookies in care packages. Iced cookies travel well and stay fresh for 2 weeks or longer. With simple step-by-step designs, even beginner cookie decorators can create cookies that add something special to themed care package contents.
Usually, I use a round cookie cutter for decorated sugar cookies. Circles are a good compact shape (without easily broken corners or delicate details) for packing and shipping. Plus, a circle works well for so many different designs, like snowmen, Elf on the Shelf, or spring flowers.
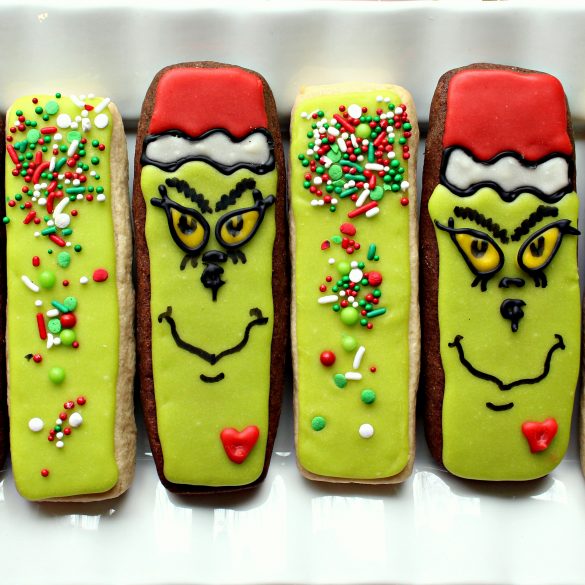
I have sent a few decorated sugar cookie rectangles. Nutcracker cookies are made with short and wide rectangles. Decorated Grinch Cookies are long, thin rectangles in a "cookie stick" shape.
If you do a search on Google or Pinterest, you'll find that "cookie sticks" are a trend with professional/expert cookie decorators. (There are even cookie cutters made especially for cookie sticks!) The artistry can be astounding, with details that make it possible to envision an entire object or character when only a portion of the object or character is visible on the narrow cookie.
I was inspired to try this method on a beginner level simple design. With Decorated Grinch Cookies, only the Grinch's face is complete, but it's easy to imagine the whole green guy in his Santa hat.
If, like me, you are a cookie decorating novice, don't be intimidated. When the design is broken down into simple steps, this really is a cookie that anyone with a bit of patience can create.
My roadblock is perfectionism. I am rarely totally happy with my decorated cookies because I focus on the tiny imperfections. I need to stop doing that! These are cookies meant to be eaten, not artwork to hang on the wall!
I want my cookie recipients to see the cookies, smile, and then (most important) enjoy eating the cookie. A perfectly piped detail would taste the same as my wobbly piped detail. Recently, I had a very short text conversation with my son that really pointed out the need to change my perfectionist outlook.

Within 15 minutes of receiving a care package from me containing various goodies and gifts, my son sent me a text to thank me for the package. When he didn't comment on the two Decorated Grinch Cookies in the box, I was surprised. Maybe he didn't like them or couldn't figure out what they were? Maybe I had sent him cookies without complete "essential" details? So, I asked.
ME: Did you get the Grinch cookies? I think I sent you one without eyebrows by mistake.
SON: I did, very Grinchy. Also tasty. Not sure if it had eyebrows.
The cookies had been received. My son had noted that they were Decorated Grinch Cookies, smiled, and proceeded to enjoy eating them, which is exactly what you are supposed to do with cookies. The moral of this story is: Dive in and decorate. Have fun. Don't sweat the imperfections. No one else is going to care and likely won't even notice.
In the interest of time and patience, I decorated half of the cookie sticks with the Grinch design. The other half of the cookies I quickly decorated in solid green icing with sprinkles. For gifting and care package shipping, I packaged one Decorated Grinch Cookie and one green sprinkled cookie in each self-sealing cellophane cookie bag.
DIRECTIONS FOR MAKING DECORATED GRINCH COOKIES
BASIC DECORATING TOOLS NEEDED
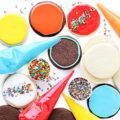
- Food coloring gel; green (I used Americolor Electric Green), red, yellow, black
- Black food coloring marker
- Disposable piping bags
- Decorating tips (# 3, #4, #5)
- Christmas sprinkles
RECIPES NEEDED FOR GRINCH COOKIES
The following recipes make 24 vanilla cookie sticks (1 ½" x 5") and 24 chocolate cookie sticks (1 ½" x 5"). Two batches of the icing are required for all 48 cookies.
- One batch Chocolate Sugar Cookies
- One batch Vanilla Sugar Cookies
- Two batches Glaze Icing Recipe
BAKING THE COOKIE STICKS
- Prepare one batch of Vanilla Sugar Cookie dough and one batch of Chocolate Sugar Cookie dough according to recipe directions.
- Roll out dough to ⅜" thick on a lightly floured surface or between two sheets of wax paper.
- Cut out rectangles (1 ½"x 5") and place onto prepared baking sheet about 2" apart. Bake for about 9 minutes.
- Cool on the baking sheet for 5-10 minutes then transfer to a wire rack to cool completely before decorating.
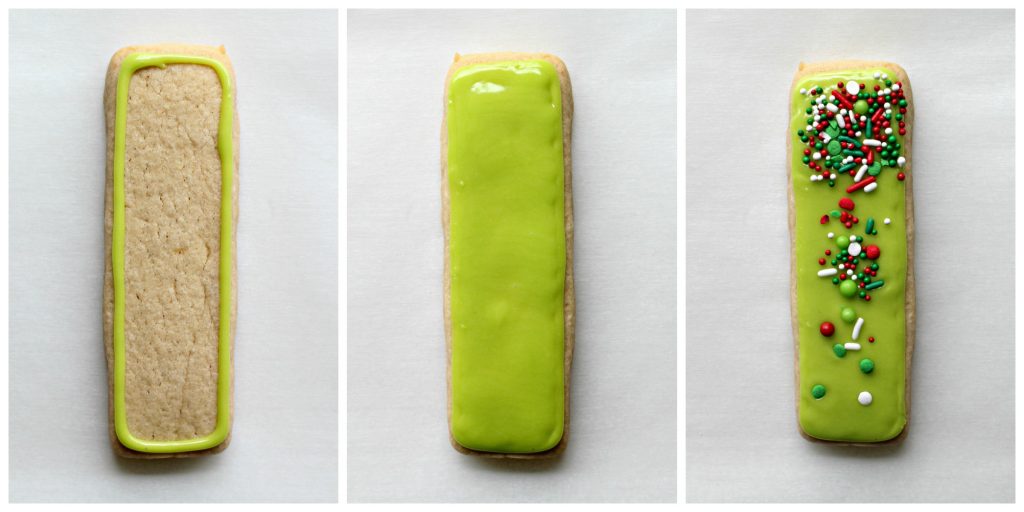
PREPARING THE ICING
- Prepare the first batch of icing according to recipe directions, until the consistency of white glue.
- Use about 5 drops of green food coloring gel (I used Americolor Electric Green) to color the entire first batch of icing.
- Place the green icing into 2 piping bags (for easier handling) with round #4 or #5 piping tips.
- Prepare the second batch of icing according to recipe directions.
- Remove ¼ cup of icing. The consistency should be slightly thicker than white glue. Mix with yellow food coloring gel to make the icing for the eyes. Place in a piping bag with a round # 3 tip.
- To the remaining icing add water in tiny amounts, until the icing is the consistency of white glue.
- Remove ½ cup of icing and mix with red food coloring gel to make the icing for the hat and heart. Place in a piping bag with a round #4 tip.
- Remove ½ cup of icing. Leave the icing white for the fur on the Santa hat, with no food coloring, and place in a piping bag with a round #4 or #5 tip.
- To the remaining icing, add 1 teaspoon of baking cocoa, and stir until thoroughly incorporated. Mix in a few drops of black gel food coloring to make the icing for the detail outlines.
Would you like to save this?
DECORATING THE GRINCH COOKIES
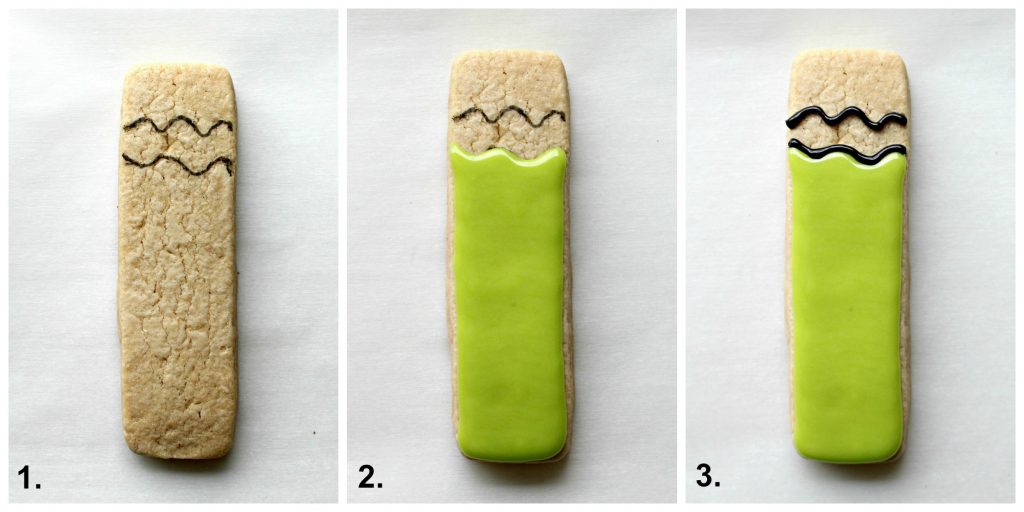
1. Use the black food marker to draw 2 wavy lines for the outline of the white fur on the hat.
2. Outline the area below the lowest black line in green icing, then fill in the area outlined.
3. Use the black icing to trace over the wavy food marker lines.
Allow the icing to dry slightly for an hour or longer.
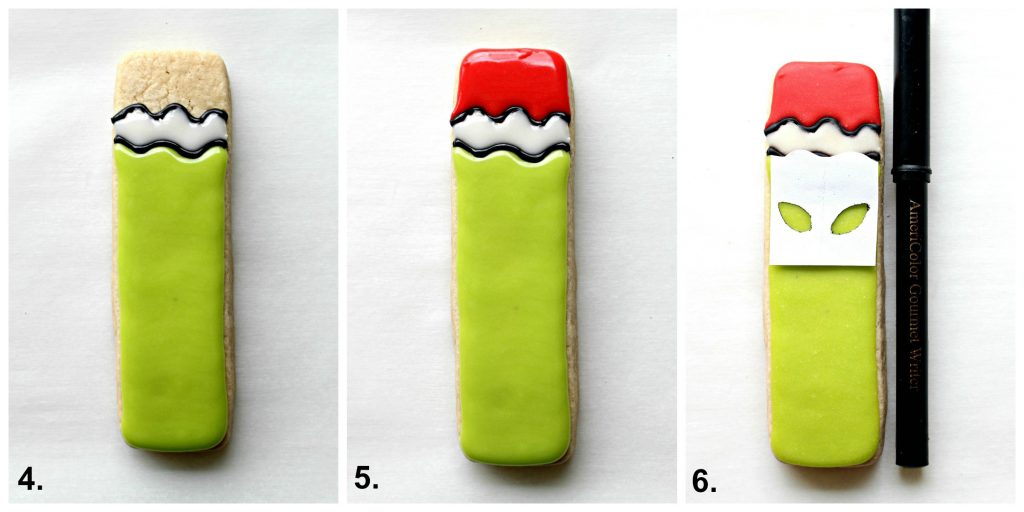
4. Fill in the outlined area with white icing.
5. Use the red icing to outline, then fill in, the cookie above the white "fur trim".
6. Create a stencil of the eyes on a small rectangle of paper. Cut the paper to the same width as the cookie and long enough to line up on the bottom edge of the hat with room to cut out almond shaped holes for the eyes.
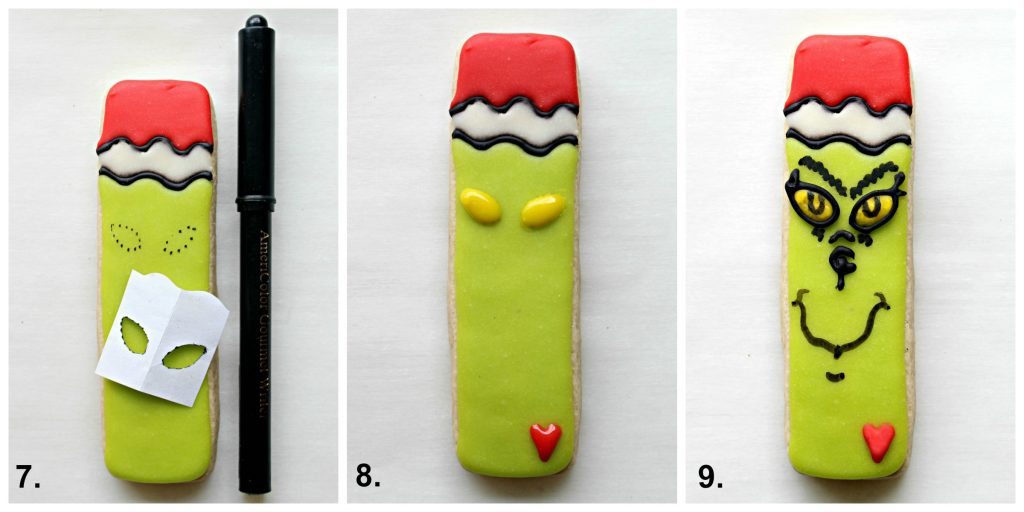
7. With the stencil lined up, use the black food marker to lightly dot an outline of the eyes.
8. Fill in the dotted outline with yellow icing. Pipe a small red heart in the bottom right corner of the cookie.
Allow the icing dry for one hour or longer.
9. Use the black icing to outline the yellow eyes and create a nose shaped like a small letter c with a vertical line from the center of the c downward to a tiny bit below the c.
The remaining black details (eyebrows, pupils, lines above nose, mouth, chin) can be added with black icing or with the black marker. If using the black marker, wait until the icing has dried overnight before drawing.
Let the iced cookies dry overnight before storing or wrapping.
Store at room temperature in an airtight container, with wax paper between layers, for up to 2 weeks. Enclosing 1 or two cookies in self-sealing cellophane cookie bags helps preserve freshness and creates gift packaging.
PACKING TIPS
Enclose each cookie in a self-sealing cellophane cookie bag or wrap individually in plastic wrap. Package wrapped cookies snugly in a storage container or freezer weight ziplock bag.
I hope you will give cookie decorating a try and enjoy the process. Have fun! Your Decorated Grinch Cookies will taste especially good because of all the love you put into creating them!
YOU MAY ALSO LIKE THESE CARE PACKAGE THEMES
For a complete listing of all of The Monday Box posts sharing themed care package ideas please read the Military Care Package Ideas page by clicking here or on the drop down menu on the navigation bar under Military Care Packages.

Phyllis
I love your Grinch cookies with the face. I see all these Grinch cookies being with only a red heart. I am a Grinch lover of all things but the ones with only a red heart to me are not real Grinch cookies. Thanks for all your great recipes.
Helen at the Lazy Gastronome
I was wondering if the icing recipe is on your site. I'm going to make these cookies but can't find the recipe for the faux royal icing. Thanks.
The Monday Box
Hi Helen. I am SO sorry! The recipes were supposed to have been linked in this post! I am going in to edit right now, but you will find the recipes I use for vanilla and chocolate sugar cookies plus the faux royal (corn syrup) icing here. The icing recipe is at the very bottom of the page : https://themondaybox.com/birthday-cake-surprise-cookies/
Helen at the Lazy Gastronome
Pinned!! Thanks for sharing at the What's for Dinner Party. Have a wonderful week!
April J Harris
I can't see any imperfections! Your Grinch Cookies look amazing, Wendy! Your tutorial is so helpful, and with step by step instructions like this I'm sure even I could do this. (I'm a great baker, but not a great decorator!) Thank you so much for sharing these fun and delicious cookies - I'm sure anyone who receives them will really enjoy both how they look and how they taste! Pinning and sharing, including on the Hearth & Soul Facebook page. Hope you are having a lovely weekend!
saltandserenity
These cookies are next level amazing. So adorable. I love your patience and the attention to detail. The step by step instructions are wonderful. So clear and complete. You need to start a youtube cookie decorating channel for cookie novices!
I love that you had to ask your son if his grinch cookies had eyebrows!! As if our sons would even notice. So funny.
Marisa Franca
Love the Grinch cookies -- they are super adorable. I'll have to remember these for the grandsons next year.